
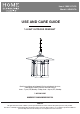
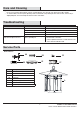
Instructions / Assembly


7
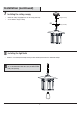
Installation (continued)
HOMEDEPOT.COM/HOMEDECORATORS
Please contact 1-800-986-3460 for further assistance.
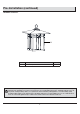
* Use wire connectors (CC) to connect the wires.
Ground wire:
Wrap the supply ground wire around the green ground screw
on the crossbar assembly (AA), no less than 2 in. from the end
of the wire. Tighten ground screw.
Connect the xture ground wire to the supply ground wire
with a wire connector (CC).
Supply wire:
Connect the house white wire to the xture supply wire
(ribbed sided) identied with the label “N. ”
Connect the house black (or red) wire to the xture supply
wire (smooth side) identied with the label “L.”
Wrap each connection with approved electrical tape and
carefully insert all of the connected wires into the outlet box.
DD
DD
EE
□
□
□
□
□
□
Trimming excess xture wire
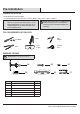
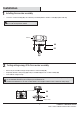
5
Unthread the canopy lock ring.
Slide the canopy lock ring and the ceiling canopy (EE) down
the quick link (DD).
Push all slack xture wire through canopy chain loop and into
the outlet box.
Trim excess xture wire leaving a minimum of 6 inches
hanging out of the outlet box.
Separate the smooth side and ribbed side of the supply wire to
about 3 inches from the end.
Using wire strippers, strip each wire ½ inch from the end.
Supply wire
and ground wire
Canopy lock ring
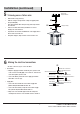
6
Making the electrical connections
□
□
□
□
□
□
□
Ground wire
from supply
Ground wire from fixture
identified with the label “G”
Green ground screw
Black (or red)
wire from supply
Ribbed side of wire from
fixture identified with the
label “N”
Smooth side of wire from
fixture identified with the label “L”
White wire from supply
CC