
Instructions / Assembly

HOMEDEPOT.COM/HOMEDECORATORS
Please contact 1-800-986-3460 for further assistance.
5
Assembly
1
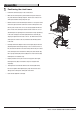
Positioning the chair frame
□
□
□
□
□
□
□
Position the swivel base (B) on a flat, solid surface.
Make sure the swivel plate is positioned all the way into the base. It
may have vibrated out during shipment. The two sets of holes in the
swivel plate should be facing away from you.
Note the arrows on both the swivel plate and the "U" bar portion of the
chair frame (A). Position the chair frame onto the swivel plate so that
the two pairs of holes in the "U" bar are exactly aligned with the two
pairs of holes in the swivel plate and the arrows on both the "U" bar
and swivel plate are pointing in the same direction. Proper positioning
of the chair frame(A) on the swivel plate/swivel base assembly (B),
and proper alignment of the holes in the "U" bar with the holes in the
swivel plate are critical to the safe, well balanced swivelling motion
of the chair.
Carefully examine the diagram. Attach a metal plate (CC) to two bolts
(AA) and guide the bolts through the top of one set of holes in the "U"
bar (located at the bottom of the chair frame) and into the pair of holes
in the swivel plate. From beneath the swivel plate, add a washer (FF),
then a spring washer (BB) and a nut (DD) to the end of each bolt (AA).
Hand tighten 3-4 revolutions only.
Repeat procedure for the pair of holes on the opposite side. Again,
hand tighten nuts (DD) 3-4 revolutions only. Do not tighten nuts
completely.
Then tighten all nuts and bolts with the hex wrenches (GG & HH).
Do not over tighten. Over tightening may strip the bolts and cause
damage to the swivel plate, making the chair unsafe.
Cover all bolts (AA) with covers (EE).
B
A
SWIVEL PLATE
FOOT CAP
EE
AA
CC
FF
BB
DD