
Installation Guide

5 HOMEDEPOT.COM
July 3, 2019 Please contact 1-866-843-8453 for further assistance.
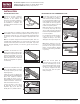
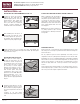
Continue to square the joints by
tapping the long edge with the
profiled tapping block and soft-
faced hammer. Then, lightly tap
down on top of the plank at the
short joint with the soft-faced
hammer. Continue installing the
remainder of the row in this fashion.
After installing the last piece of
the second row, slide the entire
assembly against the spacers on
the starting wall, maintaining the
required ¼" (6mm) expansion gap.
Install remaining rows, one row after the other, and maintain the
required 8" (20.3cm) stagger throughout the install. Tap and square
each plank as in step 7.
INSTALLING THE LAST ROW
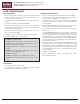
Most often the entire length of
the last row will need to be cut
so that it is narrow enough to fit
the remaining space. Cut the first
plank of the last row to length
(if necessary to follow stagger
pattern). Place directly on top of
the previously installed row. Then,
take another plank and place
it against the wall on top of the
plank to be cut for width. Mark the
plank (length-wise), cut to size.
Remember to allow for the ¼"
(6mm) expansion gap against fixed
objects.
Install the plank with the cut side
always facing the wall. Use a pull
bar to lock the long edges together.
Do not use the pull bar on the short
edges.
Continue to cut and install
remainder of the planks in the last
row.
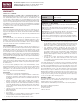
Make a template to fit around pipes
or irregular shaped objects. Place
the pattern upon the plank and trace.
Cut along the trace lines using a
utility knife or jig saw, and lay plank.
Alternatively, a hole saw can be used
when cutting planks that are to fit
around pipes.
Note: Be sure to leave a minimum of
¼" (6mm) expansion space around
all fixed objects, cabinetry, and metal
door jambs.
FINISHING THE JOB
Remove spacers. Cover expansion spaces with quarter round or other
trim, being sure not to trap or pin down the floor. Nails should go into
wall, not the floor.
Fill any expansion spaces around potentially wet areas (such as
refrigerators, tubs, etc.) with premium, waterproof 100% silicone caulk.
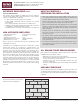
Remember, the use of coordinating T-Molds is required when installing
HDC Solid Core in a room or area that is larger than 100 lineal feet (30.5
meters) in any direction, so that the floor is separated into sections
that are no larger than 100ft. x 100ft. (30.5 meters x 30.5 meters) per
section.
Save and protect any leftover planks. Do not discard, as they are color-
matched (by dye-lot) to your floor. They can be used for replacement in
the event you need to replace a plank in the future.
7
8
9
10
11
INSTALLATION cont.
INSTALLING SECOND & REMAINING ROW cont.
FITTING AROUND IRREGULARLY SHAPED OBJECTS
Product Description: Solid Core Plank and Tile Flooring
Grade Levels: Above Grade / On Grade / Below Grade
Installation Method: Floating - Drop and Lock