
Installation Guide


HOMEDEPOT.COM/HUBSPACE
Please contact 1-877-592-5233 for further assistance.
3
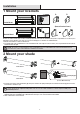
PACKAGE CONTENTS
B
C
C* E
H I
J LK
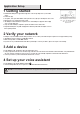
Pre-Installation
First-Time Use
PARTS: Please identify the parts above required for installation of your Home Decorators Collection smart roller shade.
NOTE: Screws are provided for installation into wooden frames only. For wallboard or plaster please use the included plastic
wall anchors. For other surfaces such as metal or concrete please purchase appropriate screws and hardware.
TOOLS REQUIRED (Not included)
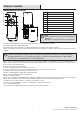
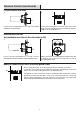
Charging your shade
Part
1
1 2 3 4 5
Description
Phillips Screwdriver
2
3
Measuring Tape
4
5
Pencil
Level
Drill with 1/16”(1.6mm) and 3/16”(4.8mm) drill
bit (optional)
Blinking indicator light signals low battery or configuration mode when
setting button is pressed.
Prior to first-time use, the Hubspace smart shade may require up to 6
hours of charging. To charge your smart shade, connect the charger to
the charger socket on the motor interface and plug it into a wall socket.
Detach the charger once the shade is fully charged. USB wall adapter
not included.
Make sure the on/off switch is in the ‘on’ position for operation.
A
stepped tip
D
F
G
Part
A
Quantity
1
Description
D
Smart Shade
1
1
B
C
1
1
1
Bracket cover with stepped tip
Bracket cover without stepped tip
Brackets B
(with rubber shock absorber)
Brackets A
(round pin hole)
C*
E
Rubber stabilizer
Part QuantityDescription
F
G
Plastic hem slat
Screws
Anchors
1
4
4
H
J
Remote
1
I
End cap
2
K
Charging cable
1
L 1
Smart Home Gateway
(gateway included models only)