
Installation Guide


4
Installation
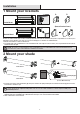
1 Mount your brackets
2 Mount your shade
Inside Mount
Outside Mount
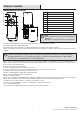
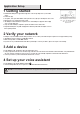
(Front of Motor Interface)
Switch
Up button
Type-C 5V / 1A charging port
Down button
1. Insert the motor end of shade into Bracket [B], then press and insert the spring-loaded pin-end of shade into Bracket [A]. The front of the
motor interface should face you.
2. The pin-end of the shade is spring loaded and allows up to 1/8” of flexibility. The shade will fit the labeled width exactly without any
additional deductions and will fit inside a window frame that is up to 1/8” narrower than the stated width.
3. Slide on the bracket covers if desired.
NOTE: If the shade is being installed on a tall window, you may rotate the shade towards you by 90 degrees before sliding motor
end into bracket B. This adjustment will provide easier access to the switch and buttons, as well as improve visibility of the
illuminating indicator.
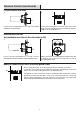
Brackets are universal and can be used for mounting both inside and outside the window frame (shade is only suitable for use indoors). It is
important to remove bracket covers [C & C*] to ease the mounting process. Brackets are labeled A and B.
1. Measure and mark the location for the brackets.
2. For default (under-roll), install Bracket A on the left and Bracket B on the right. For extra clearance (over-roll), install Bracket B on the left
and Bracket A on the right.
NOTE: The shade is set up by default for under-roll installation. For over-roll installation, the motor direction will need to be
reversed. Refer to remote control instruction manual for more details.
A
(Remove Bracket Covers)
Inside Mount
Outside Mount
B