
Network Router User Manual

Dynamix DW3512 Technical Manual V1.00
Copyright © 2007 Dynamix Pro., Ltd. All right reserved.
59
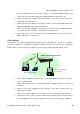
page of TCP/IPÆ LAN to set the network settings to connect with DW3512-A. Maybe you
could set the IP to 192.168.123.200 and set Default Gateway to 192.168.123.123.
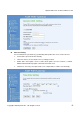
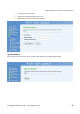
¾ Step5: Go to the page of WirelessÆ Basic Settings, set the mode to Client and set the
Network Type to Infrastructure.
¾ Step6: Go to the page of WirelessÆ Security, to set the necessary authentication method for
DW3512-A if DW3512-A has enable authentication.
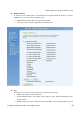
¾ Step7: Go to the page of WirelessÆ Site Survey to search and connect to DW3512
-A. When
conne
ction is OK, there should be a successful message appeared.
¾ Step8: At this time, the PC connected to the LAN of DW3512-B could be able to reach the
DW
3512-A, and access Internet via it.
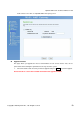
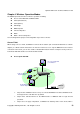
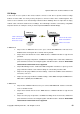
Client (Ad-hoc)
If Client (Ad-hoc) is enabled, the DW3512 can work like a wireless station when it’s connected to a computer
so that the computer can send packets from wired to wireless interface. You can share files and printers
between wireless stations. Below is an example to show you how to implement Client (Ad-hoc) mode.
DW3512 (Client mode with Ad-hoc)
LAN
WLAN
PC connected with LAN
port of DW3512
PC and Notebook with
Wireless Network Adapter
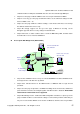
¾ Step1: Power on DW3512 and set one pc to connect with DW3512. Set PC to a Fixed IP,
such as 192.168.123.100.
¾ Step2: Enter 192.168.123.123 for the WEB interface of DW3512 with no login ID and
password.
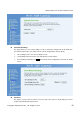
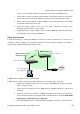
¾ Step3: Go to the page of WirelessÆ Basic Settings, set the mode to Client and set the
Network Type to Ad-hoc.
¾ Step4: Go to the page of WirelessÆ Security, to set the necessary authentication method.
¾ Step5: At this time, the PC or Notebook with wireless network adapter should be able to
search the DW3512 and use WiFi to send packets to PC connected to the LAN of DW3512.