
Installation Guide


19
Fitting Assembly
should not be supported by conductive metallic systems such as metallic appliance vents,
ducting, or piping. Electrical cables must be avoided and cannot be used as supports. Tubing
is considered supported if it passes through or over a structural component of the building.
4.2 Fitting Assembly
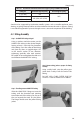
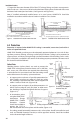
Step 1 Cut HOME-FLEX® tubing to length
Using a stainless steel tube cutter, cut the
HOME-FLEX® tubing to the desired length,
leaving at least 1 extra inch for placement
of the tting. Cut in the valley of the tubing
and clean any burrs or jagged edges. Cut
in full circular strokes in one direction,
tightening gradually after each rotation.
Be careful to not overtighten the roller as it
could atten the HOME-FLEX® tubing.
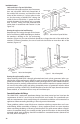
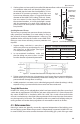
Step 2 Remove tubing jacket to prepare for tting
assembly
Using a utility knife, strip the yellow pipe
jacket back 2 valleys from the end of the
tubing.
DO NOT USE A TUBE CUTTER FOR THIS
TASK AS IT COULD DAMAGE THE TUBING.
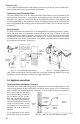
Step 3 Place ange nut over HOME-FLEX® tubing
Slide the HOME-FLEX® ange nut over the
tubing with the threaded end pointing
toward the end of the tubing. Do not push
the nut beyond the catch on the jacket.
The ange should cover the yellow tubing
jacket.
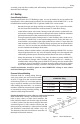
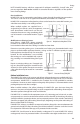
Table 4.2 Recommended Horizontal and Vertical Support Spacing for HOME-FLEX® Tubing
Tubing Size Horizontal Support Spacing Vertical Support Spacing
½" (13 mm) 6 ft.
10 ft.¾" (19 mm)
8 ft. (USA) 6 ft. (CAN)
1" (25 mm)