
Installation Guide


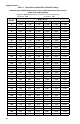

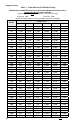
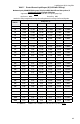
Table Of Contents
- Chapter 1: Introduction
- Chapter 2: Description of System Components
- Chapter 3: System Configuration and Sizing
- Chapter 4: Installation Practices
- Chapter 5: Sizing/Capacity Tables

18
Installation Practices
Step 8 Fitting is installed
The tting is now fully installed and
ready for use. Note nut position relative
to the ange on the central body.
Check for system leaks prior to backlling.
WARNING! Improper installation or operation of the system may result in
fire, explosion, or asphyxiation. Only the components provided or specified
by Valencia Pipe Company for use with HOME-FLEX Underground® or as
part of the fuel gas system are to be used in the installation.
4.4 Pressure and Leak Testing
The HOME-FLEX Underground® gas piping system must be pressure tested for leaks in
accordance with all local codes. The system must pass the pressure / leak test and have
passed inspection by the authority having jurisdiction (AHJ) before backlling the trench. In
the absence of a specic local code that species the pressure test, refer to the latest edition
of the National Fuel Gas Code NFPA 54. A copy of this code can be purchased and down-
loaded from: catalog.nfpa.org/NFPA-54-C3324.aspx.
Be sure that the new installation is isolated from any existing piping and the meter or
regulator supply prior to conducting a pressure / leak test. A typical pressure / leak test for
a single family residence might consist of pressurizing the newly installed pipe and tting
system with air to 15 PSI:
• Watch the needle on the pressure gauge for 15 - 30 minutes.
• If there is no detectable loss of pressure, this indicates that the system holds pres-
sure.
NFPA 54 species that the system should be tested at 1.5 times the intended system oper-
ating pressure, but never less than 3 PSI. Long duration pressure / leak tests are not ideal,
because the change of air temperature in the piping system will aect the reading on the
pressure gauge. For each 10°F reduction in air temp, anticipate a 1.9% reduction in air pres-
sure due to the cooling and contraction of the air in the pipe.
Troubleshooting Fitting Assembly and Correcting Leaks
If a leak is detected, check the following:
Step 1 Ensure that all yellow nuts on the tting are tight up against the black body of the
tting. If they are and leak persists, go to step 2.
Step 2 Loosen the yellow nut and remove the pipe from the tting.
a) Examine the inside of the ttings to make sure it is free of dirt or any debris that
will interfere with the outside of the pipe making a seal against the inside of the
tting.
b) Make sure that the outside of the pipe is clean and smooth.
c) Reassemble the pipe into the tting follow the assembly instructions and check
for leaks.