
Installation Guide


Doc. ID: 131 Rev: 3 Effective: 1/25/2014 Page | 6
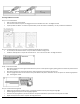
Step 5 – Tight Spaces
• In tight spaces use the pull bar and a hammer. See diagrams below.
Step 6 – Pipes
• Expansion gaps around vertical pipes is created by drilling a hole through a locked ends joint.
• Drill a hole the size of the diameter plus ¾ inch for expansion.
• Separate the panels and rejoin them around the pipe. See diagrams.
Step 7 - Under Door Frames
• Ensure a 3/8 inch expansion gap between floor and door jamb.
• Use a tapping block and a hammer, or a pull bar and a hammer. See diagrams.
Step 8 – Finishing Touches
• Clean the floor.
• Remove all spacers.
• Install the molding on the plastic membrane that runs up the wall from under the floor. Never fasten the molding to the floor.
• Caulk around pipes and in places where molding cannot be installed.
• Use matching putty where necessary
• Install or reinstall all wall trim pieces. Nail them through the wall, but not to the subfloor to avoid restricting the expansion gap.
• Install transition trim pieces. Nail them to the subfloor, not the flooring.
• At doorways, transitions should be used to protect the edges of the floor and to provide a decorative transition from one floor type
to another.
• If the floor is to be covered, use a breathable material such as cardboard. Do not cover with plastic