Perfect Water Technologies Home Master® Reverse Osmosis System Installation & Service Manual Home Master® Standard RO Home Master® Artesian Full Contact Home Master® IRON Home Master® UV Home Master® ULTRA Home Master® HydroPerfection Customer Service Hotline 1-877-693-PURE
Home Master® Reverse Osmosis System—Owners Manual Home Master® RO Contents: 1 1 1 1 1 1 1 1 Assembled RO filter cluster Storage tank Tank valve Drain saddle & gasket Roll Teflon tape Mounting clips & screws Chrome long reach RO faucet (or custom faucet); faucet adapter fitting and hardware. EZ adapter—feed water adapter 3/8” mc x 3/8” fc x 1/4” tube General System Specifications Feed water: PSI 40 - 100 PSI Feed water Temperature: 40˚ - 100˚(F) Max. Total Dissolved Solids (TDS): 2000 ppm Max.
Home Master® Reverse Osmosis System—Owners Manual Drilling hole for RO faucet – porcelain sinks steps 1-5; stainless sinks steps 3-5 WARNING: Serious cracking and damage may occur to your sink even if instructions are followed exactly due to age and the imperfections inherent in natural materials. Instructions may not apply exactly to your sink. Use caution – sink may be slippery. 1. Remove base cover plate from RO faucet packaging. Line-up base cover plate with other sink faucets.
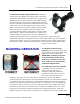
Home Master® Reverse Osmosis System—Owners Manual Installing The Home Master® Reverse Osmosis System 1. Mount RO Faucet* 1. Use existing spray hose hole, or Drill 1/2” hole in sink top. See page 3. 2. Slide escutcheon plate onto faucet shank. 3. Slide rubber washer onto faucet shank. 4. Insert shank through hole in sink. 5. Slide locating washer, followed by locking washer onto shank under sink. 6. Thread brass nut onto shank, position faucet and tighten nut. 7.
Home Master® Reverse Osmosis System—Owners Manual 3. Install drain saddle clamp and drain line – Identify a vertical section of drainpipe with enough space to mount the drain saddle clamp. NOTE: A horizontal section of pipe is less desirable but can be used provided the drain saddle opening flows downward into the pipe, like a manhole drops down into the sewer. DO NOT mount the drain saddle between the P-trap and the wall. The drain pipe material can be either metal or plastic.
Home Master® Reverse Osmosis System—Owners Manual drawers, doors, or sharp objects. Smooth the holes free from splinters and sharp edges. [Alternate route for refrigerator line -- run ¼” refrigerator tubing along the baseboard, and enter the kitchen sink cabinet by drilling a ¼” opening in the bottom board of your kitchen sink cabinet, towards the front baseboard.] Push tubing through the cabinetry holes from the Home Master® RO to refrigerator.
Home Master® Reverse Osmosis System—Owners Manual 7. Connect drain line tubing — Locate the black plastic nut found in drain saddle parts bag. Press it onto the RED 1/4” tubing attached to the filter cluster. The red tubing should protrude from the black plastic nut slightly. Wrap excess tubing around the drainpipe so that some loops are above the drain saddle. Hand tighten black plastic nut onto the drain saddle male fitting until it is snug. Do not over tighten and DO NOT add a tubing insert. 8.
Home Master® Reverse Osmosis System—Owners Manual Troubleshooting IMPORTANT NOTE: Before performing service on the Home Master® RO at any time, and for any reason: first close all under-sink water valves, except for the RO faucet, which you should open to relieve system pressure and drain away excess water from the lines. Pushpull and quick connect fittings are nearly impossible to remove when under pressure. Leaks from metal fittings Unscrew fittings and re-tape male fitting.
Home Master® Reverse Osmosis System—Owners Manual few things you can do. A) Disconnect the red drain line from the drain saddle, adjust the red tube protruding from the nut (add a little more or reduce it), while ensuring there is at least some visible red tube protruding, and reconnect. B) Empty your P trap to ensure the system waste water isn't dropping into standing water. C) Use a common rubber stopper to cover your sink’s drain opening to muffle the sound.
Home Master® Reverse Osmosis System—Owners Manual check each connection point until you find the blockage point. At each point - turn off the water at the EZ adapter and tank, and briefly turn on the RO faucet at the sink to relieve any system pressure. Disconnect the tube from the fitting. Point the tube you have just disconnected into a pitcher and turn on the EZ adapter valve. Poor Taste The first step is to purge the system.
Home Master® Reverse Osmosis System—Owners Manual Page 11 Customer Service Hotline 1-877-693-PURE
Home Master® Reverse Osmosis System—Owners Manual USING QUICK CONNECT FITTINGS Page 12 Customer Service Hotline 1-877-693-PURE
Home Master® Reverse Osmosis System—Owners Manual Page 13 Customer Service Hotline 1-877-693-PURE
Home Master® Reverse Osmosis System—Owners Manual Page 14 Customer Service Hotline 1-877-693-PURE
Home Master® Reverse Osmosis System—Owners Manual Page 15 Customer Service Hotline 1-877-693-PURE
Home Master® Reverse Osmosis System—Owners Manual 10 Tips for an Easy and Successful Installation 1. Keep it simple - there are 4 connections to make, and the tubing is color coded. VIDEO INSTRUCTIONS ARE AVAILABLE ONLINE (6 PARTS) 2. Have plenty of time, light, space, and towels before getting started. If everything goes well, you should be done in 45 minutes. However, if your feed water line is a different size, or if you don’t have an extra hole for the faucet, it can take somewhat longer. 3.