
Instructions / Assembly
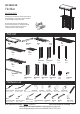

Assembly Instructions
2
IMPORTANT
* Please keep Hex Wrench in a safe place as you may need to tighten up the Head Cap Bolts in the future.
* Do not tighten up all the Screws until each part is properly assembled.
* Use a soft cloth between these parts and the floor.
* After assembly item must be level to work properly. Use the included adjustable levelers to level.
/5
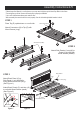
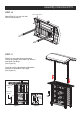
STEP 1
Place Top (E) upside down on a soft cloth.
Attach Connectors (S) to Top (E) with
Wood Screws (long).
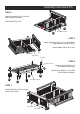
STEP 3
Attach Back Panel (O) to
Side Panel (J) unit with Bolts,
Wing Washers and Nuts (long).
(See Figure 1)
Attach Back Panels (P) and then (Q)
Figure 1
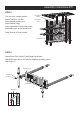
STEP 2
Attach Side Panels (J) and (K) to
Posts (L) and (M) with
Wood Screws (middle).
to unit with Wood Screws (small).
(See Figure 2)
E
S
S
S
S
J
O
P
Q
Bolt
Wing Washer
Nut (long)
J
K
L
M
L
M
Wood Screw (long)
Wood Screw (middle)
Figure 2
Wood Screw (small)
M6 Wrench