TABLE OF CONTENTS Notice 4 License Notice 5 Safety Information 6 1. Before You Begin 8 1.1 Features 8 1.2 Accessories 9 2. Controls and Functions 2.1 Front Panel 10 2.2 Rear Panel 11 2.3 Remote Control Unit 12 3. Connections 14 3.1 Connecting to TV 14 3.2 Connecting to Dish 17 4. Menu Overview 2 10 19 4.1 Menu Instruction 19 4.2 Menu Help 19 4.3 Menu Structure 20 5. Menu Operation 22 5.1 First Installation 22 5.2 Installation 23 5.3 Option 28 5.4 Channel 31 5.
5.7 PVR 6. Viewing General Information 35 36 6.1 Banner Information 36 6.2 TV & Radio changing 37 6.3 TV or Radio Channel Lists 37 6.4 Option 41 6.5 A/V+ 42 6.6 Fav 43 6.7 A-Z 43 6.8 EPG 44 7. PVR 45 7.1 File List 45 7.2 PVR Banner 47 Additional Information 51 A.1 Troubleshooting 51 A.2 Technical Specifications 52 A.
Notice Read this manual carefully and make sure you understand the provided instructions. For your safety, check what the result each action will be. Warnings, Cautions and Notes Throughout he whole manual, pay special attention to the following marks that indicate hazardous situations. Caution Indicates a situation which, if not avoided, could damage the equipment or apparatus. Warnings Indicates a hazardous situation which, if not avoided, could result in serious injury.
License Notice Manufactured under license from Dolby Laboratories. Dolby, and the double-D symbol are trademarks of Dolby Laboratories. HDMI, the HDMI logo and High-Definition Multimedia Interface are trademarks or registered trademarks of HDMI licensing LLC. ABOUT DIVX VIDEO: DivX® is a digital video format created by DivX,Inc. This is an official DivX Certified device that plays DivX video. Visit www.divx.com for more information and software tools to convert your files into DivX video.
Safety Information This digital satellite receiver has been manufactured to comply with international safety standards. Please read the following safety precautions carefully. Safety Instructions and Precautions Avoid placing heavy things and blocking ventilation passage. (Passage blocking can cause fire) Avoid scrubbing the surface with Benzene or Volatile gasoline. Color can be damaged. Leave the power and the antenna off for the ling absence or during thunder storm.
Keep away from the water. Clear off the dust. Dust or Metallic particles inside the set can cause fire and electric shock. Avoid dissembling and assembling. Do not open the set. Do not snatch the cable to plug out. Do not move the set while power cord is plugged in. Keep the distance from Magnetic items and Audio Speaker. Place the set with the good ventilation and away from the direct sunlight and humidity. Avoid the temperature of over 30C and below 5C.
1. Before You Begin 1.1 Features Brilliant On Screen Graphic MPEG-2 Video(MP@ML), MPEG-1 Audio Layer1, Layer2, H.264/AVC, Dolby Digital LNB Controlling Logic SCPC/MCPC Receiver from C/Ku-Band Satellites Digital Tuner with Loop-through Wide Symbol Rate 1~45Mbps & Frequency Input 950~2150MHz DiSEqC 1.
1.
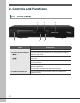
2. Controls and Functions 2.1 Front Panel 2 1 4 3 Item 6 5 Description 1. Power Button Turn the receiver On/Off. 2. Volume Up/Down Buttons (◀/▶) Increase & decrease the volume levels in viewing mode and changes settings in menu mode. 3. CH Up/Down Buttons (▲/▼) Change channels in viewing mode and moves the cursor up/down in menu mode. 4. MENU/OK Button Show the Main menu in viewing mode. Activates the highlighted menu item in menu mode. 5.
2.2 Rear Panel Item 1. DISH IN Description Connect the satellite dish. 13/18V 500mA Max 2. LOOP OUT Loop Out is an output port of the DISH IN signal. 3. YPbPr OUT Using standard A/V cables, these jacks connect Y/Pb/Pr(Green, Blue, Red) to a TV or VCR that accepts HD component video input. 4 CVBS OUT Using standard video cables, these jacks connect CVBS(Yellow) to Video of TV or VCR. 5. Stereo Audio OUT Using standard stereo audio cables, these jacks connect L/R(White, Red) to Audio of TV or VCR.
2.3 Remote Control Unit All receiver features can be controlled with the remote controller. Button 1. POWER Description Turn the receiver On/Off. TV/Rad Switch between TV and Radio. TV/STB Switch between TV and STB mode. 2. NUMERIC Buttons Select channels or can use as an ( ~ ) alphabetic search key in the sorted channel lists. BACK Move to the previous channel. MUTE Turn the sound on/off. 3. OPT( ) 12 Select the option such as Audio Language, Teletext Language and Subtitle Language.
Button Description Move left/right or change settings in menu mode. 4. ◀/▶ ( / ) ▲/▼ ( OK( ) / ) Move up/down in menu mode. Confirm the choices and/or selections the highlighted menu item. While watching TV or listening to Radio, press the will appear. button and the channel list 5. V+/- Change the volume level in viewing mode. P+/- Change channels in viewing mode. Selects other menu pages with sub-pages. EXIT Go back step or exit from the menu of the receiver. 6. PAUSE PLAY 7.
3. Connections 3.1 Connecting to TV 1. 2. resolution Connect STB’s YPbPr out and audio L/R out to YPbPr in and audio L/R in of TV. Set STB’s video output mode among 1080p, 1080i, 720p, 576p and 576i using ‘A/V+( )’ key of remote controller. Please check TV’s user manual for detail connecting method of the YPbPr input port.
1. 2. Connect STB’s HDMI out and to HDMI in of monitor or TV. Set STB’s video output mode among 1080p, 1080i, 720p, 576p and 576i using ‘A/V+( )’ key of remote controller. For the best access to HD programming at the highest available resolution, use this connection method.
16 1. Connect STB’s optical digital audio out to A/V receiver. 2. Set STB’s audio out mode to ‘Digital Audio’.
3.2 Connecting to Dish Connect the Satellite antenna cable to DISH IN. Connect the output of DiSEqC 1.0 to DISH IN of the receiver.
Connect the output of DiSEqC 1.2 to DISH IN of the receiver.
4. Menu Overview 4.1 Menu Instruction Press the MENU button to display the menu. You can select the sub menu using ▲/▼/◀/▶ button. The selected sub menu becomes highlighted. When you have selected the sub menu you want, press the button. When you want to return to the previous menu, press the button. When you want to return to the live screen, press the Menu button. 4.2 Menu Help In the menu, short information is displayed at the bottom of the screen. : Using ▲/▼ button. : Using P+/P- button.
4.3 Menu Structure In the menu, short information is displayed at the bottom of the screen. Installation Dish : Select the dish and LNB Settings for channel search. Auto Scan : Search the channel of the selected satellite automatically without inputting the special parameters. Manual Scan : Search the channel manually with user's inputting parameters. Transponder Edit : Delete, edit, and add satellite or transponder parameters. Option TV Output : Select the video or audio output.
PVR HDD Information : Check the capacity of HDD Format HDD : Format HDD permanently Demount HDD : Use this function when you safely remove the external HDD from the STB.
5. Menu Operation 5.1 First Installation You can install the receiver using First Installation for your convenience. ‘First Installation' allow you to set your receiver using simple procedure. 1. Select the desired language using the ▲/▼ button. 2. Press the button to confirm and go to the next step. 1. Select the desired antenna power using the ▲/▼ button. 2. Press the 22 button to confirm. In step2 if you select Load Astra1 or Load Hotbird, you can make Default channels.
5.2 Installation 5.2.1 Dish 1. Press the Menu button to display the main menu. 2. Press the button on the sub menu. The password pop-up window appears. All sub menus such as Dish, Auto Scan, Manual Scan, and Transponder Edit on the Installation are locked by password. The default password is “ 0000” . 1. Use the ▲/▼ button, you can move upwards and downwards in this mode. In any item, such as Dish, Satellite, Transponder, etc. if you want to check the detail view, use the ◀/▶ button. 1.
1. Press the ◀/▶ button, the right screen shows the transponder lists. 2. Press the button to select other transponder. If you select one of the alternative satellite names, the transponder list is changed automatically according to the selected satellite name. 1. Select one of the LNB Power types using the ◀/ ▶ button. You can select LNB Power value as 13/18V normally or if the distance between antenna and receiver is further than 60m, you can select LNB Power value as 14/19V. 1.
1. Select Switch Type. 2. If you use a DiSEqC 1.1 switch, select SMATV on the Switch Type. 3. Enter a value with the numeric key. (950~2150). 1. Select Switch Type. 2. If you use a DiSEqC 1.2 motor, select the Motor on the Switch Type. 3. Change position of your Motor through the Option. DiSEqC 1.2 Options : Move West-East : Press the ◀/▶ button to move the motor. Store Position : Press the button to save the current position.
1. “ Jump To” allows you to go to the Auto Scan or Manual Scan mode directly. 2. Select “ Auto Scan” press the or “ Manual Scan” and button. 5.2.2 Auto Scan You can search the channels offered by the satellite for which your antenna has been configured. 1. Select the satellite for scanning using ▲/▼ button and press the button. 2. The check mark indicates which satellite has been marked for scanning. 3. Press the ◀/▶ button, select scan option using ▲/▼ button, and press the button. 4.
1. If you press the button when scanning for channels, pop-up window appears. 2. When you complete scanning for channels, a similar pop-up menu appears. 3. If you want to save the updated channels, select ‘ Yes’ . 5.2.3 Manual Scan 1. Change to the specific values you want to scan. 2. Press the button to start the manual scan. Dish : The target satellite for the manual scan. Frequency : The frequency of the transponder you want to find manually.
1. When you select DVB-S2 Modulation (DVB-S2 QPSK & DVB-S28PSK), you can see “ Roll off” menu at the below. 2. “ Roll Off” is the value of the transponder you want to find, enter the value of “ Roll Off” with the red Opt button. 3. Press the button to make the pop-up window disappeared. 5.2.4 Transponder Edit 1. Press the Opt button to select the satellite in the left screen or the transponder in the right screen. 2. Select one of Delete, Edit or Add from the pop-up window.
TV Screen : Select the screen format of your TV (4:3, 16:9). TV Screen Format : Select the screen format through your STB (Auto, Pillar box, Pan & Scan). Dolby Digital : If you set it to the enable mode, you can listen Dolby Digital audio in preference to other audio formats when the broadcasting contents are encrypted with Dolby Digital audio format. Digital Audio : If you set it to the enable mode, you can listen Dolby Digital audio through Dolby Digital decoder connecting with RCA output. 5.3.
5.3.4 Parental Control 1. If you want to change the password, press the ◀/▶ button, following message requiring new password will be displayed. 2. Change the password into new one by numeric button. 3. To ensure your change, you are supposed to input a password once more. 1. Select your desired rating level using the ◀/▶ button. 2. Press the button to save and exit. Rating mode allows you to block channel according to the age level you have set. View All : All channels can be watched.
5.4 Channel 5.4.1 Sorting 1. Select Sort Type using the ◀/▶ button. 2. If you press the button, current changing state will be saved and exit. Transponder : Channels are sorted into transponder order. Network : Channels are sorted into service provider order. CAS : Channels are sorted into Scramble channels and Free channels order. 5.4.2 Reservation You can reserve a Channel at your desired time. In this mode, you can reserve channels up to 8. 1.
5.5 Advanced 5.5.1 Reset Factory Default 1. If you want to change the set into the default values, press the button. The following confirmation window will appear. 2. If you select 'Yes', the system will be reset to the primitive state like new receiver. 5.5.2 OTA 1. You can upgrade the latest software. The receiver checks whether the new S/W is released when you view channels or select this OTA menu. 2.
1. If the data exits in the target, the data will be removed and the new data will be replaced. 1. The window will appear on the TV screen if the data exists in the target. 1. If you select “Yes”, the data will transfer. The window will appear while the data being transferred. You should keep USB connection until transferring is done. 1. The window will appear on the TV screen after data transferring is done.
5.5.4 DivX key Registration 1. To watch your purchased DivX contents, you must get the DivX key of the STB. With the displayed DivX key on the screen, you can watch them. For more information, please visit the below website. http://www.divx.com/vod 5.5.5 DivX key Deactivation 1. To transfer your purchased DivX contents to another person, you must deactivate your initially registered DivX key. Otherwise, he can not watch the contents on his DivX certified device. 5.6 Status 5.6.1 Information 1.
5.6.3 CI slot 1 1. You can see not only Free To-Air services, but also scrambled services, using the Conditional Access Modules (CAM). If you want to see scrambled services, contact your service provider or distributor. Common Interface module and smart card depend on the service provider. 5.7 PVR 5.7.1 HDD Information 1. You can see the capacity of HDD such as Total size, Free size, Used size and the model name of HDD. 5.7.2 Format HDD 1.
6. Viewing General Information 6.1 Banner Information 1. Whenever you press the INFO button, the banner information window appears for a few seconds. * You can also find the output resolution at the righ top side 1. If you press the INFO button again on the banner, the detail EPG window appears. 2. If you press the button, information and EPG window will disappear. 3. Press the P+- button and then you can change the channel. 4.
6.2 TV & Radio changing While watching TV or listening to Radio, you can select TV or Radio using the TV/Rad button. 6.
6.3.1 Watching Mode While watching TV or listening to Radio, you can watch the channel list. Press the button to display the channel list. You can watch several icons at the bottom of the channel list. Each icon has a special and convenient function for user. If you want to change the mode, press the Opt button to go to the desired icon. 1. Press the button or A-Z button. If you want to view the sorted channel list, press the A-Z button. 2. Press the ▲/▼ button to move the cursor. 3.
6.3.2 Delete Mode 1. Select the Delete Icon using the Opt button. 2. Select channel you want to delete using the ▲/ ▼ button. Press the button. Checked sign will be marked on the right side of the channel name. 3. Press the EXIT button to save and exit. 6.3.3 Move Mode 1. Select the Move Icon using the Opt button. 2. Select the channel which will be located in other position. 3. Press the button, and then a sign which indicates "move" will be marked on the right side of the channel name. 4.
It is impossible that Delete & Group function can be changed in grouping mode. Space ( Back ( ) : Write between two characters. ) : Delete characters. Caps ( Done ( ) : Change between caps and lower case letter. ) : To save the change. Cancel ( ) : Exit rename mode. 6.3.5 Lock Mode 1. Select Lock Icon using the Opt button. 2. Select the channel to be locked and press the button. 3. Set the password. Locking mark will appear on the left side of the Channel name.
6.4 Option While watching TV or listening to Radio, press the Opt button. You can watch small pop-up window. You can select a option.(Audio Language, Teletext Language, Subtitle Language) If you want to change the option mode, press the ◀/▶ button. 6.4.1 Audio Language 1. Select the 'Audio' using the ◀/▶ button. 2. Press the ▲/▼ button to select a desired audio language. 3. Press the button to change the audio language. 6.4.2 Teletext Language 1. Select the 'Teletext' using the ◀/▶ button. 2.
6.5 A/V+ While watching TV or listening to Radio, press the A/V+ button. You can watch small pop-up window. You can select an option.(Audio Mode, Video Mode) If you want to change the option mode, press the ◀/▶ button. 6.5.1 Audio Mode 1. Select the 'Audio Mode' using the ◀/▶ button. 2. Press the ▲/▼ button to set the output direction for speakers. (STEREO, LEFT, RIGHT, JOINT) 3. Press the button to save and exit. 6.5.2 Video Mode 1. Select the 'Video Mode' using the ◀/▶ button. 2.
6.6 Fav While watching TV or listening to Radio, press the Fav button. You can watch small pop-up window. You can select a Favorite group. 6.6.1 Satellite 1. Select the 'Satellite' using the ◀/▶ button. 2. Press the ▲/▼ button to select a satellite. 3. Press the button, then you can watch the channel list of selected satellite. 6.6.2 Favorite 1. Select the 'Favorite' using the ◀/▶ button. 2. Press the ▲/▼ button to select a group. 3.
6.8 EPG Press the EPG button and the electronic channel guide appears if applicable. Time intervals are arranged in a row and Channel lists are shown in a column. 6.8.1 EPG Information 1. Press the ◀/▶ button to change time interval. 2. Press the ▲/▼ button to watch the guide about the channel, and then press the INFO button, the detail EPG window will appear. 3. Press the button to exit. Press the Opt button to reserve channels with event.
7. PVR 7.1 File List 7.1.1 Playback mode 1. Select the 'Playback mode' using the Opt button. 2. Select the recorded file using the ▲/▼ button. 3. Press the button and then the file will be played. 4. Press the EXIT button to close the file list.
1. You can watch the detail file information. 2. Press the “INFO” button to watch the information for the selected file. 3. Press the EXIT button to hide the information. 7.1.2 Delete mode 1. Select the 'Delete mode' using the Opt button. 2. Select the file you want to delete using the ▲/▼ button. 3. If you decide to delete the file, press 'Yes' on the pop-up window. 4. Press the EXIT button to exit. 7.1.3 Rename Mode 1. Select 'Rename mode' using the Opt button. 2.
7.2 PVR Banner To access the PVR Banner, press the ◀/▶ button or the trick button such as PLAY( ▶ ), FF( ▶▶), REW(◀◀ ), SLOW( ▶). The description of icons : Time Shift status : Recording status : Playback and trick status (색깔 변경 – 녹색) : Time Shift playback 7.2.1 Time Shift Time Shift function automatically records the current playing program temporarily. 1. If Time Shift function is set to enable in the PVR menu. Time Shift is always working on air and changing the channel.
7.2.2 Record 1. Press the Record( ● ) button to record the channel you're watching. 2. Record mode can't be canceled by any control such as changing channel, etc. except pressing the STOP( ■ ) button. Max duration time for recording is set to the default record time which set in Menu. If you want to change the duration, press the ◀/▶ button. (Minimum: 5Minutes, Maximum: 10Hours) 7.2.3 Playback 1. Press the LIST button to open the file list. 2.
Jump in playback mode 1. You can locate the control position to the desired position using the ◀/▶ button. 2. By releasing the ◀/▶ button, playback continues from this position. Bookmark For your convenience, the bookmark function enables you to set bookmarks within the media file to continue or target a special position in media file. 1. Play the file you want to watch. 2. Move the control position to the favored position using the ◀/▶ button.
7.2.4 FF/REW/SLOW mode These functions are available in Playback mode and Time Shift mode. 1. Press the FF( ►►) button. 2. If you press the FF( ►►) button continuously, speed will be increased up to 4 times. : Fast forward icon on Playback mode. : Fast forward icon on Time Shift mode. 1. Press the REW(◄◄ ) button. 2. If you press the REW(◄◄ ) button continuously, speed will be increased up to 4 times. 1.
Additional Information A.1 Troubleshooting There may be various reasons behind receiver problems. Check the receiver according to the procedures described below. If you can’t solve your problem even after following the troubleshooting procedures, please contact the dealer. Do not open the receiver cover. It may cause a dangerous situation. Symptom Cause Remedy The front panel doesn’t display any message. The power cord is not plugged in. Check that the power cable is plugged in to the wall outlet.
A.2 Technical Specifications 1. Tuner & Demodulator Parameter Specifications Input Frequency Range 950MHz to 2150 MHz RF Input Signal Level -25 ~ -65dBm RF Impedance 75 Ω IF Bandwidth 55 Mhz/8MHz(Under 5Msps) LNB Power 13/18DC, 14/19V +/-5%, 0.5Amax LNB Tone Switch 22kHz +/-2kHz, 0.6Vpp +/-0.2V DiSEqC Control Version 1.2, Tone burst A/B Demodulation QPSK, NBC-QPSK, NBC-8PSK Symbol Rate 1~45Msps/SCPC, MCPC 2.
3. Connector Port Specifications LNB IF input Ftype, IEC 169-24 Female LNB IF Loop-through Output Ftype, IEC 169-24 Female Video RCA (CVBS) Component (YPbPr) HDMI Audio RCA (Audio L,R) HDMI SPDIF USB2.0 Host 1ea 4. Conditional Access Interface Parameter PCMCIA Specifications 1 Slot Common Interface 5.
A.3 Glossary of Terms DiSEqC Digital Satellite Equipment Control. EPG Electronic Program Guide. Software that enables viewers to navigate easily among the large selection of channels provided by the digital technology and choose the service they desire. FEC Forward Error Correction. Correction of faulty bits in the received signal. LNB(Low-Noise Block converter) The LNB is an electronic unit mounted on the satellite dish.