
Instructions / Assembly

HomeGuard Installation
Products
HomeGuard Weather Barrier System includes:
HomeGuard Housewrap
HomeGuard TITAN Drainage Wrap
HomeGuard Synthetic Flashing - "Arctic Flash"
HomeGuard Flexible Butyl Flashing
HomeGaurd RA-Plus Flashing
HomeGuard Seam Tape
HomeGuard MS Polymer Sealant
Installation Instructions
Install housewrap over an approved exterior sheathing in "shingle-lap" fashion, with higher courses lapped over lower
courses by at least two inches. Vertical seams should have an overlap of at least six inches.
Attach the housewrap so that it is flat and tight. Start with lower course, two to three feet from the corner and continue
nailing or stapling as you move around the house. Fasteners must penetrate the stud or nail base material.
Secure the housewrap firmly in place by fastening it every 12" to 18" along the vertical studs using large-headed or
plastic cap nails, or 1" crown staples. Use HomeGuard Seam Tape to seal all the seams.
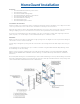
Windows
Make an inverted Y cut in the housewrap at the rough opening. Then cut straight across the top and make 45 degree
cuts from the corners to create header flap.
Fold the flaps in through the opening at the two sides and the sill, fastening them inside with staples about every six
inches.
Temporarily tape the header flap up to expose nail base material. Using HomeGuard Flexible Butyl flashing, install
the sill flashing over the housewrap.
Apply a coninuous bead of caulk behind the top and both side window flanges only and install window. DO NOT
APPLY CAULK ACROSS SILL FLANGE to allow for drainage. Install the window per manufacturers' installation
instructions.
Next, install jamb flashing over side window flanges. Next install head flashing over the top window flange and extend
beyond the jamb flashing. Remove the temporary tape from the header flap and fold back down over top flange. Next
seal header flap with HomeGuard Seam Tape or flashing tape.