Chain Saw / Scie De Chaine / Motosierra UT10946 - 45cc Chain Saw - 18" OPERATOR'S MANUAL MANUEL DU PROPRIÉTAIRE MANUAL PARA EL OPERADOR PS06206 9-02
CONTENTS TABLE DES MATIÈRES ÍNDICE Product Identification ............................ 3 Safety ................................................ 4-13 Operation ........................................ 14-35 Maintenance .................................. 36-57 Bar & Chain Combinations ................. 58 Troubleshooting ............................. 59-61 Storage ................................................ 62 Technical Data .................................... 63 Warranty ...........................
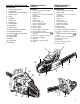
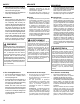
PRODUCT IDENTIFICATION Components 1. 2. 3. 4. 5. 6. 7. 8. 9. 10. 11. 12. 13. Throttle Trigger Lockout Front Handle Chain Brake Lever / Hand Guard SAFE-T-TIP® Chain Guide Bar Clutch Cover Choke Lever Throttle Trigger Rear Handle Cylinder Cover Carburetor Adjustment Screws Idle Adjustment Screw 14. 15. 16. 17. 18. 19. On/Off ( I / ) or (I / O) Switch Fuel Tank Cap Starter Handle Muffler Oil Tank Cap Spike Bar IDENTIFICATION DU PRODUIT IDENTIFICACIÓN DE COMPONENTES Éléments Componentes 1. 2. 3. 1. 2.
SAFETY SÉCURITÉ SEGURIDAD State and Local Requirements Réglementation régionale et locale Requisitos estatales y locales Your saw is equipped with a temperature limiting muffler and spark arresting screen which meets the requirements of SAE Recommended Practice J335 and California Codes 4442 and 4443. All national forest land and land managed by the states of California, Maine, Washington, and Oregon require internal combustion engines to be equipped with a spark arrester screen by law.
SAFETY SÉCURITÉ SEGURIDAD Precautions Against Kickback Précautions pour éviter le rebond du guide-chaîne Precauciones frente a la tensión de retroceso Le phénomène de rebond du guide-chaîne est une réaction dangereuse pouvant provoquer des blessures graves. Il ne suffit pas de se fier aux dispositifs de sécurité fournis avec l’appareil. Il incombe à l’utilisateur de la tronçonneuse de prendre les mesures de sécurité particulières permettant d’éviter les accidents et les blessures.
SAFETY SÉCURITÉ SEGURIDAD • • • With a basic understanding of kickback, you can reduce or eliminate the element of surprise. Sudden surprise contributes to accidents. Keep a good firm grip on the saw with both hands when the engine is running. Place your right hand on the rear handle and the left hand on the front handle with your thumbs and fingers encircling the chain saw handles. A firm grip together with a stiff left arm will help you maintain control of the saw if kickback occurs.
SAFETY SÉCURITÉ SEGURIDAD Basic Safety Precautions Mesures de sécurité élémentaires Precauciones básicas de seguridad Poussée et traction Empuje y tirón La force de réaction s’exerce toujours dans la direction opposée à celle du mouvement de la chaîne lorsque celle-ci entre en contact avec le bois.
SAFETY SÉCURITÉ SEGURIDAD • • • • • • • Never let anyone use your chain saw who has not received adequate instructions in its proper use. This applies to rentals as well as privately owned saws. Keep the handles dry, clean, and free of oil or fuel mixture. Before you start the engine, make sure the saw chain is not contacting any object. Shut off the engine before setting down the saw. Do not leave the engine running unattended.
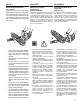
SAFETY SÉCURITÉ SEGURIDAD Kickback Rebond du guide-chaîne Tensión de retroceso ROTATIONAL KICKBACK (A) occurs when the moving chain contacts an object at the Kickback Danger Zone (B) of the guide bar zone. The result is a lightning fast, reverse reaction which kicks the guide bar up and back towards the operator. This reaction can cause loss of control which can result in serious injury.
SAFETY SÉCURITÉ SEGURIDAD • • • Wipe spilled fuel from the unit. Move 30 feet (10m) away from refueling site before starting engine. Never attempt to burn off spilled fuel under any circumstances. • • Essuyer toute trace d’essence sur l’appareil. S’éloigner du lieu de remplissage de 10 m (30 pi) avant de faire démarrer l’appareil. Ne jamais faire brûler l’essence qui aurait été renversée lors du remplissage. • Limpie el combustible derramado existente en la unidad.
SAFETY SÉCURITÉ SEGURIDAD • • • • • Never start cutting until you have a clear work area, secure footing, and a planned retreat path from the falling tree. Use extreme caution when cutting small size brush and saplings, because slender material may catch the saw chain and be whipped toward you or pull you off balance. When cutting a limb that is under tension, be alert for springback so that you will not be struck when the tension in the wood fibers is released.
SAFETY SÉCURITÉ SEGURIDAD Low Kickback Saw Chain The rakers (depth gauges) ahead of each cutter can minimize the force of a kickback reaction by preventing the cutters from digging in too deeply at the kickback zone. Only use replacement chain that is equivalent to original chain or has been certified as low kickback chain per ANSI B175.1. Low kickback saw chain is chain that has met the kickback performance requirements of ANSI B175.
SAFETY SÉCURITÉ SEGURIDAD Chain Brake Frein de chaîne Freno de la cadena Chain brakes are designed to rapidly stop the chain from rotating. When the chain brake lever / hand guard is pushed toward the bar, the chain should stop immediately. A chain brake does not prevent kickback. Les freins de chaîne sont conçus pour arrêter rapidement la rotation de la chaîne. Lorsque le levier du frein de chaîne / protège-main est poussé vers l’avant, la chaîne devrait s’arrêter de tourner immédiatement.
OPERATION UTILISATION WARNING The warnings and instructions in this section of the operator's manual are for your safety and to prevent serious personal injury. OPERACIÓN AVERTISSEMENT Les avertissements et les instructions fournis dans cette section du manuel de l’utilisateur sont prévus pour la sécurité de l’utilisateur et pour éviter des blessures graves.
OPERATION UTILISATION OPERACIÓN Filling the Tank Remplissage du réservoir de carburant Llenado del depósito de combustible WARNING Always shut off engine before fueling. Never add fuel to a machine with a running or hot engine. Move at least 30 feet (10m) from refueling site before starting engine. DO NOT SMOKE! Refer to the Safety-Refueling Section for additional Safety Precautions. 1. Clean surface around fuel cap to prevent contamination. 2. Loosen fuel cap slowly. 3.
OPERATION UTILISATION Chain Oil System OPERACIÓN Dispositif de lubrification de la 1. Use HOMELITE Bar and Chain Oil. chaîne Sistema de lubricación de la cadena It is designed for chains and chain oilers and is formulated to perform over a wide temperature range with no dilution required. NOTE: Do not use dirty, used or otherwise contaminated oils. Damage may occur to the oil pump, bar, or chain. 2. Carefully pour the bar and chain oil into the tank as shown in illustration (B). 3.
OPERATION UTILISATION OPERACIÓN Starting the Engine Démarrage du moteur Arranque del motor WARNING A AVERTISSEMENT ADVERTENCIA Keep body to the left of the chain line. Never straddle the saw or chain, or lean over past the chain line. Il faut maintenir le corps à l’écart de la ligne de la chaîne. Il ne faut jamais chevaucher la tronçonneuse, ni se pencher audelà de la ligne de la chaîne. Mantener el cuerpo a la izquierda de la línea de la cadena.
OPERATION UTILISATION OPERACIÓN 2. Set ignition switch to RUN (I) position. Set the ignition switch (D) to the run “ I ” position. 2. Mettre l’interrupteur à la position de MARCHE (I). Mettre l’interrupteur (D) à la position de marche «I». 2. Coloque el interruptor de encendido en la posición EN MARCHA (I). Coloque el interruptor de encendido (D) en la posición en marcha (I). 3. Fully press and release PRIMER BULB 7 times. Fully press and release primer bulb (C) 7 times. 3.
OPERATION UTILISATION OPERACIÓN 6. Push CHOKE lever all the way IN. Push the choke lever (E) completely in to the engine run position, as shown in Illustration (F). 7. Pull STARTER until engine runs. Pull the starter until the engine runs, as shown in Illustration (G). 8. Immediately SQUEEZE and release throttle trigger. Immediately depress the throttle trigger lockout (H), squeeze and release the throttle trigger (J).
OPERATION UTILISATION OPERACIÓN Now you are ready to pick up the saw. Use the proper grip for both handles as illustrated in Operation-Preparation for Cutting Section. Maintenant, tout est prêt pour lever la tronçonneuse. Il faut prendre la tronçonneuse bien en main, comme illustré dans section Préparation pour la coupe, Utilisation. Ahora se puede levantar la sierra. Tomar los mangos en la posición correcta, tal como se indica en la sección de Preparación para cortar (Utilización).
OPERATION UTILISATION OPERACIÓN Preparation for Cutting Préparatifs pour la coupe Preparación para el corte Proper Grip on Handles Refer to Safety Section for appropriate Safety Equipment. 1. Wear non-slip gloves for maximum grip and protection. 2. Hold the saw firmly with both hands. Always keep your LEFT HAND on the front handle and your RIGHT HAND on the rear handle as shown in Illustration (A), so that your body is to the left of the chain line.
OPERATION UTILISATION OPERACIÓN Proper Cutting Stance Position correcte du corps pour la coupe Postura de corte adecuada • • • • Weight should be balanced with both feet on solid ground. Keep left arm with elbow locked in a "straight arm" position (D) to withstand any kickback force. See Illustration (E). Your body should always be to the left of the chain line (F). Thumb on underside of handlebar (G).
OPERATION UTILISATION OPERACIÓN Work Area Precautions Précautions sur l’aire de travail • Cut only wood or materials made from wood; no sheet metal, no plastics, no masonry, no non-wood building materials. Never allow children to operate your saw. Allow no person to use this chain saw who has not read this Operator's Manual or received adequate instructions for the safe and proper use of this chain saw. Keep everyone - helpers, bystanders, children, and animals a SAFE DISTANCE from the cutting area.
OPERATION UTILISATION OPERACIÓN Carburetor Adjustment Réglage du carburateur Ajuste del carburador Before adjusting the carburetor, clean the air filter (A), see Maintenance-Air Filter Section. Also clean the starter cover vents as shown in Illustration (B). Allow the engine to warm up prior to carburetor adjustment. Avant de régler le carburateur, nettoyer le filtre à air (A), voir la section Entretien, Filtre à air.
OPERATION UTILISATION OPERACIÓN Idle Speed Adjustment Réglage du ralenti • • Ajuste de la velocidad de marcha lenta • If the engine starts, runs, and accelerates but will not idle; turn the idle speed screw “ T ” clockwise to increase idle speed. If the chain turns at idle, turn the idle speed screw “ T ” counterclockwise to reduce the idle RPM and stop the chain movement.
OPERATION UTILISATION OPERACIÓN Chain Brake Operation Utilisation du frein de chaîne Refer to Safety-Chain Brake Section before use. The chain brake Run Position (A) and Brake Position (B) are illustrated below. The chain brake operating condition should be checked prior to each use as follows: 1. Start the engine and grasp front and rear handles securely with both hands. 2. Pull the throttle trigger to bring the chain saw up to full speed.
OPERATION UTILISATION OPERACIÓN AVERTISSEMENT WARNING ADVERTENCIA Si le frein de chaîne n’arrête pas la chaîne instantanément, ne plus utiliser la tronçonneuse et la faire réparer par un centre de service Homelite agréé. If chain brake does not stop the chain immediately, take the saw to a Homelite Servicing Dealer for repair prior to use.
OPERATION OPERACIÓN UTILISATION WARNING ADVERTENCIA AVERTISSEMENT If the tree starts to fall in the wrong direction, or if the saw gets caught or hung up during the fall, leave the saw and save yourself! 1. Pick your escape route (or routes in case the intended route is blocked). Clear the immediate area around the tree, and make sure there are no obstructions in your planned path of retreat. Clear path of safe retreat (A) approximately 135° from planned line of fall (B). 2.
OPERATION UTILISATION OPERACIÓN 5. Never cut through to the notch. Always leave a band of wood between the notch and back cut (approximately 2 inches (5 cm) or 1/10 the diameter of the tree). This is called "hinge" (E) or “hingewood.” It controls the fall of the tree and prevents slipping or twisting or shoot-back of the tree off the stump. 6. On large diameter trees, stop the back cut (F) before it is deep enough for the tree to either fall or settle back on the stump.
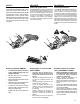
OPERATION UTILISATION OPERACIÓN Buttress Roots Racines échasses Raíces zanco A buttress root is a large root extending from the trunk of the tree above ground. Large buttress roots should be removed prior to felling. Make the horizontal cut (A) into the buttress first, followed by the vertical cut (B). Remove the resulting loose section (C) from the work area. Utilize the proper instructions from the Operation-Tree Felling section of the manual after the large buttress roots have been removed.
OPERATION UTILISATION OPERACIÓN • • • • During bucking operations always stand on the uphill side so that the cut-off section of the log can not roll over you. Sometimes it is impossible to avoid pinching (with just standard cutting techniques) or difficult to predict which way a log will settle when cut. To avoid pinching while cutting, review the following sections, Bucking with a Wedge and Logs Under Stress.
OPERATION UTILISATION OPERACIÓN Logs Under Stress Billes sous tension Leños sometidos a tensión • • • Make the first bucking cut (F) 1/3 of the way through the log and finish with a 2/3 cut (G) on the opposite side. As the log is being cut, it will tend to bend. The saw can become pinched or hung in the log if you make the first cut deeper than 1/3 of the diameter of the log.
OPERATION UTILISATION OPERACIÓN Limbing and Pruning Ébranchage et élagage Eliminación de ramas y poda • • • • • • Work slowly, keeping both hands on the saw with a firm grip. Maintain secure footing and balance. Keep the tree between you and the chain while limbing (A). Cut from the side of the tree opposite the branch you are cutting. Do not cut from a ladder, this is extremely dangerous. Leave this operation for professionals.
OPERATION UTILISATION OPERACIÓN • • • When pruning trees it is important not to make the flush cut next to the main limb or trunk until you have cut off the limb further out to reduce the weight. This prevents stripping the bark from the main member. Underbuck the branch 1/3 through for your first cut (A), your second cut (B) should overbuck to drop the branch off. Now make your finishing cut (C) smoothly and neatly against the main member so the bark will grow back to seal the wound.
OPERATION UTILISATION OPERACIÓN Springpoles Effet de ressort A springpole (D) is any log, branch, rooted stump, or sapling which is bent under tension by other wood so that it springs back if the wood holding it is cut or removed. On a fallen tree, a rooted stump has a high potential of springing back to the upright position during the bucking cut to separate the log from the stump. Watch out for springpoles, they are dangerous.
MAINTENANCE Maintenance Chart To prevent possible serious personal injury, always follow the safety warnings and instructions in this section of your operator's manual.
ENTRETIEN Calendrier d’entretien Pour éviter la possibilité de blessures graves, suivre toujours les instructions et les avertissements de sécurité fournis dans cette section du manuel de l’utilisateur.
MANTENIMIENTO Table de mantenimiento A fin de evitar una posible lesión personal grave, siempre siga las advertencias e instrucciones de seguridad indicadas en esta sección de su manual del usuario.
MAINTENANCE ENTRETIEN MANTENIMIENTO Assembling Bar and Chain Assemblage du guide et de la chaîne Armado con barra y cadena DANGER DANGER Never start your engine unless guide bar, chain, drivecase cover and clutch drum are installed. Without all these parts in place, the clutch can fly off or explode exposing the user to possible serious injury. Ne démarrer jamais le moteur tant que le guide-chaîne, la chaîne, le carter d’embrayage et le carter de la boîte d’engrenages ne sont pas installés.
MAINTENANCE ENTRETIEN Then remove the clutch cover (D), and outer guide bar plate (E). MANTENIMIENTO Déposer ensuite le carter d’embrayage (D) et la plaque extérieure du guidechaîne (E). Déposer ensite le carter d’ambrayage (D) et la plaque extérieure du guidechaine (E). E 5. Lay out the saw chain in a loop and straighten any kinks [see illustration (F)]. The cutters (G) should face in the direction of chain rotation (H- see Illustration). If they face backwards, turn the loop over. 5.
MAINTENANCE ENTRETIEN MANTENIMIENTO 6. Place the chain drive links (I) into the bar groove (J) as shown in illustration (K). Position the chain so there is a loop at the back of the bar as shown in illustration (K). Hold chain in position on the bar and place the loop around the sprocket (L) as shown in illustration (M). Fit the bar flush against the mounting surface so that the bar studs (N) are in the long slot of the bar.
MAINTENANCE ENTRETIEN MANTENIMIENTO 7. Replace the outer guide bar plate (E) assuring that the bar pin groove is at the bottom, with the upper and lower edges angled away from the guide bar as shown in illustration. 8. Replace the clutch cover (D) and bar mounting nuts. Tighten the bar mounting nuts finger tight only. The bar must be free to move for tension adjustment. 9.
MAINTENANCE ENTRETIEN MANTENIMIENTO 11. Hold the tip of the guide bar up and tighten the bar mounting nuts securely as shown in illustration (S). 12. Chain is correctly tensioned when there is no sag on the underside of the guide bar, the chain is snug, but it can be turned by hand without binding, see illustration (T). Ensure that the chain brake is not set. NOTE: If chain is too tight, it will not rotate. Loosen bar nuts slightly and turn tension adjuster 1/4 turn counterclockwise.
MAINTENANCE ENTRETIEN MANTENIMIENTO 1. Stop the engine before setting the chain tension. Make sure the guide bar nuts are loosened to finger tight, turn the chain tensioner clockwise to tension the chain. Refer to Assembly-Assembling the Bar and Chain Section. A cold chain is correctly tensioned when there is no slack on the underside of the guide bar, the chain is snug, but it can be turned by hand without binding. 2.
MAINTENANCE ENTRETIEN MANTENIMIENTO Chain Maintenance Entretien de la chaîne Mantenimiento de la cadena CAUTION: Check that the switch is in the / O ” position before you do any stop “ work on the saw. Use only low-kickback chain on this saw. This fast-cutting chain will provide kickback reduction when properly maintained. For smooth and fast cutting, chain needs to be maintained properly.
MAINTENANCE ENTRETIEN MANTENIMIENTO How to Sharpen the Cutters Affûtage des gouges Cómo afilar los cortadores Be careful to file all cutters to the specified angles and to the same length, as fast cutting can be obtained only when all cutters are uniform. Faire bien attention à affûter toutes les gouges selon l’angle spécifié et à la même longueur, car une coupe rapide n’est possible que lorsque toutes les gouges sont uniformes.
MAINTENANCE ENTRETIEN MANTENIMIENTO 5. 5. 5. Put a few firm strokes on every tooth. File all left hand cutters (E) in one direction. Then move to the other side and file the right hand cutters (F) in the opposite direction. Occasionally remove filings from the file with a wire brush. Appliquer quelques coups de lime énergiques sur chaque dent. Limer toutes les gouges gauches (E) en se plaçant d’un côté, puis se placer de l’autre côté pour limer les gouges droites (F).
MAINTENANCE ENTRETIEN MANTENIMIENTO Side Plate Angle J) CORRECT- 80o Produced automatically if correct diameter file is used in file holder. K) “HOOK”- “Grabs” and dulls quickly. Increases potential of KICKBACK. Results from using a file with diameter too small, or file held too low. L) BACKWARD SLOPE- Needs too much feed pressure, causes excessive wear to bar and chain. Results from using a file with diameter too large, or file held too high.
MAINTENANCE ENTRETIEN MANTENIMIENTO Use a Flat File and a Depth Gauge Jointer to lower all gauges uniformly. P) FLAT FILE Q) DEPTH GAUGE JOINTER Depth gauge jointers available in .020" to .035" (0.5mm to 0.9mm). Use a .025" (0.6mm) depth gauge jointer. After lowering each depth gauge, restore original shape by rounding the front (R). Be careful not to damage adjoining drive links with the edge of the file.
MAINTENANCE ENTRETIEN MANTENIMIENTO A bar with any of the following faults should be replaced. • Wear inside the bar rails which permits the chain to lay over sideways. • Bent guide bar. • Cracked or broken rails. • Spread rails. In addition, guide bars with a sprocket at their tip must be lubricated weekly with a grease syringe to extend the guide bar life. Using a grease syringe, lubricate weekly in the lubricating hole (T). See Illustration (S).
MAINTENANCE ENTRETIEN MANTENIMIENTO 1. In addition to preventing chain contact with solid objects at the nose of the bar, the SAFE-T-TIP® also helps keep the chain away from abrasive surfaces such as the ground. Keep it on the right hand side of the bar, where it will be between the chain and the ground during flush with ground cutting. 2. The mounting screw requires a 5/16" wrench (or adjustable wrench) to achieve the recommended tightness of 35 to 45 inch-pounds (4-5 Nm).
MAINTENANCE ENTRETIEN MANTENIMIENTO Air Filter Filtre à air Filtro de aire NOTE Always clean the air filter before making any mixture adjustments of the carburetor. 1. For access to the air filter and carburetor area, loosen the three screws (A) holding the cylinder cover. Activate chain brake. Lift front of cylinder cover past chain brake lever, then lift back of cylinder cover past the handle. 2.
MAINTENANCE ENTRETIEN MANTENIMIENTO 6. The pre-filter (D) should be cleaned every 25 tanks of fuel or sooner if required. Remove the cylinder cover, starter assembly and the fan housing baffle for access to the pre-filter in the engine housing. NOTE If an air hose is used for drying, blow through both sides of filter. 6. 6. CAUTION Never run the engine without the air filter, serious damage could result. Make sure the air filter is correctly placed in the air filter cover before reassembly.
MAINTENANCE ENTRETIEN MANTENIMIENTO Engine Moteur Motor Clean the cylinder fins [See illustration (A)] & flywheel fins [See illustration (B)] with compressed air or a brush periodically. Dangerous overheating of engine may occur due to impurities on the cylinder. Nettoyer régulièrement le cylindre [Voir l’illustration (A)] et les ailerons du volant d’inertie [Voir l’illustration (B)] avec une brosse ou de l’air comprimé. Si le moteur est encrassé, il peut en résulter une surchauffe dangereuse.
MAINTENANCE WARNING Never run the saw without all the parts, including the drivecase cover and starting housing, securely in place. Because parts can fracture and pose a danger of thrown objects, leave repairs to the flywheel and clutch to trained Homelite Servicing Dealers. MANTENIMIENTO ENTRETIEN ADVERTENCIA AVERTISSEMENT Ne jamais faire fonctionner la tronçonneuse si certaines parties, y compris le carter d’engrenages et le boîtier du dispositif de démarrage, ne sont pas bien fixés en place.
MAINTENANCE ENTRETIEN MANTENIMIENTO Spark Arresting Muffler Silencieux pare-étincelles Silenciador con apagachispas The muffler (A) is equipped with a spark arrester screen (B). A faulty spark arrester screen can create a fire hazard. Through normal use the screen can become dirty and should be inspected weekly and cleaned as required. To clean: • Allow the muffler to cool. • Remove two nuts (C) and screen retainer (D) to access the spark arrestor screen.
MAINTENANCE ENTRETIEN MANTENIMIENTO Chain Brake Frein de chaîne Freno de la cadena Remove the clutch cover and clean the chain brake components. Check wear on the brake band (H) and replace if worn or deformed. The band thickness should not be less than 0.024" (.60mm), or worn halfway through. Always keep the chain brake mechanism clean and lightly lubricate the linkage (I). Always test the chain brake performance after servicing or cleaning per the Operation - Chain Brake Section.
BAR AND CHAIN COMBINATIONS Recommended Bar and Chain Combinations For .325 Low Profile .050 Gauge Length of Bar Guide Bar Part Number Chain Part Number Chain Description 16" Power Tip ........................... UP08676 .................................. UP08677 ................................... 32-MD50-66 18" Power Tip ........................... UP08679 .................................. UP08680 ...................................
TROUBLESHOOTING Using Troubleshooting Chart If you are experiencing a problem that is not listed in this chart, see your Homelite Servicing Dealer for service. When you have checked all the possible causes listed and you are still experiencing the problem, see your Homelite Servicing Dealer. PROBLEM POSSIBLE CAUSE Engine will not start: (Make sure Ignition switch is in start position “I”.) 1. No spark 2. Flooded engine. SOLUTION 1. Check Spark. Remove air filter cover. Remove spark plug from cylinder.
LOCALISATION DES PANNES Utilisation du tableau de localisation des pannes Si les solutions suivantes ne permettent pas de résoudre le problème, ou si vous avez vérifié toutes les causes possibles d’une panne et que le problème demeure, adressez-vous à un dépositaire Homelite agréé pour les réparations. PROBLÈME CAUSE POSSIBLE Le moteur ne démarre pas : Vérifier que l’interrupteur d’allumage est dans la position « I » (Marche) : SOLUTION 1. Pas d’étincelle. 1. 2. Le moteur est noyé. 2.
RESOLUCIÓN DE PROBLEMAS Utilización de la tabla de resolución de problemas Si experimenta un problema que no se encuentra indicado en la tabla, acuda a su Agente de Servicio de Homelite para que se lleven a cabo las tareas de servicio necesarias. En los casos en que haya comprobado todas las causas posibles indicadas y siga experimentando problemas, acuda a su Agente de Servicio de Homelite. PROBLEMA POSIBLE CAUSA El motor no se pone en 1. No hay chispa.
STORAGE (1 month or longer) ENTREPOSAGE (un mois ou plus) ALMACENAMIENTO (1 mes o más) Storing Chain Saw (1 month or longer) Entreposage de la tronçonneuse (un mois ou plus) Almacenamiento de la motosierra (1 mes o más) 1. Drain all fuel from tank into a container approved for gasoline. Run engine until it stops. This will remove all fuel-oil mix which could become stale and leave varnish and gum in the fuel system. 2. Drain all bar and chain oil from tank into a container approved for oil. 3.
TECHNICAL DATA ENGINE: Displacement ........................................................................................................................................................... 2.75 cu. in (45 cc) Bore ............................................................................................................................................................................ 1.69 in (43 mm) Stroke ...................................................................................................
WARRANTY Homelite Consumer Products, Inc. warrants to the original retail purchaser that this Homelite® Product is free from defects in material and workmanship and agrees to repair or replace, at Homelite Consumer Products, Inc.'s discretion, any defective Product free of charge within these time periods from the date of purchase: • Two years, if the Product is used for personal, family, or household use; • 90 days, if the Product is used for any other purpose, such as commercial or rental use.
MANUFACTURER'S WARRANTY COVERAGE: 1997 and later model year nonroad engines are warranted for two years. If any emission-related part on your engine is defective, the part will be repaired or replaced by Homelite Consumer Products, Inc. free of charge. OWNER'S WARRANTY RESPONSIBILITIES (a)As the nonroad or small off-road engine owner, you are responsible for the performance of required maintenance listed in your owner's manual. Homelite Consumer Products, Inc.
GARANTIE Homelite Consumer Products, Inc. garantit à l’acquéreur original (vente au détail) que ce produit Homelite® ne présente pas de défauts de matière ou de main d’oeuvre, et s’engage à réparer ou à remplacer (à la discrétion de Homelite Consumer Products, Inc.) gratuitement tout produit défectueux pendant la durée ci-dessous à compter de la date de l’achat : • Deux ans si le Produit est utilisé dans le cadre personnel, familial ou domestique.
GARANTIE DU FABRICANT : Les moteurs d'équipement hors route datant de 1997 et ultérieurs bénéficient d’une garantie de deux ans. En cas de défaillance d’une pièce faisant partie du dispositif anti-pollution, la pièce sera gratuitement réparée ou remplacée par Homelite Consumer Products, Inc.
GARANTIA La Homelite Consumer Products, Inc. le garantiza al comprador original al por menor que este Producto Homelite® se encuentra libre de defectos de material y mano de obra, y acepta reparar o reemplazar, a discreción de Homelite Consumer Products, Inc.
COBERTURA DE GARANTIA DEL FABRICANTE: Los motores de equipos para uso fuera de la carretera y todo terreno fabricados en 1997 y los modelos de años posteriores se encuentran asimismo garantizados durante un período de dos años. Si cualquier pieza relacionada con el sistema de emisiones de su motor es defectuosa, la pieza en cuestión será reparada o reemplazada por Homelite Consumer Products, Inc. sin que se derive ningún cargo.
NOTES 70
NOTES 71
WARNING The engine exhaust from this product contains chemicals known to the State of California to cause cancer, birth defects or other reproductive harm. CALIFORNIA PROPOSITION 65 AVERTISSEMENT Les gaz d’échappement de ce produit contiennent des produits chimiques qui sont reconnus par l’État de Californie comme étant cancérigènes, responsables de malformations congénitales et comme présentant d’autres risques pour la reproduction.