UNL 18.0 v OPERATOR'S MANUAL 18V CORDLESS STRING TRIMMER MODEL NO. UT31810 CO L K THANK YOU FOR BUYING A HOMELITE CORDLESS STRING TRIMMER Your new cordless string trimmer has been engineered and manufactured to Homelite's high standard for dependability, ease of operation, and operator safety. Properly cared for, it will give you years of rugged, trouble-free performance. CAUTION: Carefully read through this entire operator's manual before using your new cordless string trimmer.
TABLE OF CONTENTS Rules for Safe Operation ................................................................................................................................ 2 - 5 Safety Symbols .................................................................................................................................................... 6 Features ...............................................................................................................................................................
RULES FOR SAFE OPERATION READ ALL INSTRUCTIONS • • BEFORE OPERATING • • • • • • • • • • • • Read the instructions carefully. Be familiar with the controls and proper use of the unit. Do not operate this unit when tired, ill, or under the influence of alcohol, drugs, or medication. Inspect the unit before use. Replace damaged parts. Check for battery pack leaks. Make sure all fasteners are in place and secure. Replace string head or any other parts that are cracked, chipped, or damaged.
RULES FOR SAFE OPERATION • • • • • • • • • • • Before starting the unit, make sure the string head will not come in contact with anything. If you strike or become entangled with foreign objects, stop the unit immediately, remove the battery pack and check for damage. Do not operate before repairing damage. Do not operate the unit with loose or damaged parts. Keep all body parts away from string head and other moving parts. Do not touch or try to stop the string head when it is rotating.
RULES FOR SAFE OPERATION • • Do not dispose of batteries in a fire. The cell may explode. Batteries should be recycled, consult your local waste authority for information regarding available recycling and/or disposal options. When battery pack is not in use, keep it away from other metal objects like: paper clips, coins, keys, nails, screws, or other small metal objects that can make a connection from one terminal to another. Shorting the battery pack terminals together may cause sparks, burns, or a fire.
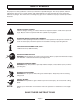
SAFETY SYMBOLS The purpose of safety symbols is to attract your attention to possible dangers. The safety symbols, and their explanations, deserve your careful attention and understanding. The safety warnings do not by themselves eliminate any danger. The instructions or warnings they give are not substitutes for proper accident prevention measures. SYMBOL MEANING SAFETY ALERT SYMBOL Indicates danger, warning, or caution. Attention is required in order to avoid serious personal injury.
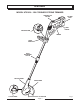
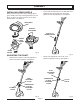
FEATURES MODEL UT31810 - 18V CORDLESS STRING TRIMMER TRIGGER LOCK BUTTON 18.0v BATTERY PACK REAR HANDLE ANCHOR SCREW TRIGGER FRONT HANDLE SHAFT ADJUSTIMENT COLLAR U O N L L K C MOTOR HOUSING GRASS SHIELD CUT OFF BLADE CUTTING LINE Page 7 Fig.
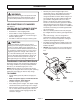
ASSEMBLY INSTALLING GRASS SHIELD • Remove both screws on the motor housing. Orient grass shield on the motor housing and twist to lock in place as shown. Re-install screws to secure grass shield in place. See Figure 2. Lower shaft should now be free to slide down from inside the upper shaft. Make sure the shaft is pulled out to the desired position. See Figure 4. GRASS SHIELD RE-INSTALL BOTH SCREWS N SLIDE OUT TO DESIRED POSITION U O L L K C REMOVE BOTH SCREWS MOTOR HOUSING Fig. 2 Fig.
OPERATION • WARNING: If any parts are missing, do not operate unit until the missing parts are replaced. Failure to do so could result in possible serious personal injury. LED FUNCTIONS OF CHARGER See Figure 6. LED WILL BE ON TO INDICATE STATUS OF CHARGER AND BATTERY PACK: • • • • • Red LED on = Fast charging mode. Green LED on = Fully charged battery pack. Yellow and Green LEDs on = Control charge or defective battery pack. No LED on = Defective charger or battery pack.
OPERATION IMPORTANT INFORMATION FOR RECHARGING HOT BATTERY PACK TO REMOVE BATTERY PACK • When using your string trimmer continuously, the batteries in your battery pack will become hot. You should let a hot battery pack cool down for approximately 30 minutes before attempting to recharge. NOTE: This situation only occurs when continuous use of your string trimmer causes the batteries to become hot. It does not occur under normal circumstances.
OPERATION HOLDING THE STRING TRIMMER USING THE STRING TRIMMER ADVANCING LINE WARNING: Dress properly to reduce the risk of injury when operating this unit. Do not wear loose clothing or jewelry. Wear eye protection. Wear heavy, long pants, boots and well fitting gloves. Do not wear short pants, sandals or go barefoot. • Hold the string trimmer as shown. See Figure 9. Right arm is slightly bent, the right hand holding the rear handle. Left arm is straight, the left hand holding the front handle.
OPERATION CUTTING LINE This string trimmer is equipped with a string cut off blade on the grass shield. See Figure 11. For best cutting, advance line until it is trimmed to length by the string cut-off blade. Advance line whenever you hear the motor running faster than normal. This will maintain best performance and keep the cutting line long enough to advance properly. • Wire and picket fences cause extra line wear, even breakage. Stone and brick walls, curbs, and wood may wear line rapidly.
MAINTENANCE AND REPAIR • While pressing in the tabs, push down the spool cap and spool to lock in place. Completely assembled string head should appear as shown. See Figure 14. CAUTION: Do not at any time let brake fluids, gasoline, petroleum based products, penetrating oils, etc., come in contact with plastic parts. They contain chemicals that may damage, weaken, or destroy plastics.
MAINTENANCE AND REPAIR INSTALLING A PREWOUND SPOOL BATTERIES See Figure 13. • Remove the battery pack from the string trimmer. • Press in the tabs on each side of the spool cap. • Remove the spool cap and spool. NOTE: If the spring falls off the spool housing during this procedure, reinstall the spring before installing the spool and spool cap. • Inspect the string head for damaged or worn parts and clean thoroughly. • Unwind approximately 4 in. (102 mm) of the line from the prewound spool.
MAINTENANCE AND REPAIR CLEANING THE STRING TRIMMER WARNING: Do not attempt to modify this unit or create or mount any accessory not specifically recommended in this manual for use with this string trimmer. Any such alteration or modification is misuse and could result in a hazardous condition leading to possible serious personal injury. WARNING: Battery units do not have to be plugged into an electrical outlet; therefore, they are always in operating condition.
TROUBLESHOOTING BATTERY PACK WILL NOT CHARGE POSSIBLE CAUSE POSSIBLE SOLUTION No power to charger or battery pack. Check charger. Battery pack has failed. Replace battery pack. MOTOR OPERATES SLOWLY OR WILL NOT OPERATE POSSIBLE CAUSE POSSIBLE SOLUTION Battery pack is not charged. Charge battery pack. STRING HEAD WILL NOT ADVANCE LINE POSSIBLE CAUSE POSSIBLE SOLUTION String head bound with grass. Stop the unit and clean string head. String head out of line. Refill with new line.
HOMELITE PRODUCTS LIMITED WARRANTY Homelite Consumer Products, Inc. warrants to the original retail purchaser that this HOMELITE® Product is free from defect in material and workmanship and agrees to repair or replace, at Homelite Consumer Products, Inc.
OPERATOR'S MANUAL 18V CORDLESS STRING TRIMMER MODEL NO. UT31810 SERVICE Now that you have purchased your unit, should a need ever exist for repair parts or service, simply contact your nearest Homelite Authorized Service Center. Be sure to provide all pertinent facts when you call or visit. Please call 1-800-chainsaw (1-800-242-4672) for your nearest Homelite Authorized Service Center. You can also check our web site at www.homelite.com for a complete list of Authorized Service Centers. MODEL NO.