OPERATOR'S MANUAL 18 Volt Cordless Chain Saw Model No. UT34010 Your new chain saw has been engineered and manufactured to Homelite’s high standard for dependability, ease of operation, and operator safety. Properly cared for, it will give you years of rugged, trouble-free performance. WARNING: To reduce the risk of injury, the user must read and understand the operator’s manual before using this product. Pay close attention to the Rules for Safe Operation, Warnings, and Cautions.
TABLE OF CONTENTS ■ Table of Contents / Introduction ....................................................................................................................... 2 ■ Important Safety Instructions ...................................................................................................................... 3 - 7 ■ Symbols ......................................................................................................................................................
IMPORTANT SAFETY INSTRUCTIONS ■ Maintain the unit with care. Keep the cutting edge sharp and clean for best performance and to reduce the risk of injury. Follow instructions for lubricating and changing accessories. Inspect the battery charger cord periodically, and if damaged, have it replaced or repaired by an authorized service dealer. ■ Keep handles dry, clean, and free of oil and grease. ■ Do not operate a chain saw that is damaged, improperly adjusted, or not completely and securely assembled.
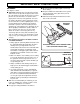
IMPORTANT SAFETY INSTRUCTIONS ■ Do not cut above shoulder height or overreach when cutting. ■ Keep the SAFE-T-TIP anti-kickback nose guard properly mounted on the guide bar to prevent rotational kickback. ■ Follow the sharpening and maintenance instructions for the saw chain. KICKBACK See Figures 1 and 2. ■ WARNING: Kickback may occur when the moving chain contacts an object at the upper portion of the tip of the guide bar or when the wood closes in and pinches the saw chain in the cut.
IMPORTANT SAFETY INSTRUCTIONS ■ Push and Pull - This reaction force is always opposite to the direction the chain is moving where wood contact is made. Thus, the operator must be ready to control the PULL when cutting on the bottom edge of the bar, and PUSH when cutting along the top edge. See Figure 3. IN THE CUTTING/WORK AREA ■ Do not operate a chain saw in a tree, on a ladder, or scaffold; this is extremely dangerous.
IMPORTANT SAFETY INSTRUCTIONS UNDERSTANDING YOUR CHAIN SAW SAFETY DEVICES BATTERY SAFETY ■ Battery operated units do not have to be plugged into an electrical outlet; therefore, they are always in operating condition. Be aware of possible hazards even when unit is not operating. ■ Remove the battery pack from the chain saw before cleaning, servicing, storing, removing material from the unit, changing accessories such as the bar and chain, or when not in use.
IMPORTANT SAFETY INSTRUCTIONS ■ Do not dispose of batteries in a fire. The cell may explode. Batteries should be recycled, consult your local waste authority for information regarding available recycling and/or disposal options. ■ When battery pack is not in use, keep it away from other metal objects like: paper clips, coins, keys, nails, screws, or other small metal objects that can make a connection from one terminal to another.
SYMBOLS Important: Some of the following symbols may be used on your tool. Please study them and learn their meaning. Proper interpretation of these symbols will allow you to operate the tool better and safer.
SYMBOLS Important: Some of the following symbols may be used on your tool. Please study them and learn their meaning. Proper interpretation of these symbols will allow you to operate the tool better and safer. SYMBOL NAME EXPLANATION SAFE-T-TIP The SAFE-T-TIP® nose guard on your bar nose prevents rotational kickback. Bar nose contact Avoid bar nose contact. Holding saw Hold saw properly with both hands.
SPECIFICATIONS PRODUCT SPECIFICATIONS: Motor Bar Length Replacement Bar Part Number Replacement Chain Part Number Net Weight Charger Replacement Part Number 1425701 Battery Pack Replacement Part Number 1323701 Charger Rating 120V, 60 Hz, AC Only Charger Voltage 18 Volt Charger Rate 1 Hour 18 Volt, DC 10 in. (254 mm) 6222001 6958301 7.5 lbs. (3.4 kg.) NOTE: This saw was designed for occasional light duty use and has some limitations as to what can be cut with it.
FEATURES CHAIN OIL TANK CAP SCABBARD REAR HANDLE BAR SAFE-T-TIP® CHAIN BATTERY PACK HAND GUARD FRONT HANDLE TRIGGER LOCK BUTTON HEX KEY STORAGE AREA HEX KEY TRIGGER Fig.
GLOSSARY OF TERMS Front Handle The support handle located at or toward the front of the chain saw. Front Handle Guard A structural barrier between the front handle of a chain saw and the guide bar, typically located close to the hand position on the front handle and sometimes employed as an activating lever for a chain brake. Guide Bar A solid railed structure that supports and guides the saw chain. Saw Chain A loop of chain that has cutting teeth for cutting wood.
OPERATION BATTERY PACK AND CHARGER BATTERY PACK LED FUNCTION OF CHARGER See Figure 6. LED WILL BE ON TO INDICATE STATUS OF CHARGER AND BATTERY PACK: ■ Red LED on = Fast charging mode. ■ Green LED on = Fully charged battery pack. ■ Yellow and Green LEDs on = Control charge or defective battery pack. ■ No LED on = Defective charger or battery pack. BATTERY CHARGER CHARGING YOUR CHAIN SAW The battery pack for your chain saw has been shipped in a low charge condition to prevent possible problems.
OPERATION TO INSTALL BATTERY PACK See Figure 7. 1. Place the battery pack in your chain saw. Align raised rib on battery pack with groove in chain saw’s battery port. 2. Make sure the latches on each side of the battery pack snap in place and that battery pack is secured in chain saw before beginning operation. CAUTION: Remove battery pack from unit. Fill oil tank with Homelite Bar and Chain Oil before starting the chain saw. Failure to lubricate the chain will cause damage to the bar and chain.
OPERATION STARTING AND STOPPING THE CHAIN SAW See Figure 9. WARNING: Keep body to the left of the chain line. Never straddle the saw or chain, or lean over past the chain line. STARTING THE CHAIN SAW 1. Place the chain saw on a flat bare surface and make sure no objects or obstructions are in immediate vicinity which could come in contact with the bar and chain. 2. Press and hold the trigger lock button. This makes the trigger operational. 3.
OPERATION WARNING: Never use a left-handed (cross-handed) grip, or any stance which would place your body or arm across the chain line. 3. Maintain a proper grip on the saw whenever the unit is running. The fingers should encircle the handle and the thumb is wrapped under the handlebar. This grip is least likely to be broken (by a kickback or other sudden reaction of the saw).
OPERATION PROPER CUTTING STANCE See Figure 13. ■ Weight should be balanced with both feet on solid ground. ■ Keep left arm with elbow locked in a "straight arm" position to withstand any kickback force. ■ Your body should always be to the left of the chain line. ■ Thumb should be on underside of handlebar. CHAIN LINE STRAIGHT ARM POSITION BASIC CUTTING PROCEDURE Practice cutting a few small logs using the following technique to get the "feel" of using your saw before you begin a major sawing operation. 1.
OPERATION PLANNED LINE OF FALL WARNING: Periodically glance at the top of the tree during the backcut to assure the tree is going to fall in the desired direction.
OPERATION ■ Felling Backcut. The backcut is always made level and horizontal, and at a minimum of 2 inches (5 cm) above the horizontal cut of the notch. See Figures 15 and 16. ■ Never cut through to the notch. Always leave a band of wood between the notch and backcut (approximately 2 inches (5 cm) or 1/10 the diameter of the tree). This is called "hinge" or “hingewood.” It controls the fall of the tree and prevents slipping or twisting or shoot-back of the tree off the stump. See Figures 15 and 16.
OPERATION ■ ■ When bucking on a slope, always stand on the uphill side of the log. To maintain complete control of the chain saw when cutting through the log, release the cutting pressure near the end of the cut without relaxing your grip on the chain saw handles. Do not let the chain contact the ground. After completing the cut, wait for the saw chain to stop before your move the chain saw. Always stop the motor before moving from tree to tree. See Figure 19.
OPERATION TYPES OF CUTTING USED WARNING: See Figure 21. Never climb into a tree to limb or prune. Do not stand on ladders, platforms, a log or in any position which can cause you to lose your balance or control of the saw. OVERBUCKING Begin on the top side of the log with the bottom of the saw against the log; exert light pressure downward. Note that the saw will tend to pull away from you.
OPERATION PRUNING See Figure 23. Pruning is trimming limbs from a live tree. ■ Work slowly, keeping both hands on the chain saw with a firm grip. Always make sure your footing is secure and your weight is distributed evenly on both feet. ■ Do not cut from a ladder, this is extremely dangerous. Leave this operation for professionals. ■ Do not cut above chest height as a saw held higher is difficult to control against kickback.
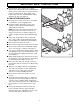
MAINTENANCE ASSEMBLING BAR AND CHAIN See Figures 25, 26, 27, 28 and 29. ADJUSTING PIN SPROCKET CAUTION: Remove the battery pack from the chain saw and make sure the chain has stopped before you do any work on the saw. BAR WARNING: WASHER The safety instructions in this section are to protect the user from serious personal injury. CHAIN CAUTION: CHAIN TENSION PIN HOLE Always wear gloves when handling the bar and chain; these components are sharp and may contain burrs.
MAINTENANCE 7. Replace the chain cover, washer and chain cover screw. Tighten the chain cover screw finger tight only. The bar must be free to move for tension adjustment. 8. Remove all the slack from the chain by turning the chain tensioning screw clockwise until the chain seats snugly against the bar with the drive links in the bar groove. 9. Lift the tip of the guide bar up to check for sag. Release the tip of the guide bar and turn the chain tensioning screw 1/2 turn clockwise.
MAINTENANCE CHAIN TENSION See Figures 30 and 31. 1. Stop the engine before setting the chain tension. Make sure the guide bar screw is loosened to finger tight, turn the chain tensioner clockwise to tension the chain. Refer to “Assembling the Bar and Chain” earlier in this manual for additional information. A cold chain is correctly tensioned when there is no slack on the underside of the guide bar, the chain is snug, but it can be turned by hand without binding. 2.
MAINTENANCE CHAIN MAINTENANCE CUTTING CORNER See Figures 32 and 33. TOP PLATE CAUTION: Remove the battery pack and make sure the chain has stopped before you do any work on the saw. SIDE PLATE DEPTH GAUGE RIVET HOLE HEEL Use only low-kickback chain on this saw. This fastcutting chain will provide kickback reduction when properly maintained. For smooth and fast cutting, chain needs to be maintained properly.
MAINTENANCE 5. Put a few firm strokes on every tooth. File all left hand cutters in one direction. Then move to the other side and file the right hand cutters in the opposite direction. Occasionally remove filings from the file with a wire brush. LEFT HAND CUTTERS WARNING: Improper chain sharpening increases the potential of kickback. RIGHT HAND CUTTERS Fig. 35 WARNING: Failure to replace or repair damaged chain can cause serious injury.
MAINTENANCE Use a Flat File and a Depth Gauge Jointer to lower all gauges uniformly. Depth gauge jointers are available in .020 in. to .035 in. (0.5 mm to 0.9 mm). Use a .025 in. (0.6 mm) depth gauge jointer. After lowering each depth gauge, restore original shape by rounding the front. Be careful not to damage adjoining drive links with the edge of the file. See Figures 39 and 40. Depth gauges must be adjusted with the flat file in the same direction the adjoining cutter was filed with the round file.
MAINTENANCE MOUNTING SCREW CAUTION: Remove the battery pack and make sure the chain has stopped before you do any work on the saw. LOCKING RIVET WARNING: Although the guide bar comes with a SAFE-TTIP® anti-kickback device already installed, you need to check the tightness of the mounting screw before each use. SAFE-T-TIP SAFE-T-TIP® NOSE GUARD MAINTENANCE Fig. 42 See Figures 42 and 43. Tighten the mounting screw of the nose guard as instructed below. These are specially hardened screws.
MAINTENANCE BATTERIES WARNING: The battery pack for your chain saw is equipped with nickel-cadmium rechargeable batteries. Length of service from each charging will depend on the type of work you are doing. The batteries in this tool have been designed to provide maximum trouble free life. However, like all batteries, they will eventually wear out. Do not disassemble battery pack and attempt to replace the batteries.
BAR AND CHAIN COMBINATIONS RECOMMENDED BAR AND CHAIN COMBINATIONS Bar Part Number - 10 in. (254 mm) Chain Part Number 6222001 6958301 TROUBLESHOOTING IF THESE SOLUTIONS DO NOT SOLVE THE PROBLEM CONTACT YOUR AUTHORIZED SERVICE DEALER. PROBLEM POSSIBLE CAUSE SOLUTION Bar and chain running hot and smoking. 1. Check chain tension for over tight condition 2. Chain oil tank empty. Motor runs, but chain is not rotating. 1. Chain tension too tight. 2. Check guide bar and chain assembly. 3.
WARRANTY normal wear or by the use of parts or accessories which are either INCOMPATIBLE WITH THE HOMELITE product or adversely affect its operation, performance or durability. In addition, this warranty does not cover: A. Tune-ups – Spark Plugs, Carburetor Adjustments, Filters B.
NOTES 33
OPERATOR'S MANUAL 18 Volt Cordless Chain Saw Model No. UT34010 SERVICE Now that you have purchased your unit, should a need ever exist for repair parts or service, simply contact your nearest Homelite Authorized Service dealer. Be sure to provide all pertinent facts when you call or visit. Please call 1-800-chainsaw (1-800-242-4672) for your nearest Homelite Authorized Service dealer. You can also check our web site at www.homelite.com for a complete list of Authorized Service dealers. MODEL NO.