Installationsanleitung Installation instruction Dimmerkompensator S. 2 Dimming Compensator p.
Lieferumfang Anzahl Bezeichnung 1 Homematic IP Dimmerkompensator 1 Bedienungsanleitung Dokumentation © 2020 eQ-3 AG, Deutschland Alle Rechte vorbehalten. Ohne schriftliche Zustimmung des Herausgebers darf diese Anleitung auch nicht auszugsweise in irgendeiner Form reproduziert werden oder unter Verwendung elektronischer, mechanischer oder chemischer Verfahren vervielfältigt oder verarbeitet werden. Es ist möglich, dass die vorliegende Anleitung noch drucktechnische Mängel oder Druckfehler aufweist.
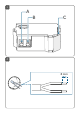
1 A B C 2 8 mm
3 OFF 4
6
7 8
9 10 1 2
Inhaltsverzeichnis 1 2 3 4 5 Hinweise zur Anleitung....................................................9 Gefahrenhinweise.............................................................9 Funktion und Geräteübersicht..................................... 12 Allgemeine Systeminformationen............................... 12 Inbetriebnahme............................................................... 13 5.1 5.2 6 7 8 Installationshinweise............................................................
Hinweise zur Anleitung 1 Hinweise zur Anleitung Lesen Sie diese Anleitung sorgfältig, bevor Sie Ihr Homematic IP Gerät in Betrieb nehmen. Bewahren Sie die Anleitung zum späteren Nachschlagen auf! Wenn Sie das Gerät anderen Personen zur Nutzung überlassen, übergeben Sie auch diese Anleitung. Benutzte Symbole: Achtung! Hier wird auf eine Gefahr hingewiesen. Hinweis. Dieser Abschnitt enthält zusätzliche wichtige Informationen. 2 Gefahrenhinweise Öffnen Sie das Gerät nicht.
Gefahrenhinweise Aus Sicherheits- und Zulassungsgründen (CE) ist das eigenmächtige Umbauen und/oder Verändern des Geräts nicht gestattet. Verwenden Sie das Gerät nicht, wenn es von außen erkennbare Schäden, z. B. am Gehäuse oder an den Anschlussbuchsen aufweist. Lassen Sie das Gerät im Zweifelsfall von einer Fachkraft prüfen.
Gefahrenhinweise Das Gerät ist Teil der Gebäudeinstallation. Bei der Planung und Errichtung sind die einschlägigen Normen und Richtlinien des Landes zu beachten. Der Betrieb des Geräts ist ausschließlich am 230 V/50 Hz-Wechselspannungsnetz zulässig. Arbeiten am 230-V-Netz dürfen nur von einer Elektrofachkraft (nach VDE 0100) erfolgen. Dabei sind die geltenden Unfallverhütungsvorschriften zu beachten.
Funktion und Geräteübersicht 3 Funktion und Geräteübersicht Der Homematic IP Dimmerkompensator sorgt für ein Dimmverhalten, wie man es von konventionellen Lampen kennt: Durch den Einsatz des Dimmerkompensators als Lastelement in der Elektroinstallation können Nachglimmen, Flackern und Geräuschbildung bei Leuchtmitteln (auch im ausgeschalteten Zustand) in einem Lichtkreis vermieden werden.
Inbetriebnahme 5 5.1 Inbetriebnahme Installationshinweise Bitte lesen Sie diesen Abschnitt erst vollständig, bevor Sie mit der Installation beginnen. Hinweis! Installation nur durch Personen mit einschlägigen elektrotechnischen Kenntnissen und Erfahrungen!* Durch eine unsachgemäße Installation gefährden Sie • Ihr eigenes Leben; • das Leben der Nutzer der elektrischen Anlage. Mit einer unsachgemäßen Installation riskieren Sie schwere Sachschäden, z. B. durch Brand.
Inbetriebnahme • • • IP-Schutzarten; Einbau des Elektroinstallationsmaterials; Art des Versorgungsnetzes (TN-System, IT-System, TT-System) und die daraus folgenden Anschlussbedingungen (klassische Nullung, Schutzerdung, erforderliche Zusatzmaßnahmen etc.). Die Installation darf nur in handelsüblichen Schalterdosen (Gerätedosen) gemäß DIN 49073-1 oder Aufputzdosen gemäß DIN 60670-1 (z. B. Abox 025 oder Abox 040) erfolgen.
Inbetriebnahme Zugelassene Leitungsquerschnitte zum Anschluss an den Dimmerkompensator sind: Starre Leitung [mm2] 0,2-1,50 Flexible Leitung ohne Aderendhülse [mm2] 0,2-1,50 Zum Anschließen und auch zum Lösen der Leiter ist der weiße Betätigungshebel oben auf den Klemmen zu drücken. Isolieren Sie die Anschlussleitungen auf eine Länge von 8 mm ab (s. Abbildung 2). 5.
Inbetriebnahme • • • 5.2.2 der Anschlusszeichnung an (s. Abbildung 4). Setzen Sie das Gerät in eine geeignete Unterputzdose (s. Abbildung 5+6) oder alternativ in eine Aufputzdose (z. B. Abox 025 oder Abox 040) (s. Abbildung 7+8). Schließen Sie die Unter- bzw. Aufputzdose mit einer geeigneten Abdeckung. Schalten Sie die Haussicherung wieder ein. Installation auf einer Hutschiene Der Dimmerkompensator kann auf 35 mm Hutschienen montiert werden. Hierfür wird ein zusätzlicher Montageadapter benötigt.
Wartung und Reinigung • • • 6 fest auf der Schiene sitzt. Schließen Sie den Dimmerkompensator gemäß der Anschlusszeichnung an (s. Abbildung 4). Setzen Sie die Abdeckung des Stromkreisverteilers wieder auf. Schalten Sie die Sicherung wieder ein. Wartung und Reinigung Das Gerät ist wartungsfrei. Überlassen Sie eine Reparatur einer Fachkraft.
Technische Daten 7 Technische Daten Geräte-Kurzbezeichnung: Versorgungsspannung: Stromaufnahme: Leitungsart und -querschnitt: Installation: Schutzart: Umgebungstemperatur: Abmessungen (B x H x T): Gewicht: HmIP-DC 230 V/50 Hz 7 mA max.
Technische Daten Entsorgungshinweis Gerät nicht im Hausmüll entsorgen! Elektronische Geräte sind entsprechend der Richtlinie über Elektro- und Elektronik-Altgeräte über die örtlichen Sammelstellen für Elektronik-Altgeräte zu entsorgen. Konformitätshinweis Das CE-Zeichen ist ein Freiverkehrszeichen, das sich ausschließlich an die Behörden wendet und keine Zusicherung von Eigenschaften beinhaltet. Bei technischen Fragen zum Gerät wenden Sie sich bitte an Ihren Fachhändler.
Package contents Quantity Description 1 Homematic IP Dimming Compensator 1 User manual Documentation © 2020 eQ-3 AG, Germany All rights reserved. Translation from the original version in German. This manual may not be reproduced in any format, either in whole or in part, nor may it be duplicated or edited by electronic, mechanical or chemical means, without the written consent of the publisher. Typographical and printing errors cannot be excluded.
Table of contents 1 2 3 4 5 Information about this manual....................................22 Hazard information.........................................................22 Function and device overview.....................................25 General system information.........................................25 Start-up.............................................................................26 5.1 5.2 6 7 Installation instructions......................................................
Information about this manual 1 Information about this manual Please read this manual carefully before beginning operation with your Homematic IP component. Keep the manual so you can refer to it at a later date if you need to. If you hand over the device to other persons for use, hand over this manual as well. Symbols used: Attention! This indicates a hazard. Please note: This section contains important additional information. 2 Hazard information Do not open the device.
Hazard information For safety and licensing reasons (CE), unauthorized change and/or modification of the device is not permitted. The device may only be operated in dry and dustfree environment and must be protected from the effects of moisture, vibrations, solar or other methods of heat radiation, cold and mechanical loads. The device is not a toy; do not allow children to play with it. Do not leave packaging material lying around. Plastic films/bags, pieces of polystyrene, etc.
Hazard information The device is part of the building installation. Observe the relevant national standards and directives during planning and set-up. The device has been designed solely for operation on a 230 V/50 Hz AC supply. Only qualified electricians (to VDE 0100) are permitted to carry out work on the 230 V mains. Applicable accident prevention regulations must be complied with whilst such work is being carried out.
Function and device overview 3 Function and device overview The Homematic IP Dimming Compensator ensures a dimming behaviour similar to that of conventional lamps: The dimming compensator can be used as load element in the electrical installation to prevent afterglow, flickering and noise formation from illuminants (even when switched off) in a light circuit. The dimming compensator is ideal also in conjunction with Homematic IP dimming actuators or trailing edge dimmers from other manufacturers.
Start-up 5 5.1 Start-up Installation instructions Please read this entire section before starting to install the device. Please note! Only to be installed by persons with the relevant electro-technical knowledge and experience!* Incorrect installation can put • your own life at risk; • and the lives of other users of the electrical system. Incorrect installation also means that you are running the risk of serious damage to property, e.g. because of a fire.
Start-up • • • safeguarding shut-off conditions; IP protection types; Installation of electrical installation material; Type of supply network (TN system, IT system, TT system) and the resulting connecting conditions (classical zero balancing, protective earthing, required additional measures etc.). Installation may only take place in normal commercial switch boxes (device boxes) in accordance with DIN 49073-1 or surfacemounting boxes in accordance with DIN 60670-1 (e.g. Abox 025 or Abox 040).
Start-up Please observe the hazard information in section “2 Hazard information” on page 22 during installation. Permitted cable cross sections for connecting to the dimming compensator are: Rigid cable [mm2] 0.2.-1.50 Flexible cable without ferrule [mm2] 0.2.-1.50 To connect or loosen the conductor, the white actuation lever at the top of the clamp has to be pressed. Strip the connecting cables to a length of 8 mm (see figure 2). 5.
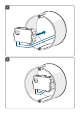
Start-up 49073-1) directly behind a trailing edge dimmer. To do this, proceed as follows: • Switch off the fuse of the power circuit (see figure 3). • Connect the dimming compensator according to the connection diagram (see figure 4). • Place the device into an appropriate flushmounted box (see figure 5+6) or into a surfacemounted box (e.g. Abox 025 or Abox 040) (see figure 7+8). • Close the flush-mounting or surface-mounting box using an appropriate cover.
Maintenance and cleaning • • • • 6 compensator (see figure 9). Place the dimming compensator onto the DIN rail using the mounting adapter (see fig. 10). Make sure that the catch spring of the mounting adapter engages properly and securely on the rail. Connect the dimming compensator according to the connection diagram (see figure 4). Replace the cover of the power distribution panel. Switch the fuse back on. Maintenance and cleaning The product does not require any maintenance.
Technical specifications 7 Technical specifications Device short name: Supply voltage: Current consumption: Cable type and cross section: HmIP-DC 230 V/50 Hz 7 mA max. rigid and flexible cable, 0.2-1.
Technical specifications Instructions for disposal Do not dispose of the device with regular domestic waste! Electronic equipment must be disposed of at local collection points for waste electronic equipment in compliance with the Waste Electrical and Electronic Equipment Directive. Information about conformity The CE sign is a free trading sign addressed exclusively to the authorities and does not include any warranty of any properties. For technical support, contact your specialist dealer.
Kostenloser Download der Homematic IP App! Free download of the Homematic IP app! Bevollmächtigter des Herstellers: Manufacturer’s authorised representative: eQ-3 AG Maiburger Straße 29 26789 Leer / GERMANY www.eQ-3.