Montage- und Bedienungsanleitung S. 2 Installation and Operating Manual p.
1. Ausgabe Deutsch 10/2013 Dokumentation © 2013 eQ-3 Ltd., Hong Kong Alle Rechte vorbehalten. Ohne schriftliche Zustimmung des Herausgebers darf dieses Handbuch auch nicht auszugsweise in irgendeiner Form reproduziert werden oder unter Verwendung elektronischer, mechanischer oder chemischer Verfahren vervielfältigt oder verarbeitet werden. Es ist möglich, dass das vorliegende Handbuch noch drucktechnische Mängel oder Druckfehler aufweist.
Inhaltsverzeichnis 1 2 3 4 5 6 6.1 6.2 6.3 6.3.1 6.3.2 6.3.3 6.3.4 7 7.1 7.2 7.3 8 8.1 8.2 9 10 11 Hinweise zu dieser Anleitung . . . . . . . . . . . . . . . . . . . . . . . . . . . . 4 Gefahrenhinweise . . . . . . . . . . . . . . . . . . . . . . . . . . . . . . . . . . . . 4 Funktion . . . . . . . . . . . . . . . . . . . . . . . . . . . . . . . . . . . . . . . . . . . . 4 Allgemeine Systeminformation zu HomeMatic . . . . . . . . . . . . . . . . 6 Allgemeine Hinweise zum Funkbetrieb . . . . . . . . . . .
1 Hinweise zu dieser Anleitung Lesen Sie diese Anleitung sorgfältig, bevor Sie Ihre HomeMatic Geräte in Betrieb nehmen. Bewahren Sie die Anleitung zum späteren Nachschlagen auf! Wenn Sie das Gerät anderen Personen zur Nutzung überlassen, übergeben Sie auch diese Bedienungsanleitung. Benutzte Symbole: Achtung! Hier wird auf eine Gefahr hingewiesen. Hinweis.
• • • • • • Ausfiltern von kurzfristigen Helligkeitsschwankungen Direktes Anlernen von Aktoren möglich Sabotageschutz (Gehäusekontakt) Im Wand-/Deckenhalter um 45 Grad links/rechts schwenkbar Bei längerem Aufenthalt in einem Raum erfolgt eine Ausschaltvorwarnung durch eine leichte Helligkeitsschwankung einer dimmergesteuerten Beleuchtung als Aufforderung, den Sensor erneut auszulösen.
4 Allgemeine Systeminformation zu HomeMatic Dieses Gerät ist Teil des HomeMatic-Haussteuersystems und arbeitet mit dem bidirektionalen BidCoS® Funkprotokoll. Alle Geräte werden mit einer Standardkonfiguration ausgeliefert. Darüber hinaus ist die Funktion des Gerätes über ein Programmiergerät und Software konfigurierbar.
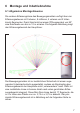
6 Montage und Inbetriebnahme 6.1 Allgemeine Montagehinweise Die vordere Erfassungslinse des Bewegungsmelders verfügt über vier Erfassungsebenen mit 9 oberen, 8 mittleren, 5 unteren und 2 Unterkriech-Segmenten. Damit lässt sich bei einem Öffnungswinkel von 90° eine Reichweite von bis zu 12 m erzielen.
Erfassungsbereiche der als Unterkriechschutz eingesetzten unteren Linse • • • • • • • 8 Um einen Fehlalarm durch Haustiere zu vermeiden, halten Sie diese möglichst vom geschützten Bereich fern. Ist dies nicht möglich, versuchen Sie, durch Höhenvariation des Gerätes die Erfassung dementsprechend auszurichten. Decken Sie ggf. den Unterkriechschutz ab. Bedenken Sie, dass Haustiere auch z. B. auf Schränke springen und so in den Erfassungsbereich gelangen können.
• Achten Sie bei der Montage darauf, dass der Funk-Bewegungsmelder nicht direkt auf oder in der Nähe von großen Metallgegenständen (Heizung, alukaschierte Wände, etc.) montiert wird, da sich hierdurch die Funkreichweite reduziert. 6.2 Montage Das Gerät ist mit einem Halter ausgestattet, der sowohl eine Wand- als auch eine Deckenmontage zulässt.
Decken-/Wandhalter nach oben abziehen Wandmontage ø 5 mm 20 mm Deckenmontage 10 ø 5 mm
6.3 Inbetriebnahme 6.3.1 Batterien einlegen Der PIR-Melder benötigt 3 Batterien der Größe LR6 / Mignon / AA. Wir empfehlen für eine lange Betriebsdauer der Batterien, Marken-AlkalineBatterien einzusetzen. • • • Nehmen Sie den Wand-/Deckenhalter, wie in Kapitel 6.2 erläutert, und danach die Batteriefachabdeckung (nach oben) ab. Legen Sie die Batterien polrichtig entsprechend der Polungskennzeichnung in den Batteriehaltern in diese ein (siehe Bild unten). Das Batteriefach bleibt zunächst geöffnet.
Verbrauchte Batterien gehören nicht in den Hausmüll! Entsorgen Sie diese in Ihrer örtlichen Batteriesammelstelle! 6.3.3 Verhalten nach dem Einlegen der Batterien Nach dem Einlegen der Batterie erfolgt die Initialisierung. Den Abschluss bildet die LED-Test-Anzeige: rot, grün, orange für jeweils eine halbe Sekunde.
Schaltaktor) kommunizieren kann, muss das Gerät zunächst angelernt werden. Sie können den Funk-Bewegungsmelder direkt an andere HomeMatic-Geräte oder an die HomeMatic Zentrale anlernen. Sie haben die Möglichkeit, den Funk-Bewegungsmelder mit oder ohne Helligkeitsschwelle anzulernen.
Sie können den Anlernvorgang durch erneute kurze Betätigung der Anlerntaste abbrechen. Dies wird durch rotes Aufleuchten der Geräte-LED bestätigt. Wenn kein Anlernen erfolgt, wird der Anlernmodus automatisch nach 20 Sekunden beendet. Befinden sich andere Geräte im Anlernmodus, werden diese angelernt. • • Versetzen Sie jetzt das Gerät, das Sie an den Bewegungsmelder anlernen möchten (z.B. einen HomeMatic Schaltaktor), in den Anlernmodus.
Halten Sie beim Anlernen einen Mindestabstand von 50 cm zwischen den HomeMatic Geräten und der Zentrale ein. Zum Anlernen Ihres Gerätes an die Zentrale gehen Sie wie folgt vor: • Öffnen Sie die WebUI-Bedienoberfläche in Ihrem Browser. Geben Sie dafür in Ihrem Browser die URL http://homematic-ccu2 ein. Anschließend gelangen Sie auf die Startseite Ihrer WebUI. Klicken Sie auf den Button „Geräte anlernen“ im rechten Bildschirmbereich.
• • Lernen Sie ggf. weitere Geräte an, indem Sie die vorher beschriebenen Schritte für jedes Gerät wiederholen. Konfigurieren Sie nun die neu angelernten Geräte im Posteingang wie im Abschnitt 6.3.2 beschrieben. 7.3 Neu angelernte Geräte konfigurieren Nachdem Sie Ihr Gerät an die HomeMatic Zentrale angelernt haben, wird es in den „Posteingang“ verschoben. Hier muss Ihr Gerät und die dazugehörigen Kanäle zunächst konfiguriert werden, damit es für Bedien- und Konfigurationsaufgaben zur Verfügung steht.
• • rung mit leicht flackerndem Licht als Ausschaltvorwarnung” So wird man bei längerem Aufenthalt im Raum rechtzeitig daran erinnert, den Bewegungsmelder erneut auszulösen. Je nach Anlernvariante (siehe Kapitel 6.3) wird dabei auch das Helligkeitskriterium (z. B. Schalten nur bei Dunkelheit) übertragen. 9 Werkseinstellungen wiederherstellen • • • Halten Sie die Anlerntaste des Funk-Bewegungsmelders für mindestens 5 Sekunden gedrückt. Die Geräte-LED beginnt langsam rot zu blinken.
11 Technische Daten PIR-Sensorcharakteristik: - Hauptlinse · Reichweite / Erfassungswinkel: - Unterkriechschutz · Reichweite / Erfassungswinkel: Schwenkbereich: Funkfrequenz: Typ. Freifeldreichweite: Stromversorgung: Batterielebensdauer: Schutzart: Abmessungen (ø x H): ca. 12 m / ca. 90° max. 4 m / ca. 43° ±45° 868,3 MHz 300 m 3 x LR6 / AA / Mignon ≥1 Jahr IP20 55 x 132 mm Technische Änderungen vorbehalten.
1st English edition 10/2013 Documentation © 2013 eQ-3 Ltd., Hong Kong All rights reserved. This manual may not be reproduced in any format, either in whole or in part, nor may it be duplicated or edited by electronic, mechanical or chemical means, without the written consent of the publisher. Typographical and printing errors cannot be excluded. However, the information contained in this manual is reviewed on a regular basis and any necessary corrections will be implemented in the next edition.
Table of contents 1 2 3 4 5 6 6.1 6.2 6.3 6.3.1 6.3.2 6.3.3 6.3.4 7 7.1 7.2 7.3 8 8.1 8.2 9 10 11 20 Information about these instructions . . . . . . . . . . . . . . . . . . . . Hazard information . . . . . . . . . . . . . . . . . . . . . . . . . . . . . . . . . . . Function . . . . . . . . . . . . . . . . . . . . . . . . . . . . . . . . . . . . . . . . . . . General system information on HomeMatic . . . . . . . . . . . . . . . . General information on radio operation . . . . . . . . . . . . . . . . . .
1 Information about these instructions Read these instructions carefully before beginning operation with your HomeMatic components. Keep the instructions handy for later consultation! Please hand over the operating manual as well when you hand over the device to other persons for use. Attention! This indicates a hazard. Note. This section contains additional important information! 2 Hazard information Do not open the device: it does not contain any components that need to be serviced by the user.
• • • • • Actuators can be taught-in directly Anti-tamper protection (housing contact) Can be swivelled in the wall/ceiling bracket 45 degrees to the left and right If someone is present in a room for a long time, a dimmer-controlled light will flicker briefly; this acts as an advance switch-off warning and prompts the user to activate the sensor again.
4 General system information on HomeMatic This device is a part of the HomeMatic home control system and works with the bi-directional BidCoS® wireless protocol. All devices are delivered in a standard configuration. The functionality of the device can also be configured with a programming device and software.
6 Mounting and start-up 6.1 General notes on mounting The front detection lens of the motion detector operates on 4 detection levels, with 9 upper, 8 middle, 5 lower and 2 creep zone segments. This means that, with an aperture angle of 90°, a range of up to 12 m can be achieved.
Detection ranges of the bottom lens used for creep zone protection • • • • • • • • Keep pets away from the protected area as far as possible to prevent them from triggering a false alarm. If you cannot do this, try to align the detection area accordingly by adjusting the height of the device. If necessary, cover the lens for creep zone protection. Please bear in mind that pets can also jump up onto cupboards, for example, which may bring them into the detection range.
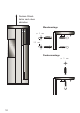
it is not installed directly on or in the vicinity of large metal objects (heaters, aluminium clad walls, etc.), as this would reduce the wireless range. 6.2 Mounting The device is equipped with a bracket that can be mounted on a wall or ceiling. As the sensor can be rotated by 45 degrees in the bracket, the detection range can be set at practically any angle to the wall and can also, of course, be readjusted as needed afterwards.
Pull the wall/ ceiling bracket up and off Wall mounting ø 5 mm 20 mm Ceiling mounting ø 5 mm 27
6.3 Start-up 6.3.1 Inserting batteries The PIR detector requires 3 x LR6/Mignon/AA batteries. We recommend you use branded alkaline batteries to ensure a long service life. • • • Remove the wall/ceiling bracket as described in chapter 6.2, then remove the battery compartment cover (by moving it up). Insert the batteries into the battery holders, observing the correct polarity as per the corresponding diagram (see figure below). The battery compartment remains open initially.
Used batteries are not to be disposed of with the household waste! Please dispose them at your local battery collection point! 6.3.3 Response once the batteries have been inserted Once the batteries have been inserted, initialisation is performed. The LED test display will indicate that initialisation is complete: the LED will light up red, green and orange in that order, for half a second each. If an error occurs, this is indicated by the LED flashing red.
To integrate the motion detector into your HomeMatic system and enable it to communicate with other HomeMatic devices (e.g. HomeMatic actuators), you must teach it in first. You can teach-in the motion detector directly to other HomeMatic devices or to the HomeMatic Central Control Unit. You can teach-in the motion detector with or without taking a brightness threshold.
Teaching-in without a brightness threshold: Briefly press the teach-in button (the device LED flashes orange). Teaching-in taking a brightness threshold: Press the teach-in button for at least 5 seconds (the device LED flashes red) and then press it again shortly (the device LED flashes orange). The teach-in procedure can now be cancelled by pressing the teach-in button briefly; this will cause the device LED to light up red.
devices are taught-in to the Central Control Unit via the HomeMatic „WebUI“. A soon as a component has been taught-in to a Central Control Unit, it can only be connected to other components via the CCU. Each component can only be taught-in to one Central Control Unit. During teach-in, please make sure you maintain a distance of at least 50 cm between the HomeMatic devices and the Central Control Unit.
• Now configure the newly taught-in devices in the inbox as described in the next section. 7.3 Configuring newly taught-in devices Once you have taught-in your motion detector to the HomeMatic Central Control Unit, it will be moved to the inbox. Here, you must configure the device and its associated channels in order to make them available for operating and configuration tasks. Give the device a name and assign it to a room. You can also make individual parameter settings.
• Depending on the teach-in variant used (see Subsection 6.3), the brightness criterion (e.g. only switch when dark) may also be transferred. 9 Restore factory settings • • • Press and hold the teach-in button on the wireless motion detector for at least five seconds. The device LED starts to slowly flash red. Press and hold the teach-in button for at least another five seconds. The LED will now start to flash red faster. Release the teach-in button to complete the process.
11 Technical data PIR sensor characteristics: - Main lens · Range/sensing angle: - Creep zone protection · Range/sensing angle: Swivel range: Radio frequency: Typ. open air range: Power supply: Battery life: Degree of protection: Dimensions (ø x H): 12 m approx./90° approx. 4 m max./43° approx. ±45° 868.3 MHz 300 m 3 x LR6/AA/Mignon ≥ 1 year IP20 55 x 132 mm Subject to technical changes.
eQ-3 AG Maiburger Straße 29 D-26789 Leer www.eQ-3.