
User manual


26
it is not installed directly on or in the vicinity of large metal objects
(heaters, aluminium clad walls, etc.), as this would reduce the
wireless range.
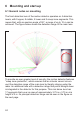
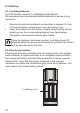
6.2 Mounting
The device is equipped with a bracket that can be mounted on a wall or
ceiling.
As the sensor can be rotated by 45 degrees in the bracket, the detection
range can be set at practically any angle to the wall and can also, of
course, be readjusted as needed afterwards.
Ceiling mounting also enables the detector to be installed wherever you
like in the room, meaning that you can omit certain sections of a hallway
from the detection range, for example.
Find a suitable mounting position for the device in the room to be
monitored, observing the detection ranges shown on the previous pages.
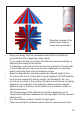
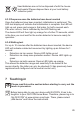
Mounting the combined wall/ceiling bracket
(refer also to the sketches on the next page):
• Pull the wall/ceiling bracket up to remove it from the PIR detector
base unit.
• Position the bracket at a suitable location on a wall or the ceiling.
• Mark through the screw holes where you will make the
corresponding bore holes. If you are mounting the bracket on the
ceiling, use the hole in the middle of the bracket’s top piece. For
wall mounting, use the two holes in the side piece.
•
Make sure that the wall or ceiling is able to carry a load at the
points where you have marked your bore holes and that no
electricity, gas, water or drain lines, etc. run there.
• Bore a 5 mm hole to a minimum depth of 35 mm at each marked
position and insert a plug or plugs.
• Position the wall/ceiling bracket above the bore holes and attach it
using a screw or screws.