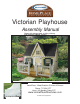
Victorian Playhouse Assembly Manual Shown with optional deck & railing, chimney and customer supplied shingles H HomePlace - Wood Products Division of Suncast Phone: 717.354.3777 Hours: 9-5 Monday-Friday EST www.HomePlaceStructures.
Victorian Playhouse Assembly Manual Thank you for purchasing this Victorian Playhouse kit. The craftsmanship and detail in this playhouse are unmatched. We are proud to bring you this unit made by our Amish friends and neighbors. This manual is designed to simplify the assembly process, however we strongly recommend having an experienced carpenter involved in the project.
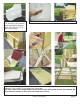
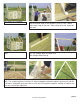
Step 1: Kit should look like this when arriving at your property. Inspect package for damage. Please call 717.354.3777 to report any damages. Step 2: Cut shrink wrap and unwrap kit. Step 3: Cut off packaging bands and remove one section at a time by backing out screws used for packaging. Carry sections to site where unit will be built. Note: Use caution when unpacking kit, keep sections from falling after screws are removed. Do not throw away bottom of skid, this is the large floor section.
flush Step 4: Assemble floor sections by aligning black marks on floor and fastening together using pre-drilled screws. Make sure floor edges are precisely flush. Step 5:Set floor on leveled site. If needed, level site with 2" of stone or gravel. It is very important for site to be level. Step 6: Set up back wall (be sure ends are flush with floor) & nail bottom plate into floor every 12” as shown. Note: Before nailing make sure bottom wall plate and siding overhang are tight against the floor.
Step 9: cont... Push walls tightly together at top and bottom. Fasten gable wall to front and back wall sections as shown. Attach bottom plate to floor repeating previous steps. Step 11: Set remaining gable wall section repeating previous steps. Step 10: Remove door stabilizer from gable door section. Step 12: Push walls tightly together, nail corners and along bottom of siding around perimeter of building using, 1¾" galvanized nails as shown.
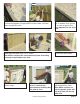
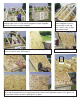
Wall sections are complete. Step 15: Align inside of rafter flush with marks, keep point even with the outside edge of 2x6 top plate. Using 3" nails, toenail rafter into the top of side wall. After nailing front side, repeat on back wall. Step 16: Repeat for other rafter. Step 17: Set 45” ridgepole with stud marking on top of rafter gussets, nail through rafter from both ends. Note: Keep marked side up. Step 18: Assemble dormer rafter on hard flat surface as shown.
Step 19: Set dormer section on top of wall and fasten to wall plate, keeping edges flush. Fasten dormer ridgepole to peak ridgepole aligning with marks on peak ridgepole. Step 20: Align back rafter with dormer ridgepole and centered at mark on wall top plate. Toenail rafter to ridgepole and back wall. Step 21: Insert dormer siding section as shown, align edges and fasten to inside of rafter. Nail every 8". See step 22...
No more than 1/2” overhang Step 23: Install dormer plywood sections as shown pushing plywood tight against large plywood section. Note: The plywood should not overhang front of dormer by more than 1/2”. Step 24: Repeat on opposite side of dormer. Step 25: Install plywood roof sheathing on the back side. Start with full 4x8 piece on the bottom & keep it flush with edges of gable rafters and edge of wall plate as shown. Nail into rafters every 8”.
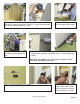
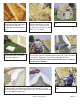
Playhouse should now look like this. Step 27 (... cont) nail V-strip into plywood at top and bottom of strip (if nails stick out through roof, bend flat against roof). Step 28: From outside, screw through plywood into V strips. Use 14 1-1/4” screws per valley (make sure screws are kept within 1 ¼ " of valley). Step 29: Paint playhouse and trim desired colors, with paint purchased separately. Step 30: Apply victorian style trim to gable ends. Align trim flush with front roof edge and top of plywood.
Step 32: Install trim on front and back of playhouse as shown. Step 34: Install metal drip edging around entire unit. Step 36: Install corner trim using galvanized trim nails as shown. Step 33: Install trim on dormer,keeping trim up against bottom of plywood overhang. Step 35: At peak of dormer, cut drip edge twice, about 1” apart, and fold over peak. Step 37: Fasten dormer strip snug behind siding piece & nail into wall plate, then nail outside of siding into dormer strip.
Note: It is very important to caulk dormer strip on inside and outside of dormer. It is also important to paint area shown with heavy duty exterior paint. Step 38: Assemble flower boxes as shown. Step 39: Install flower boxes and window shutters as shown.
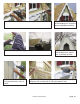
Step 40: Install asphalt shingles with 5/8” staples. Apply using standard application as shown on shingle packs. It is recommended that you involve someone who has experience in roofing to shingle the playhouse. Apply shingles directly onto the plywood, using the pattern and the directions as shown on shingle wrapper. Step 41: Fold shingles up past valley as shown Step 43: Using a straight edge and a hook-bladed utility knife, cut excess shingles off at valley. Step 44: Repeat on opposite side of dormer.
Optional Deck Assembly Step 1: Layout railing pieces as shown. Note: The side railing sections are longer than the front sections. Step 6: Railing is complete, repeat steps for opposite railing section. Step 2: Slide railing spindles into holes as shown. Step 3: Slide railing section into post brackets. Step 4: Fasten bracket to bottom of each railing runner as shown. Step 5: Assemble front railing section and slide into post brackets repeating previous steps.
Step 9: Center deck on front of playhouse and slide extended deck floor joists underneath playhouse floor as shown. Congratulations! Playhouse is complete.