
Instructions / Assembly

Vinyl Cupola Installation
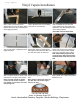
Step 7: Position cupola on center of roof
and fasten to roof using 3 inch screws.
Note: To utilize venting for cupola,
cut out an 8”x8” hole in center of
roof. Attach a screen piece over hole
to keep bugs out.
Step 1: Take 2 scrap wood pieces
approximately 24” long and fasten tightly
together with one screw, so boards pivot
when applying pressure.
Step 9: Attach roof to base using screws
attached to roof.
Step 3: Straddle the roof with each
board, making sure each board is flat
against the roof. Mark boards with pen-
cil for cutting template.
Note: Mark front and back board.
Step 4: Find center of cupola and mark
lightly with pencil.
Step 5: Align marks on bottom board
with edges of top board and make a cut
line from each corner to center line.
Step 2: Measure from end of building,
find center of roof and mark.
Step 6: Cut out roof line by starting at
corners and cutting to center. Repeat
steps 4-6 on opposite side of cupola.
Note: When marking opposite side
of cupola base, make sure that front
and back board match with previous
side.
Step 8: Place cupola roof on top of
base.
Note: Remove shrink wrap from cop-
per after step 9 to protect copper
from oils on skin.
Front
Toll Free: 866.768.8465
Hours: 9-5 Monday-Friday EST
Amish Handcrafted Gazebos, Pergolas, Garden Buildings, Playhouses
Vinyl Square