LED Wall-mounted Mirror Manual 1
LED Wall-mounted Mirror Instruc�ons & Installa�on Statement Please read this instruction carefully before installation, and refer to it again during the installation to ensure a safe and correct installation of the mirror. Compliance All the electrical components used in this product are ETL LISTED. This product passed ETL certification. Electrical Safety Instructions INSTALLATION should be made by a qualified / registered electrician.
LED Wall-mounted Mirror Wiring HOMLUX supplies an about 3.6-4.3� long power cable and U.S 3-pin plug for easy connec�on with a wall socket. This product can connect the cord to the wall and be controlled by a wall switch. Cleaning When the mirror has to be cleaned, please switch off the power first. DO NOT use abrasives or solvents when cleaning. DO NOT let water get in the mirror and submerge mirror in water. Wipe off all water spillages as soon as possible via a soft, damp cloth.
LED Wall-mounted Mirror Dimming instruc�on Power on, then press to turn on. Hold will change accordingly. PVC back board Back frame Light strip Drive power supply Touch module down and the brightness Fog-free instruc�on ( For the led mirror with an�-fog func�on) Power on, press , the mirror can be defogging.
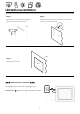
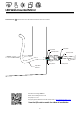
LED Wall-mounted Mirror Step 2 Step 3 Mark two dots on the wall with the length of A/B then drill holes into those marks. Place the white nylon plugs into the holes in the wall then screw the screws into the plug. Me asu Wall rem en tA Wall /B Wall Step 4 Hang the mirror to wall. Mirror ★★★ About the wire connec�on ★★★ There are two ways to connect the circuit for the mirror. Connec�on way ①: Plug the 3-pin plug in the socket on the wall.
LED Wall-mounted Mirror Connec�on way ②: Connect the mirror wire with wall switch wire via connector. Live/ Black Neutral/ white Live/ Black Neutral/ white Field Wire Earth/ Green Earth/ Green Input Wire of Mirror Thanks for choosing HOMLUX. Web: www.homluxproducts.com Tel: (800) 209-3199 Any query please feel free to email service team : help@homluxproducts.com Scan the QR code to watch the video of installa�on.
CARE AND MAINTENANCE • Please wipe the mirror with a so� dry cloth or co�on to avoid scratching the mirror. • Please avoid harsh, corrosive, and abrasive cleaners. • Keep dry and avoid damp environments. • We provide a 1-year warranty (Excludes ar�ficial damage and normal wear and tear). 1 year warranty period shall not be extended or renewed by the repair or replacement of the product/parts. If you have any problems, please feel free to contact us.