
User's Manual


7 Ambit Microsystems Corporation
Chapter 3 Adapter Installation and Configuration – Windows ® 98 / 2000
3-1
SYSTEM REQUIREMENTS
In order to install and use the T60L198 PCMCIA/T60H424 MiniPCI card your PC system must meet the following requirements:
A PCMCIA Type II or Type III slot / Type III MiniPCI slot
PCMCIA/MiniPCI revision 2.10 compliant card and socket services
Windows 98 (with the Floppy, for use during installation)
500 Kbytes free disk space for utility and driver installation
3-2 INSERTING THE ADAPTER
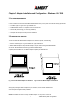
To insert the T60L198/ T60H424 Network Adapter into a notebook computer, do the following:
1. Locate an available Type II or Type III PCMCIA slot / Type III MiniPCI slot.
2. With the PCMCIA adapter’s 68-pin / MiniPCI Adapter’s 124-pin connector facing the PCMCIA/MiniPCI
slot and the “T60H424 MiniPCI” label facing up slide the PCMCIA adapter
completely into the PCMCIA slot , the MiniPCI Adapter completely into the MiniPCI slot.
Notebook with
T60L198/T60L244
PCMCIA slot
MiniPCI slot
Notebook with
T60L198/T60L244
Fig. 5.1 Insert the PCMCIA Adapter into Notebook Fig. 5.2 Insert the MiniPCI Adapter into Notebook
After properly inserting the Network Adapter into your notebook, continue with the T60H424 driver
and Lan-Express Configuration Utility installation.
NOTE: The PCMCIA slot allows “hot swap” of PCMCIA adapter. You may insert or remove the