Setup 1 For details on the operation 1 page 46 The default settings are marked with . LCD Backlight Selects the brightness of the LCD backlight when using the camera with batteries. Bright Brightens Normal • You can change the setting by pressing DISP button longer. • Selecting [Bright] uses up the battery charge faster. Beep Selects the sound produced when you operate the camera. Shutter Turns on the shutter sound when you press the shutter button.
Setup 2 For details on the operation 1 page 46 The default settings are marked with . File Number Selects the method used to assign file numbers to images. Series Assigns numbers to files in sequence even if the recording folder or the “Memory Stick Duo” is changed. (When the replaced “Memory Stick Duo” contains a file with a number higher than the last assigned number, a number one higher than the largest number is assigned.) Reset Starts from 0001 each time the folder is changed.
Setup 2 For details on the operation 1 page 46 Video Out Sets the video signal output according to the TV color system of the connected video equipment. Different countries and regions use different TV color systems. If you want to view images on a TV screen, check page 58 for the TV color system of the country or region where the camera is used. NTSC Sets the video output signal to NTSC mode (e.g., for the USA, Japan). PAL Sets the video output signal to PAL mode (e.g., for Europe).
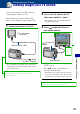
Viewing images on a TV screen Viewing images on a TV screen You can view images on a TV screen by connecting the camera to a TV. Turn off both your camera and the TV before connecting the camera and the TV. 1 Connect the camera to the TV. 2 Turn on the TV and set the TV/ video input switch to “video.” • For details, see the operating instructions supplied with the TV. 3 Press (Playback) button to turn on the camera.
Viewing images on a TV screen On TV color systems If you want to view images on a TV screen, you need a TV with a video input jack and the dedicated A/V cable. The color system of the TV must match that of your digital still camera. Check the following lists for the TV color system of the country or region where the camera is used. NTSC system Bahama Islands, Bolivia, Canada, Central America, Chile, Colombia, Ecuador, Jamaica, Japan, Korea, Mexico, Peru, Surinam, Taiwan, the Philippines, the U.S.A.
Using your computer Enjoying your Windows computer For details on using a Macintosh computer, refer to “Using your Macintosh computer” (page 76). This section describes the English version of screen contents.
Enjoying your Windows computer Vistaについて記載しますか? ご確認ください。 Recommended computer environment The following environment is recommended for a computer connected to the camera. Recommended environment for copying images OS (pre-installed): Microsoft Windows 2000 Professional, Windows XP Home Edition or Windows XP Professional • Operation is not assured in an environment based on an upgrade of the operating systems described above or in a multi-boot environment.
Installing the software (supplied) これもUSBドライバの文章でしょうか? 不要・・・? You can install the software (supplied) using the following procedure. • When using Windows 2000, do not connect the camera to the computer before installation. • In Windows 2000/XP, log on as Administrator. 1 Turn on your computer, and insert the CD-ROM (supplied) into the CD-ROM drive. The installation menu screen appears. 4 Select the [Region] and [Country/ Area], then click [Next].
Copying images to your computer ニッケル水素電池の文言に 変更致しました。 This section describes the process using a Windows computer as an example. You can copy images from the camera to your computer as follows. For a computer with a Memory Stick slot Remove the “Memory Stick Duo” from the camera and insert it in the Memory Stick Duo Adaptor. Insert the Memory Stick Duo Adaptor in the computer and copy the images.
Copying images to your computer Stage 2: Connecting the camera and your computer 1 To the (USB) · A/V OUT terminal • With Windows XP, the AutoPlay wizard appears on the desktop. “USB Mode Mass Storage” appears on the screen of the camera. Access indicators* When a USB connection is established for the first time, your computer automatically runs a program to recognize the camera. Wait for a while. Dedicated USB cable 2 To a USB jack * During communication, the access indicators turn red.
Copying images to your computer 1 After making a USB connection in Stage 2, click [Copy pictures to a folder on my computer using Microsoft Scanner and Camera Wizard] t [OK] as the wizard screen appears automatically on the desktop. 1 3 Click the check box of unwanted images to remove the checkmark so they are not copied, then click [Next]. 1 2 The “Picture Name and Destination” screen appears. 2 The “Scanner and Camera Wizard” screen appears. 2 Click [Next].
Copying images to your computer 5 Click the radio button next to [Nothing. I’m finished working with these pictures] to select it, then click [Next]. 1 Double-click [My Computer] t [Removable Disk] t [DCIM]. 1 2 The “Completing the Scanner and Camera Wizard” screen appears. 6 Click [Finish]. 2 Double-click the folder where the image files you want to copy are stored. Then, right-click an image file to display the menu and click [Copy]. The wizard screen closes.
Copying images to your computer 3 Double-click the [My Documents] folder. Then, right-click on the “My Documents” window to display the menu and click [Paste]. Stage 4: Viewing images on your computer This section describes the procedure for viewing copied images in the “My Documents” folder. 1 Click [Start] t [My Documents]. 1 2 2 The image files are copied to the “My Documents” folder.
Copying images to your computer To delete the USB connection Perform the procedures listed below beforehand when: • Disconnecting the dedicated USB cable • Removing a “Memory Stick Duo” • Inserting a “Memory Stick Duo” into the camera after copying images from the internal memory • Turning off the camera 1 Double-click Image file storage destinations and file names The image files recorded with your camera are grouped as folders on the “Memory Stick Duo”.
Copying images to your computer • Image files are named as follows. ssss stands for any number within the range from 0001 to 9999. The numerical portions of the name of a movie file recorded in movie mode and its corresponding index image file are the same. – Still image files: DSC0ssss.JPG – Movie files: MOV0ssss.AVI – Index image files that are recorded when you record movies: MOV0ssss.THM • For more information about folders, see pages 39 and 51.
Viewing image files stored on a computer with your camera (using a “Memory Stick Duo”) This section describes the process using a Windows computer as an example. When an image file copied to a computer no longer remains on a “Memory Stick Duo”, you can view that image again on the camera by copying the image file on the computer to a “Memory Stick Duo”. • Step 1 is not necessary if the file name set with your camera has not been changed.
Using the “Picture Motion Browser” (supplied) You can use still images and movies from the camera more than ever by taking advantage of the software. This section summarizes the “Picture Motion Browser” and gives the basic instructions. • The confirmation message of the Information tool appears on the screen when starting the “Picture Motion Browser” for the first time. Select [Start]. This function informs you of news, such as software updates. You can change the setting later.
Using the “Picture Motion Browser” (supplied) 2 Connect the camera to your computer with the dedicated USB cable. After the camera is automatically detected, the [Import Images] screen is displayed. Viewing images 1 Checking imported images When importing is complete, the “Picture Motion Browser” starts. Thumbnails of the imported images are displayed. • The “My Pictures” folder is set as the default folder in “Viewed folders”. • You can double-click a thumbnail to display the image by itself.
Using the “Picture Motion Browser” (supplied) Year display screen 1 2 3 Displaying individual images On the hour display screen, double-click a thumbnail to display the image by itself in a separate window. 3 Month display screen 4 • You can edit displayed images by clicking the toolbar button. Displaying images in full-screen mode Hour display screen • To list images from a particular year or month, click that period on the left of the screen.
Using the “Picture Motion Browser” (supplied) Creating a data disc Images can be saved in CD or DVD as a data disc. • CD burner drive or DVD burner drive required. • The following disc can be used for creating a data disc. –CD–R/RW (12 cm) –DVD±R/RW (12 cm) –DVD+R DL (12 cm) 1 Select images to save on the disc. • To select consecutive images, click the first image, then press and hold down “Shift” key while you click the last image.
Using the “Picture Motion Browser” (supplied) Other functions Preparing images stored on the computer for viewing To view them, register the folder that contains the images as one of the “Viewed folders”. 1 Choose [Import Settings] t [Location for Imported Images] from the [File] menu. The “Location for Imported Images” screen is displayed. 1 Click on the main screen, or choose [Register Folders to View] from the [File] menu. The settings screen for “Viewed folders” registration is displayed.
Using the “Picture Motion Browser” (supplied) To uninstall the “Picture Motion Browser” 1 Click [Start] t [Control Panel] (in Windows 2000, [Start] t [Settings] t [Control Panel]), then double-click [Add/ Remove Programs]. 2 Select [Sony Picture Utility], then click [Remove] (in Windows 2000, [Change/ Remove]) to execute the uninstallation.
Using your Macintosh computer You can copy images to your Macintosh computer. • “Picture Motion Browser” is not compatible with Macintosh computers. Recommended computer environment The following environment is recommended for a computer connected to the camera. Recommended environment for copying images OS (pre-installed): Mac OS 9.1/9.2/ Mac OS X(v10.1 to v10.
Using your Macintosh computer To delete the USB connection Perform the procedures listed below beforehand when: • Disconnecting the dedicated USB cable • Removing a “Memory Stick Duo” • Inserting a “Memory Stick Duo” into the camera after copying images from the internal memory • Turning off the camera Drag and drop the drive icon or the icon of the “Memory Stick Duo” to the “Trash” icon. The camera is disconnected from the computer.
Printing still images How to print still images When you print images shot in [16:9] mode, both edges may be cut off, so be sure to check before printing (page 92). Printing directly using a PictBridge compliant printer (page 79) You can print images by connecting the camera directly to a PictBridge compliant printer. Printing directly using a “Memory Stick” compliant printer You can print images with a “Memory Stick” compliant printer.
Printing images directly using a PictBridge ニッケル水素電池の文言に変更 compliant printer 致しました。 Even if you do not have a computer, you can print images shot using your camera by connecting the camera directly to a PictBridge compliant printer. Stage 1: Preparing the camera Prepare the camera to connect it to the printer with the dedicated USB cable. Index button • “PictBridge” is based on the CIPA standard.
Printing images directly using a PictBridge compliant printer Stage 2: Connecting the camera to the printer 1 Connect the camera to the printer. Stage 3: Printing Regardless of what the mode dial is set to, the print menu appears when you complete Stage 2. 1 Select the desired printing 2 To the (USB) · A/V OUT terminal method with v/V on the control button, then press z. [All In This Folder] Prints all the images in the folder.
Printing images directly using a PictBridge compliant printer 2 Select print settings with v/V/b/B. 3 Select [OK] with V/B, then press z. The image is printed. • Do not disconnect the dedicated USB cable while the (PictBridge Connecting) indicator appears on the screen. [Index] indicator Select [On] to print as an index image. [Size] Select the size of the printing sheet. [Date] Select [Day&Time] or [Date] to insert the date and time on images.
Printing images directly using a PictBridge compliant printer [Select] Selects images and prints all the selected images. Select the image you want to print with v/ V/b/B, then press z to display the mark. (Repeat this procedure to select other images.) Then, press MENU. [DPOF image] Prints all the images with a (Print order) mark regardless of the displayed image. [All In This Folder] Prints all the images in the folder. 5 Perform steps 2 and 3 of “Stage 3: Printing” (page 80).
Printing at a shop You can take a “Memory Stick Duo” containing images shot with your camera to a photo printing service shop. As long as the shop supports photo printing services conforming to the DPOF, you can make a (Print order) mark on images in advance so that you do not need to reselect them when you print them out at the shop. • You cannot print images stored in the internal memory at a print shop directly from the camera.
Printing at a shop To cancel, select [Cancel] in step 4 or select [Exit] in step 8, then press z. Marking in index mode To remove the mark in index mode 1 Display the index screen Select the images from which you want to remove the mark in step 5, then press z. (page 29). 2 Press MENU to display the menu. 3 Select DPOF with b/B, then press z. 4 Select [Select] with v/V, then press z. • You cannot add a Folder]. mark in [All In This 5 Select the image you want to mark with v/V/b/B, then press z.
Troubleshooting Troubleshooting If you experience trouble with your camera, try the following solutions. 1 Check the items on pages 86 to 94. 2 Remove the batteries, and insert the batteries again after about one minute, and turn on the power. 3 Initialize the settings (page 54). 4 Consult your Sony dealer or local authorized Sony service facility. Please understand that you give your consent that the contents of the internal memory may be checked when you send your camera to be repaired.
Troubleshooting [new batteries]を 削除致しました 追加致しました。 Batteries and power The battery remaining indicator is incorrect, or sufficient battery remaining indicator is displayed but the power runs out too quickly. • This phenomenon occurs when you use the camera in an extremely hot or cold location. • When using alkaline batteries (not supplied)/Oxy Nickel Primary Battery (not supplied), the displayed time remaining may not be correctly indicated. • The batteries are discharged.
Troubleshooting 数値変更致しました。 Shooting still images/movies Your camera cannot record images. • Check the free capacity of the internal memory or “Memory Stick Duo”. If it is full, do one of the following: – Delete unnecessary images (page 28). – Change the “Memory Stick Duo”. • You are using the “Memory Stick Duo” with the write-protect switch, and the switch is set to the LOCK position. Set the switch to the recording position (page 98). • You cannot record images while charging the flash.
Troubleshooting The close-up shoot function (Macro) does not work. • (Twilight mode) or (Landscape mode) is selected in the Scene mode (page 27). The date and time are not displayed. • While shooting, the date and time are not displayed. They are displayed only during playback. Cannot insert dates on images. • This camera does not have a feature for superimposing dates on images (page 93). You can print or save images with the date inserted using “Picture Motion Browser” (page 74).
[new batteries]削除 致しました。 Troubleshooting [(not supplied)]削除 致しました。 Dots appear and remain on the screen. • This is not a malfunction. These dots are not recorded (page 2). Cannot shoot images in succession. • The internal memory or “Memory Stick Duo” is full. Delete unnecessary images (page 28). • The battery level is low. Install the charged Nickel-Metal Hydride batteries. Viewing images Your camera cannot play back images. • Press (Playback) button (page 28).
Troubleshooting [(not supplied)]削除致しました。 [new batteries]削除致しました。 The resizing function does not work. • You cannot resize movies. Computers You do not know if the OS of your computer is compatible with the camera. • Check “Recommended computer environment” on page 60 for Windows, and page 76 for Macintosh. “Memory Stick PRO Duo” is not recognized by a computer with a “Memory Stick” slot. • Check that the computer and the Memory Stick Reader/Writer support “Memory Stick PRO Duo”.
Troubleshooting The image cannot be played back on a computer. • If you are using “Picture Motion Browser,” refer to the Help. • Consult the computer or software manufacturer. The image and sound are interrupted by noise when you view a movie on a computer. • You are playing back the movie directly from the internal memory or the “Memory Stick Duo”. Copy the movie to the hard disk of your computer, then play back the movie from the hard disk (page 62). You cannot print an image.
Troubleshooting “Memory Stick Duo” Cannot insert a “Memory Stick Duo”. • Insert it in the correct direction. Cannot format a “Memory Stick Duo”. • You are using the “Memory Stick Duo” with the write-protect switch, and the switch is set to the LOCK position. Set the switch to the recording position (page 98). You have formatted a “Memory Stick Duo” by mistake. • All the data on the “Memory Stick Duo” is deleted by formatting. You cannot restore it.
Troubleshooting Cannot print images with the date inserted. • You can print images with the date inserted using “Picture Motion Browser” (page 74). • This camera does not have a feature for superimposing dates on images. However, because the images shot with the camera include information on the recording date, you can print images with the date superimposed if the printer or the software can recognize Exif information.
Troubleshooting Cannot select the print size. • Consult the printer manufacturer as to whether the printer can provide the desired size. Cannot print the image at the size selected. • Disconnect the dedicated USB cable and reconnect it whenever you change the paper size after the printer has been connected to the camera. • The print setting of the camera differs from that of the printer. Change the setting of either the camera (page 81) or the printer.
Warning messages 文言変更しております。 ご確認ください。 Messages If the following messages appear, follow the instructions. E Memory Stick locked • You are using the “Memory Stick Duo” with the write-protect switch, and the switch is set to the LOCK position. Set the switch to the recording position (page 98). • The battery level is low. Charge the Nickel-Metal Hydride batteries immediately.
Warning messages Cannot record Connect to PictBridge device • The camera cannot record images in the • You tried to print images before the selected folder. Select a different folder (page 52). printer connection was established. Connect to a PictBridge compliant printer. File error • An error occurred while the image was playing back. File protect • Release the protection (page 41). No printable image • You tried to execute [DPOF image] without placing a DPOF (Print order) mark on the image(s).
Others To use your camera abroad — Power sources You can use your camera, the AC-LS5K AC Adaptor (not supplied) in any country or region where the power supply is within 100 V to 240 V AC, 50/60 Hz. • Do not use an electronic transformer (travel converter), as this may cause a malfunction.
On the “Memory Stick” A “Memory Stick” is a compact, portable IC recording medium. The types of “Memory Stick” that can be used with this camera are listed in the table below. However, proper operation cannot be guaranteed for all “Memory Stick” functions.
On the “Memory Stick” • Do not use or store the “Memory Stick Duo” under the following conditions: – High temperature locations such as the hot interior of a car parked in direct sunlight – Locations exposed to direct sunlight – Humid locations or locations with corrosive substances present • Do not leave the “Memory Stick Micro” within the reach of small children. They might accidentally swallow it.
On the batteries [On alkaline batteries]の項目を 最後尾に移動致しました。 上下入替と米印の注記番号変更致しました。 ご確認ください。 Batteries you can and cannot use with your camera Battery type A B C HR 15/51:HR6 (size AA) Nickel-Metal Hydride batteries*1*2 a a a LR6 (size AA) alkaline batteries*2 — a — ZR6 (size AA) Oxy Nickel Primary Battery*2 — a — Lithium batteries — — — Manganese batteries — — — Ni-Cd batteries — — — • A: supplied B: supported C: rechargeable *1 • • Effective use of Nickel-Metal Hydride batteri
On the batteries Battery life of Nickel-Metal Hydride batteries • The battery life is limited. The battery capacity decreases little by little as you use it more and more, and as time passes. When the battery operating time seems to have been considerably shortened, a probable cause is that the batteries have reached the end of their life. • The battery life varies depending on storage,operating conditions, and environment, and is different for each battery.
On the battery charger [バッテリーチャージャー]の項目 追加致しました。ご確認ください。 1ページ追加しております。 On the battery charger • Do not charge any other batteries except Sony Nickel-Metal Hydride batteries in the battery charger supplied with your camera. If you try to charge any other type of battery (e.g.,manganese batteries, alkaline batteries, primary lithium batteries, or Ni-Cd batteries) than the batteries specified, those batteries may leak, overheat, or explode, causing the danger of burns or other injuries.
Index Index 索引 四角枠内の文言を追加しており ます。ご確認ください。 A Computer.............................. 59 Flash forced off.....................21 AC Adaptor...........................11 Copying images ...... 62, 76 Flash forced on .....................21 Adjusting EV ........................23 Macintosh...................... 76 Flash Level............................38 AE/AF lock indicator............19 Recommended environment ............ 60, 76 Flash mode............................21 Software ................
Index M Print order mark ................... 83 Slide Show............................ 42 Macintosh computer .............76 Printing at a shop ................. 83 Slow synchro ........................ 21 Recommended environment...................76 Printing directly ................... 79 Smart zoom .......................... 47 Program Auto mode............. 18 Snow mode ...........................26 Macro....................................21 Protect ..................................
Additional information on this product and answers to frequently asked questions can be found at our Customer Support Website.
FCC Compliance Statement: This device complies with part 15 of the FCC Rules. Operation is subject to the following two conditions: (1) This device may not cause harmful interference, and (2) This device must accept any interference received, including interference that may cause undesired operation. This product has been tested and complies with the specifications for a Class B digital device, pursuant to Part 15 of the FCC Rules.