Owner’s Manual EG1400X l EG2200X
Thank you tor purchasing a Honda generator. This manual covers operation and maintenace of EG1400X and EG2200X generators. All information in this publication is based on the latest product information available at the time of approval for printing. Honda Motor Co., Ltd. reserves the right to make changes at any time without notice and without incurring any obligation.
CONTENTS CONTENTS :: 3. 4. 5. 6. ;: 9. 10. 11. 12. 13. 2 CAUTION LABEL LOCATION ......................... GENERATOR SAFETY ............................... COMPONENT IDENTIFICATION ........................ PRE-OPERATION CHECK ............................ STARTING THE ENGINE ............................. l High altitude operation. ............................. GENERATOR USE .................................. STOPPING THE ENGINE ............................. MAINTENANCE ....................................
1 .CAUTION CARBON )XIIIE POISON,NG, MONOXIOE CAUTION ROT USE lNo00RS (a I LABEL LABEL DUE TO OAffiER Of CAGGON NE PAS UTILISER OANS UN ENOROll fERME A CAUSE OU OU GAZ.
2.GENERATOR To ensure safe operation l l l l l l l l SAFETY - Place the generator at least 1 m (3 ft) away from buildings or other equipment during operation. Operate the generator on a level surface. If the generator is tilted, fuel spillage may result. Exhaust gas contains poisonous carbon monoxide. Never run the generator in an enclosed area. Be sure to provide adequate ventilation. Know how to stop the generator quickly and understand operation of all the controls.
3,COMPONENT IDENTIFICATION DC CIRCUIT BREAKER STARTER GRIP OIL FILLER CAP 5
FUEL 6 FILLER CAP MUFFLER
4.PRE-OPERATION CAUTION: stopped. Be sure to check the generator CHECK on a level surface with the engine 1. Check the engine oil level. CAUTION: Engine oil is a major factor affecting engine performance service life. Nondetergent or vegetable oils are not recommended. and Use Honda 4-stroke oil, or an equivalent high detergent, premium quality motor oil certified to meet or exceed U.S. automobile manufacturers’ requirements for Service Classification SG,SF/CC,CD.
2. Check the fuel level Remove the filler cap and check the fuel level. Refill the tank if the fuel level is low. Your engine is designed to use any gasoline that has a pump octane number (y) of 86 or higher, or that has a research octane number of 91 or higher. Gasoline pumps at service station normally display the pump octane number. We recommend that you use unleaded fuel because it produces fewer engine and spark plug deposits and extends the life of exhaust system components.
l l l l l Gasoline is extremely flammable and is explosive under certain conditions. Refuel in a well-ventilated area with the engine stopped. Do not smoke or allow flames or sparks in the area where the engine is refueled or where gasoline is stored. Do not overfill the fuel tank (there should be no fuel in the filler neck.) After refueling, make sure the tank cap is closed properly and secureIY. Be careful not to spill fuel when refueling. Spilled fuel or fuel vapor may ignite.
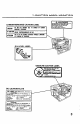
5.STARTING (1) THE ENGINE Disconnect any load from the DC terminals and make sure that the AC circuit breaker is in the OFF position. mil ON (2) Turn on the fuel valve, (3) Turn on the engine switch.
(4) Move the choke lever totheCLOSED position. (5) Pull the resistance starter rope is felt, then lightly until pull briskly. CAUTION: Do not allow the starter grip to snap back. Return it slowly by hand. (6) Move the choke lever to the OPEN position as the engine warms up.
Oil Alert System Before the oil level in the crankcase can fall below a safe limit, the Oil Alert System will automatically shut off the engine. The Oil Alert Lamp will then light when the recoil starter grip is pulled to indicate that oil must be added to the crankcase. To restart, add enough recommended engine oil to bring the oil level to the upper level mark on the dipstick (See page 7). and restart the engine. OIL ALERT LAMP ENGINE NOTE: stopped The engine switch will by the Oil Alert System.
6.GENERATOR l l USE To prevent elecrical shock from faulty appliances, the generator should be grounded. Connect a length of heavy wire between the generator’s ground terminal and an external ground source. Connections for standby power to a building’s electrical system must be made by a qualified electrician and must comply with all applicable laws and electrical codes. Improper connections can allow electrical current from the generator to backfeed into the utility lines.
AC applications 1. Start the engine and plug in the appliance; 2. Switch on the AC Circuit Breaker. always use three-pronged plugs. CAUTION: Substantial overloading will switch off the circuit breaker. Marginal overloading may not switch off the circuit breaker, but it will shorten the service life of the generator. Be sure that all appliances are in good working order before connecting them to the generator.
DC application The DC terminals only. may be used for charging 12 volt automotive-type batteries The battery gives off explosive gases; keep sparks, flames and cigarettes away. Provide adequate ventilation when charging or using batteries in an enclosed space. l The battery contains sulfuric acid (electrolyte). Contact with skin or eyes may cause severe burns. Wear protective clothing and a face shield. -. If electrolyte gets on your skin, flush with water.
CAUTION: Do not attempt to start an automobile engine while the generator is still connected to the battery. The generator may be damaged. l Connect the positive battery terminal to the positive generator terminal. Do not reverse the charging cables, or serious damage to the generator and/or battery may occur. l NOTE : The DC terminals may be used while the AC power is in use. l An overloaded DC circuit will trip the DC circuit protector (push button comes out).
7.STOPPlNG (1) Turn off the AC circuit disconnect any charging DC terminals. breaker and leads at the (2) Turn the engine position. to the OFF switch (3) Turn the fuel valve to the OFF position.
8.MAINTENANCE The purpose of the maintenance and adjustment schedule generator in the best operating condition. Inspect or service as scheduled in the table on the next page. is to keep the w Shut off the engine before performing any maintenance. If the engine must be run, make sure the area is well ventilated. The exhaust contains poisonous carbon monoxide gas. CAUTION: placement generator. Use genuine parts which HONDA are not parts or their of equivalent equivalent.
Maintenance REGULAR Schedule SERVICE .Perform at every indicated month or operating hour interval, Daily First month or 20 Hrs. Every 3 months or 50 Hrs. Every 6 months or 100 Hrs. Every year or 300 Hrs.
Changing oil Drain the oil while draining. the engine is still warm to assure rapid and complete 1. Remove the drain plug and filler cap, and drain the oil. Retighten securely. 2. Refill with the recommended oil (see page 7) and check the level. OIL CAPACITY: the plug 0.6 P (0.63 USqt) OIL DRAIN PLiJG \ OIL FILLER CAP CAUTION: Used motor oil may cause skin cancer if repeatedly left in contact with the skin for prolonged periods.
Air cleaner service A dirty air cleaner will restrict air flow to the carburetor. To prevent carburetor malfunction, service the air cleaner regularly (page 19). Service more frequently when operating the generator in extremely dusty areas. N Never use gasoline or low flash point cleaner element. A fire or explosion could result. CAUTION: Never wear will result. run the genetrator without 1. Remove the wing nut and the air cleaner cover. Remove the elements and separate them.
Sediment cup The sediment cup prevents dirt or water which may be in the fuel tank from entering the carburetor. If the engine has not been run for a long time, the cup should be cleaned. 1. Turn the fuel valve OFF. Remove the sediment 2. Clean the cup thoroughly. 3. Reassemble. Do not damage the rubber gasket. cup. m After installing the sediment cup, check for fuel leaks and make sure the area is dry before starting the engine.
Spark plug service Recommended spark plug: BPGES, BPRGES (NGK) W20EP-U, W20EPR-U (ND) To ensure proper engine operation, and free of deposits. w careful the spark plug must be properly If the engine has been running, not to touch the muffler. the muffler will gapped be very hot. Be 1. Remove the spark plug cap. 2. Clean any dirt from around the spark plug base. 3. Use the wrench supplied in the tool kit to remove the spark plug. PLUG CAP 4. Visually chipped. 5.
6. Attach the plug washer threading. and thread the plug in by hand to prevent cross 7. After a new spark plug has been seated by hand, it should be tightened l/2 turn with a wrench to compress its washer. If a used plug is being reinstalled, it should only require l/8 to l/4 turn after being seated. CAUTION: l The spark plug must be securely tightened. An improperly tightened can become very hot and could possibly damage the generator. l Never use a spark plug with an improper heat range.
Spark arrester w Allow maintenance. If the generator has been running, it to cool before proceeding. CAUTION: The spark arrester its efficiency. must be serviced the muffler every will be very hot. 100 hours to maintain 1. Loosen 0 two 8 mm nuts and @ 8mm bolt to remove the @ muffler assembly. 2. Loosen @ four 5 mm screws and remove the 0 muffler protector from the muffler. 3. Loosen@ 4 mm screw and remove @ spark arrester from the muffler. NOTE : Take care not to damage the wire mesh. 4.
, 9.TRANSPORTING/STORAGE m When transporting the generator, turn the engine switch and the fuel valve OFF and keep the generator level to prevent fuel spillage. Fuel vapor or spilled fuel may ignite. Before storing the unit for an extended period: 1. Be sure the storage area is free of excessive humidity and dust. 2. Drain the fuel a. With the fuel valve OFF, remove and empty the sediment cup. b. Turn the fuel valve ON and drain the gasoline in the fuel tank into a suitable container. c.
lO.TROUBLESHOOTING When the engine will not start: Is the fuel valve on? NO Refill the fuel tank. NO Turn the engine NO Turn the fuel NO (The oil alert lamp goes on when pulling the starter grip) in the engine? YES y$hge !?!Z!re is no spilled fuel around the spark plug. Spilled fuel may ignite. YES Add the recom- pE?zE%...~~ 1) Remove the spark plug cap and and clean any dirt from around the spark plug. 2) Remove the spark plug and install the spark plug in the plug cap.
No electricity at the AC receptacles: Is the AC circuit breaker on? I I NO Turn the AC circuit breaker on. YES t Check the electrical appliance or equipment for any defects NO DEFECTS + Take the generator to an authorized HONDA dealer. . - Replace the electrical appliance or equipment. - Take the electrical appliance or equipment to an electr ical shop for repair. I / No electricity 28 DEFECTS at the DC terminals: NO Turn the DC circuit breaker on.
,, ,, B ,,,,,,>,,, ,, ,, ,, ,, GENERATOR BLOCK . . . . . BLACK Br . . . . . BROWN G . . . . . GREEN Gr . . . . . GRAY _-.-.-.-_ ,, ,, I L Lb Lg R ,,,,,,,, I r. ,,, ,, ,, . . . . . BLUE . . . . . LIGHT . . .. . LIGHT . . . ..REO 0 ,,, BLUE GREEN ,, ,/ ,,, AC. CIRCUIT BREAKER W . . . . . WHITE Y . . . . . YELLOW CONTROL BOF 1 ,,,“, _~.-.-. ENGINE BLOCK .--.~.
lZ.SPECIFICATIONS Dimensions Length x Width x Height Dry Weight EG1400X EG2200X 475 x 390 x 400 mm (18.7 x 15.4 x 15.7 in) 505x410x415mm (19.9 x 16.1 x 16.3 in) 31.0 kg (68.4 lb) 37.0 kg (81.6 lb) Engine Model Engine Type HONDA HONDA GX140 O.H.V. 1 cylinder (25O tilted) 107 cm3 (6.6 cu.in) 144 cm3 (8.8 cu.in) 57 x 42 cm (2.2 x 1.7 in) 64 x 45 cm (2.5 x 1.8 in) 8.
13.WARRANTY Owner SERVICE Satisfaction Your satisfaction and goodwill are important to your dealer and to us. All Honda warranty details are explained in the Distributor’s Limited Warranty. Normally, any problems concerning the product will be handled by your dealer’s service department. If you have a warranty problem that has not been handled to your satisfaction, we suggest you take the following action: l l Discuss your problem with a member of dealership management.
MEMO 32