Thank you for purchasing a Honda engine. This manual covers the operation and maintenance of GXV120 and GXVl60 engines. All information in this publication is based on the latest product information available at the time of printing. The illustrations in this mannal are based on the GXVl20 engine. Honda Motor Co., Ltd. reserves the right to make changes at any time without notice and without incurring any obligation.
, CONTENTS 1. 2. 3. 4. 5. 6. 7. 8. 9. 10. 11. SAFETY INSTRUCTIONS . . . . . . . . . . . . . . . . . . . . . . . . . . . . . . . . . . . . . . . . . . . . . . . . . . . . . . . COMPONENT IDENTIFICATION . . . . . . . . ..a................................... BATTERY CONNECTIONS (for electric starter) . . . . . . . . . . . . . . . . . . . . . . . . . . PRE-OPERATION CHECK . . . . . . . . . . . . . . . . . . . . . . . . . . . . . . . . . . . . . . . . . . . ...’ . . . . . . . . . STARTING THE ENGINE . . . . .
1. SAFETY INSTRUCTIONS m To ensure safe operation - To prevent fire hazards and to provide adequate ventilation, keep the engine at least 3 ft away from buildings and other equipment during operation. Do not place flammable objects such as gasoline, matches, .etc., close to the engine while it is running. Refuel in a well-ventilated area with the engine stopped. Gasoline is flammable and explosive under certain conditions. Do not overfill the tank. There should be no fuel in the filler neck.
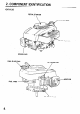
2. COMPONENT GXVI IDENtlFlCATlON 20 RECOIL STARTER SPAKE PLUG FUEL FILLER CAP .
GXV160 STARTER GRIP RECOL STARTER SPARK.
I 3. BATTERY / CONNECTIONS (for electric Use a 12 volt battery with an ampere-hour Connect the battery positive shown. starter) rating of at least 8 AH. (3-j cable to the starter solenoid terminal Connect the battery negative (-1 cable to an engine mounting bolt, or other good engine ground connection. as bolt, frame Check the battery cable connections to be sure the cables are secured and free of corrosion. Remove any corrosion and coat the terminals and cable ends with grease. l l l .
4. PRE-OPERATION CHECK 1. ENGINE OIL CAUTION: l Engine oil is a major factor affecting engine performance and service life. Non-detergent oils and vegetable oils are not recommended. l Be sure to check the engine on a level surface with the engine stopped. Use Honda 4-stroke oil or an equivalent high-detergent, premium quality motor oil certified to meet or exceed U.S. automobile manufacturer’s requirements for Service Classification SE or SF.
2. AIR CLEANER Check the air cleaner elements to be sure they are clean and in good condition. Clean or replace the elements if necessary (page 17). CAUTION: Never wear will result. run the engine PAPER ELEMENT FOAM ELEMENT 8 without the air, cleaner.
3. FUEL Your engine is designed to use any gasoline that has a pump octane of 86 or higher, or that has a research ocnumber I” 9) tane number of 91 or higher. Gasoline pumps at service station normally display the pump octane number. We recommend that you use unleaded fuel because it produces fewer engine and spark plug deposits and extends the life of exhaust system components. Never use stale or contaminated gasoline or an oil/gasoline mixture. Avoid getting dirt, dust, or water in the fuel tank.
GASOLINES CONTAINING AQqOHOL If you decide to use a gasoline containing alcohol (gasohol), be sure it’s octane rating is at least as high as that recommended by Honda. There are two types of “gasohol”: one containing ethanol, and the other containing methanol. Do not use gasohol that contains more than 10% ethanol. Do not use gasoline containing methanol (methyl or wood alcohol) that does not also contain cosolvents and corrosion inhibitors for methanol.
5. STARTING THE ENGINE 1. Turn the fuel valve to the ON position. \ (GXVI h (GXVI 20) 60) 2. Move the control lever to the CHOKE position. Do.not use the choke if the engine is warm or the ambient temperature high.
l With recoil starter: Pull the starter grip lightly until resistance is felt, then pull briskly. CAUTION: Do not allow the starter grip to snap back against Return it gently to prevent damage to the starter. l the engine. With electric starter: Turn the engine switch to the START position and hold it there until the engine starts. NOTE: Do not use the electric starter for more than 5 seconds at a time.
6. OPERATION When the engine warms up, move the control lever from the CHOKE position to the operating position for the desired engine speed.
I 7. STOPPING I THE ENGINE 1. Move the control lever to the STOP position. 2. Turn the fuel valve to the OFF position.
8. MAINTENANCE The purpose of the maintenance and adjustment schedule is to keep the engine in good operating condition. Inspect or service as scheduled in the table below. m Shut off the engine before performing any maintenance. If the engine must be run, make sure the area is well ventilated. The exhaust contains poisonous carbon monoxide gas. I CAUTION: replacement engine. Maintenance Valve clearance Fuel tank strainer Fuel line NOTE: and Use only genuine HONDA parts or their equivalent.
1. Oil change Drain the oil while the engine is still warm to assure rapid and complete draning. 1. 2. 3. 4. Remove the oil filler cap and drain plug to drain the oil. Install the drain plug and tighten it securely. Refill with the recommended oil (see page 7) and check the oil level. Install the oil filler cap. ENGINE OIL CAPACITY: GXV120 GXV160 0.6 ! (0.63 US qt, 0.53 Imp qt) 0.65 P (0.69 US qt. 0.
2. Air cleaner service A dirty air cleaner will restrict air flow to the carburetor. To prevent carburetor malfunction, service the air cleaner regularly. Service more frequently when operating the engine in extremely dusty areas. m air cleaner Never use gasoline or low flash ‘point solvents element. A fire or explosion could result. CAUTION: Never wear will result. run the engine without 1. Remove the wing nut and the air cleaner cover. Remove the elements and separate them.
, , 4. Spark plug service Recommended CAUTION: spark plug: Never BP5ES, BPRSES (NGK) WlGEP-U, WlGEPR-U (ND) use a spark plug of incorrect heat range. To ensure proper engine operation, the spark plug must be properly gapped and free of deposits. 1. Remove the spark plug cap,and use a spark plug wrench to remove the plug. Emm careful If the engine has been running, not to touch the muffler. the muffler will be very hot. Be 2. Visually inspect the spark plug.
4. Check that the spark plug washer is in good condition spark plug in by hand to prevent cross-threading. and thread the 5. After the spark plug is seated, tighten with a spark plug wrench to compress the washer. NOTE: When installing a new spark plug, tighten l/2 turn after the spark plug seats to compress the washer. When reinstalling a used spark plug, tighten l/8- 114 turn after the spark plug seats to compress the washer. CAUTION: The spark plug must be securely tightened.
5. Spark arrester maintenance (optional cmm Allow part) If the engine has belen running, it to cool before proceeding. the-muffler will be very hot. 1; Loosen the three 6 mm nuts and remove the muffler protector, identification plate, muffler and gasket. 2. Remove the sparkarrestor from the muffler (take care not to demage the wire mesh). IDENTIFICATION PLATE (OPTIONAL PART1 MUFFLER PROTECTOR / SPARK ARRESTER (OPTIONAL PART) GASKET (OPTIONiL PART) 3.
6. Carburetor adjustment 1. Start the engine and allow it to warm up to temperature. 2. With the engine idling, turn the pilot screw in or out produces the highest idle rpm. The correct setting proximately 3 turns out (GXV120), 2-l/8 (GXV160) fully closed position. CAUTION: Do not tighten the pilot screw or seat. the pilot screw PILOT against normal to the setting that will usually be apturns out from the its seat; this will damage SCREW 3.
I 9. TRANSPORTliVGlSiORAGE m When transporting position and keep the engine spilled fuel may ignite. the engine, turn the fuel valve to the OFF level to prevent fuel spillage. Fuel vapor or Before storing the unit for an extended period; 1. Be sure the storage area is free of excessive humidity and dust. 2. Drain the fuel tank and carburetor into a suitable gasoline container: a. Remove the fuel tube and drain the fuel tank. b. Loosen the carburetor drain bolt to drain the carburetor. c.
1 10. TROUBLESHOOTING Engine will not start using recoil starter: 1. Is the control lever in the CHOKE position? 2. Is the fuel valve ON? 3. Is there fuel in the fuel tank? 4. Is gasoline reaching the carburetor? To check, loosen the drain screw with the fuel valve on. Ewm If any fuel is spilled, make sure the area is dry before testing the spark plug or starting the engine. Fuel vapor or spilled fuel may ignite. DRAIN SCREW 5. Is there a spark at the spark plug? a. Remove the spark plug cap.
Engine will not start using electric starter: 1. Are the battery cables securely connected and free of corrosion? 2. Is the battery fully charged! 3. If the starter moter operates but the engine will not start, follow the troubleshooting procedures described under recoil start& operation.
11. SPECIFICATIONS GXVI Dimensions Length x Width x Height I GXVl20D1 375 x 355 x 335 mm (14.8 x 14.0 x 13.2 in) 1 12.1 Dry weight 20A1 kg (26.7 lb) - I I 1 12.6 kg (27.8 lb) Engine Engine 4-stroke, type overhead valve, single Displacement [Bore x Stroke1 118 cc (7.2 cu in) [60 x 42 mm (2.4 x 1.7 in)1 Max. output 4.0 HP/3,600 Max. torque 0.82 rpm kg-m (5.93 ft-lb)/2,700 Fuel consumption 250 g/HPh (0.
GXV160 Dimensions I Power Length equipment x Width description I I GJ03 x Height I 435 x 345 x 355 mm (17.1 x 13.6 x 14.0 in) Dry weight 15.5 kg 134.17 lb) Engine Engine 4-stroke, type overhead valve, single Displacement [Bore x Stroke1 163 cc (9.‘9 cu in) 168 x 45 mm (2.7 x 1.8 in)1 Max. output 5.5 HP/3,600 Max. toraue 1 .I kg-m Fuel consumption Cooling (7.96 250 g/HPh system Forced rpm ft-lb)/2,500 (0.
’ @High altitude operation At high altitude, the standard carburetor air-fuel mixture will be excessively rich. Performance will decrease, and fuel consumption will increase. High altitude performance can be improved by installing a smaller diameter main fuel jet in the carburetor and readjusting the pilot screw. If you always operate the engine at altitudes higher than 6,000 feet above sea level, have your authorized Honda Engine dealer perform these carburetor modifications.
12. WARRANTY Owner SERVICE Satisfaction Your satisfaction and goodwill are important to your dealer and to us. All Honda warranty details are explained in the Distributor’s Limited Warranty. Warranty service is available at any dealership displaying the Honda Power Equipment Engines sign. To locate dealers in your area, look in the yellow pages of your telephone directory under Gasoline Engines, Garden & Lawn Equipment & Supplies, Lawn Mowers, etc.
Current customer service contact information: Servicing dealership personnel are trained professionals. They should be able to answer any question you may have. If you encounter a problem that your dealer does not solve to your satisfaction, please discuss it with the dealership's management. The Service Manager, General Manager, or Owner can help. Almost all problems are solved in this way. United States, Puerto Rico, and U.S.