
Automobile Parts User Manual


−
−−
−
−
ENGLISH
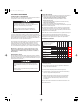
AIR CLEANER SPARK PLUG
Inspection
Cleaning
Recommended Spark Plugs:
LOWER TABS
AIR CLEANER BODY
FILTER ELEMENT
SPARK PLUG CAP
UPPER TABS
AIR CLEANER COVER
SPARK PLUG WRENCH
SIDE ELECTRODE
SEALING
WASHER
0.60 0.70 mm
(0.024 0.028 in)
9
Reinstall the filter element and air cleaner cover securely.
If the filter element is dirty, clean it as described on this page.
Replace the filter element if it is damaged.
Operating the engine without an air filter, or with a damaged air
filter, will allow dirt to enter the engine, causing rapid engine wear.
This type of damage is not covered by the
Distributor’s Limited
Warranty.
A dirty air cleaner will restrict air flow to the carburetor, reducing
engine performance. If you operate the engine in very dusty areas,
clean the air filter more often than specified in the MAINTENANCE
SCHEDULE.
CR5HSB (NGK)
Press the upper latch tab on the top of the air cleaner cover, and
remove the cover. Check the filter element to be sure it is clean
and in good condition.
Clean the filter element in warm soapy water, rinse, and allow to
dry thoroughly. Or clean in non-flammable solvent and allow to
dry.
Dip the filter element in cleanengine oil, then squeeze outall
excess oil. The engine will smoke when started if too much oil is
left in the foam.
Wipe dirt from the air cleaner body and cover, using a moist rag.
Be careful to prevent dirt from entering the carburetor.
For good performance, the spark plug must be properly gapped
and free of deposits.
An incorrect spark plug can cause engine damage.
The recommended spark plug has the correct heat range for
normal engine operating temperatures.
Disconnect the spark plug cap, and remove any dirt from around
the spark plug area.
Remove the spark plug with a 5/8-inch spark plug wrench.
Inspect the spark plug.
Replace it if damagedor
badly fouled, if the sealing
washer is in poor condition,
or if the electrode is worn.
Measure the spark plug
electrode gap with a wire-
type feeler gauge. Correct the
gap, if necessary, by carefully
bending the side electrode.
The gap should be:
Install the spark plug carefully,
by hand, to avoid cross-
threading.
After the spark plug is seated, tighten with a 5/8-inch spark plug
wrench to compress the sealing washer.
When installing a new spark plug, tighten 1/2 turn after the spark
plug seats to compress the washer.
When reinstalling the original spark plug, tighten 1/8 1/4 turn
after the spark plug seats to compress the washer.
A loose spark plug can overheat and damage the engine.
Overtightening the spark plug can damage the threads in the
cylinder head.
Attach the spark plug cap to the spark plug.
0.60 0.70 mm (0.024 0.028 in)
U16FSR-UB (DENSO)
1.
2.
3.
1.
2.
3.
,
4.
5.
6.
7.
8.
9.
07/06/01 12:39:42 32Z4D602_009