
User's Manual


Honda Super Cub Etc.
Frame & Forks
Introduction
This section is all about how to strip, servioce and rebuild the frame and forks of the Honda Super Cub and
other bikes using the same frames, plus all the anciliary components not covered in the Engine, Electrics, or
Maintenance Sections. This page is still under construction
All the models using the Super Cub frame are covered here, although models such as the CT50 will have far
fewer components. The only area or real difference between models is the forks - some use leading link and
others use telescopic types. Note that although the frames may appear to be the same, there are any number of
detail differences that, although the stripping and rebuilding methods are the same, many components are not
interchangeable. Frames fall into 4 main groups:
A - Pre 1968 (C100/C102/C105)
B - 1968 to 1983 Small (C50/C70/CT50/CT90)
C - 1968 to 1983 Large (C90)
D - 1982 to present (C50/C70/C90)
Note that the CT series used telescopic forks even though the C50/C70 used leading link forks with basically the
same frame. Note also the CT70 is not part of the same family, it used an ST type of frame.
Remember to disconnect the battery if you intend disconnecting any electrical items, and to reconnect it again
later.
Contents
Section Component
1 Engine
2 Front Wheel & Brake Assembly
3 Front Fork Assembly - Leading Link types
4 Front Fork Assembly - Telescopic types
5 Rear Wheel & Brake Assembly
6 Rear Suspension
7 Seat, Rear Mudguard, & Air-Cleaner
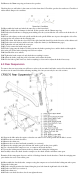
1.0 Engine
How many parts you remove while dropping the engine out of the frame depends on the reason for taking the
engine out. If it is to work on the frame, many components can remain attached to the engine, the fewer
components you remove then the less chance there is of loosing something. There is always the time factor to be
considered as well.
1.1 Lean the bike against a wall, but make sure it will not fall as you work on it.
1.2 Remove the left hand side cover, held on by three screws. Disconnect the wiring loom. Disconect the
carburettor overflow pipe, a plastic pipe usually attached forward of the generator.
1.3 Remove the chain from the engine either by splitting the chain at its split link, or by removing the 2 bolts
holding the engine sprocket on. Once the engine sprocket bolts are removed you will have to rotate the sprocket
retention plate until it comes off the splines. Remove the sprocket (screw the retention plate to the sprocket to
keep everything together).
1.4 Remove the screw holding on the carburettor access panel (the black plastic panel on top of the frame above
the engine.
1.5 Remove the 2 bolts fixing the inlet manifold to the engine cylinder head. (Only remove the carburettor if
you intend to work on it or the frame, see the carburettor section). Stuff some clean kitchen towel or cloth into
the intake port of the engine to stop things falling into it.
1.6 Remove the bolts holding on the plastic legshield, if fitted. Also remove the 2 straps, one each side of the
engine, rhat form part of the legshield mount.
1.7 Move to the right hand side of the bike and remove the muffler/exhaust system. There are 2 nuts at the
engine end and one bolt on the frame. Remove the spark plug lead.
1.8 Remove the upper and rear engine hanger bolts, these are the large bolts that hold the engine in, one is at the
top of the transmission housing and the other is near where the engine sprocket is mounted. Slacken Remove the
nuts and washers from both first, then you will have to try and lift the engine slightly to pull out the upper bolt
(you may need to tap it lightly with a soft mallet to start it. Gently lower the front od the engine down to the
ground. By supporting the engine on the footpeg you should be able to remove the rear engine mounting bolt.
You may have to wriggle the engine to pull it out from the frame.
1.9 (If stripping the engine) Remove the footpeg bar, held on by 4 bolts underneath the transmission, and the
gear pedal. Note that you might have to use an old screwdriver to open out the clamp a bit to pull the gear pedal
off its splines.
Give the engine a clean off as it will probably have accumulated a quantity of road dirt. Don't let anything enter
where the air intake manifold was bolted.