
User's Manual


OIL FILTER CHANGE
1. Drain the engine oil, and retighten the drain bolt securely (see page
37).
2. Remove the oil filter, and drain the oil into a suitable container.
Discard the used oil filter.
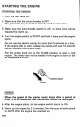
piEi%-)
Use an oil filter socket tool, rather than a strap wrench, to avoid
striking
3. Clean the filter nounting base, and coat the O-ring of the new oil
filter with clean engine oil.
[NOTICE]
Use only a Honda genuine oil filter or a filter of equivalent
quality specified for your model. Using the wrong Honda filter
or a non-Honda filter which is not of equivalent quality may
cause engine damage.
4. Screw on the new oil filter by hand, until the O-ring contacts the
filter mounting base, then use an oil filter socket tool to tighten the
filter an additional 7/8 turn.
TORQUE: 16 ft-lb (22 Nm, 2.2 kg-m)
5. Refill the crankcase with the specified amount of the recommended
oil (see page 25 & 33). Reinstall the oil filler cap/dipstick.
6. Start the engine and check for oil filter leaks.
7. Stop the engine, and check the oil level as described on page 25.
If necessary, add oil to the upper limit mark on the’dipstick.
O-RING
38
ILTER SOCKET TOOL