Thank you for purchasing a Honda tiller. This manual covers operation and maintenance of the F210 tiller. All information in this’ publication is based on the latest product information available at the time of approval for printing. Honda motor Co., Ltd. reserves the right to make changes at any time without notice and without incurring any obligation. No part of this publication may be reproduced without written This manual should be considered remain with the tiller if it is sold..
CONTENTS 1. WARNING LABEL LOCATIONS ................ :. ........... 2. TILLER SAFETY ........................................ 3. COMPdNENT IDENTIFICATI'ON ............................ 4. PRE-OPERATION CHECK ............................... 5. STARTING THE ENGINE ................................... 6. TILLER OPERATION ...................................... 7. STOPPING THE ENGINE .................................. 8. MAINTENANCE .............. .:. .... .;. .................. 9. TRANSPORTING/STORAGE ...........
1. WARNING LABEL LoCATIONS (MAIN CLUTCH ) n IIEADOWNER’S MANUAL FIRSTmR SAA OPERATION. WEXNAUST GASES AREPOISONOUS AVOIDINHALATION. n GASOLINE IS FLAMMABLE AND EXPLOSIVE. STOP II FORSPUlEllFUELOlblEAKAGE BEFORE STARTING. WOUNOTTILTTILLER EXCESSIVELY ORFULLMAYSPILL E OIL FILLER CAP BEFORE STARTING.
2. TILLER SAFETY Kmm To ensure safe operation READ THIS OWNERS MANUAL CAREFULLY. l Never permit anyone to operate the tiller without proper instruction. l Know how to stop the tiller quickly and understand the operation of all the controls. l Keep children and pets at a safe distance when tilling. l Wear close-fitting clothing and sturdy, nonslip shoes that completely enclose the feet. l Make sure that all fasteners are properly secured.
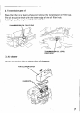
3.
4. IPRE-OPERATION CHECK 1. Engine oil level CAUTION: Engine oil is a major factor affecting engine performance and service life. Non-detergent or vegetable oils are not recommended. l Be sure to check the tiller on a level surface with the engine stopped. l Use Honda 4-stroke oil, or an equivalent high detergent, premium quality motor oil certified to meet or exceed U.S. automobile manufacturer’s requirements for Service Classification SE or SF.
2. Transmission gear oil Place the tiller on a level surface and remove the transmission oil filler cap. The oil should be level with the lower edge of the oil filler hole. Add high quality engine oil if the level is low. TRANSMISSION OIL FILLER CAP TRANSMlSSlbN CHECK BOLT 3. Air cleaner Check cleaner for dirt or obstruction AIR CLEANER COVER of elements.
4. Fuel Use any regular grade. automotive gasoline with a pump octane rating of 86 or higher. Never use an oil/gasoline water in the fuel tank. mixture CAUTION: Gasoline substitutes to fuel system components. (unleaded gasoline is preferred) or dirty gasoline. Avoid getting dirt, dust or are not recommended; they may be harmful Gasoline is extremely flammable and explosive under certain conditions. Refuel in a well ventilated area with the engine stopped.
5. STARTING CAUTION: Be sure the clutch THE ENGINE is disengaged. 1. Turn the fuel valve ON. FUEL VALVE 2. Pull the choke rod out. NOTE: Do not use the choke if the engine is warm or the air temperature is high. 3. Turn the engine switch position.
4. Move the throttle the left. lever slightly to 5. Pull the starter grip lightly until resistance is felt, then pull briskly. STARTER GRIP CAUTION: Do not allow the starter grip to snap back against the engine. Return it gently to prevent damage to the starter. 6. Push the choke rod in as the engine warms up.
1. Handlebar height adjustment CAUTION: Before adjusting the handlebar, place the tiller ground to prevent the handle from collapsing accidentally. on firm level To adjust the handlebar height, loosen the adjuster, select the appropriate holes and tighten the adjuster. 2. Tilling depth adjustment Tilling depth can be adjusted by removing the retainer and sliding the drag bar up or down as necessary. 3. Clutch The clutch engages and disengages the power from the’ engine to the tines.
4. Front wheel 0 To move the tiller from place to place when not tilling: Working from the right side of the tiller, pull the wheel arm toward you, pivot the wheel down and then release the wheel arm. Be sure that the arm locks in place. l To prepare for tilling: Pull the wheel arm out, pivot the wheel up and release the arm. hen used in the field. - 5. Handling -------When moved.on road. tips 0 Adjust the handlebar height to a comfortable position (waist height for normal tilling)., . .
7. STOPPING 1. Move the throttle right. lever fully to the THROTTLE 2. Turn the engine OFF position. switch THE ENGINE LEVER to either OFF OFF 3. Turn the fuel valve OFF. NOTE: In case of an emergency, immediately.
8. MAINTENANCE The purpose of the maintenance schedule is to keep the tiller in the best operating condition. Inspect or service as scheduled in the table below. m Shut off the engine before performing any maintenance. If the engine must be run, make sure the area is well ventilated. The exhaust contains poisonous carbon monoxide gas. CAUTION: replacement Use only genuine HONDA parts or their equivalent. The use of parts which are not of equivalent quality may damage the engine.
1. Changing oil Drain the oil while the engine is still warm to assure rapid and complete draining. 1. Remove the oil drain bolt and the filler cap to drain. 2. Reinstall the drain bolt and fill the crankcase to the upper level with the recommended oil (P. 6). 3. Reinstall and tighten the filler cap. OIL CAPACITY: 0.4 II (0.
2. Air cleaner service A dirty air cleaner will carburetor malfunction, frequently when operating restrict air flow to the carburetor. To prevent service the air cleaner regularly. Service more the engine in extremely dusty areas. -N ever use gasoline or low flash point cleaner element. A fire or explosion could result. CAUTION: may result. Never run the engine without 1. Remove the wing nut and the air cleaner cover. Remove the elements and separate them.
3. Spark plug service Recommended \ spark plug: BMR-4A (NGK) W14MR-U (ND) To ensure proper engine operation, and free of deposits. the spark plug must be properly gapped 1. Remove the spark plug cap. B If the engine has been running, careful not to touch the muffler. 2. Visually chipped. the muffler will be very hot. Be inspect the spark plug. Discard it if the insulator is cracked Clean the spark plug with a wire brush if it is to be reused. 3. Measure the plug gap with a feeler gauge.
4. Clutch lever free play adjustment 1. Check the clutch Clutch 1 lever free play at the lever tip as illustrated. lever free play: 2-6 mm (0.08-0.24 in) 2-6 mm (0.08-0.24 in) t 2. If the clearance is incorrect, loosen the lock nut and turn the adjusting bolt in or out as required. 3. After adjustment, tighten the lock nut securely. Then’start the engine and check for proper clutch lever operation.
5. Throttle cable adjustment Measure the free play at the lever tip. Free play: 5-10 mm (0.2-0.4 If the free play is incorrect, or out as required. THROTTLE in) loosen the lock nut and turn the adjusting bolt in LEVER OLT 6. Fuel strainer cleaning Water or sediment accumulated in the fuel strainer can cause loss of power or hard starting. To prevent engine malfunction, service the fuel strainer regularly. l l l l Gasoline is flammable and explosive under certain conditions.
3. Remove water and sediment 4. Reinstall clips. NOTE: the fuel strainer, from the filter screen and sediment reconnect the fuel lines and secure them with the Install the tine assemblies and side disks as illustrated below. Use of the side disks is optional. FWD “L” 20 a’( Turn the fuel valve ON and check for leaks. 7. Rotor assembly NOTE: cup. side “R” side .
9. TRANSPORTING/STORAGE Transporting l l l Turn off the fuel valve. Keep the tiller level. Do not lay it on its side or lean it back on its handlebars. Tie the tiller down securely with a suitable strap or rope to prevent it from tipping over. i Preparation ,- l for storage (Over 30 days) : Drain the gasoline from the fuel tank and carburetor: Remove the fuel line from the fuel valve, and drain all gasoline from the fuel tank into a safe container.
10. TROUBLESHOOTING When .the engine will not start; 1. Is there enough fuel? 2. Is the fuel valve on? 3. Is the engine switch ON? 4. Is gasoline reaching the carburetor? To check, out freely. loosen the drain bolt ,with the fue! valve on. Fuel should Retighten the drain bolt. flow , m If any fuel is spilled, make sure the area is dry before testing the spark plug or starting the engine. Fuel vapor or spilled fuel may ignite. DRAIN‘ BOLT ,5. Is there a spark at the spark plug? a.
11. SPECIFICATIONS Model.........................F210 Dimensions(LxWxH). ......... Dry weight .................... Maximum handle height Engine Model ...................... Type ....................... Displacement/Bore .......... and stroke. ... Ignition system ............... Engine oil capacity ............ Fuel tank capacity. ............ Spark plug. .................. Clutch ........................ .................. Transmission. Oil capacity .................. .1,250 x 585 x 960 mm (49.2 x 23.
12. WARRANTY SERVICE (FOR U.S.A.) Owner Satisfaction Your satisfaction and goodwill are important to your dealer and to us Normally, any problems with the product will be handled by your dealer’s service department. Sometimes, however, despite the best intentions of all concerned, misunderstandings can occur if your problem has not been handled to your satisfaction, we.suggest you take the following action: l Discuss your problem with a member of dealership management.
Current customer service contact information: United States, Puerto Rico, and U.S. Virgin Islands: Honda Power Equipment dealership personnel are trained professionals. They should be able to answer any question you may have. If you encounter a problem that your dealer does not solve to your satisfaction, please discuss it with the dealership's management. The Service Manager or General Manager can help. Almost all problems are solved in this way.
Regional Office Locations NORTHWEST REGIONAL OFFICE (includes Alaska) American Honda Motor Co., Inc. Customer Relations Department P.O. Box 30285 Portland, Oregon 91220 Telephone: (503) 255-l 186 ,,ll!,;ON American Customer P.O. Box Gardena, Telephone: MIDWEST American Customer P.O. Box Greendale, Telephone: NORTHEAST REGIONAL OFFICE American Honda Motor Co., Inc. Customer Relations Department P.O. Box 749 Moorestown, New Jersey 08057 Telephone: (609) 778-l 100 REGIONALOFFICE Honda Motor Co., Inc.