
Product Manual
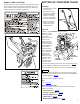

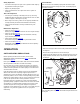
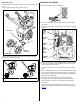


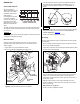
Table Of Contents

3
SAFETY LABEL LOCATION
The label shown here contains important safety information. Please
read it carefully. This label is considered a permanent part of your
tiller. If the label comes off or becomes hard to read, contact your
authorized Honda tiller dealer for a replacement.
SETTING UP YOUR NEW TILLER
Unpacking
1. Carefully remove the tiller
from the carton.
2. Unfold the tiller upper
handle to the operating
position as shown. Be
careful not to crimp or
pinch the engine switch
wires and throttle cable.
3. Tighten the handlebar
knobs to secure the
handle in the upright
operating position.
Engine Oil
The tiller is shipped WITHOUT OIL in the engine.
Working on a level
surface, tip the tiller
on its carrying
handlebar as shown.
A bottle of oil is
included in the box
with your tiller. Add
the entire contents of
the oil bottle into the
oil filler opening.
All Honda engines
are run at the factory
prior to packaging.
Most of the oil is
removed prior to
shipment; however,
some oil remains in
the engine. The
amount of oil left in
the engine varies.
If not using the supplied oil, add enough recommended oil (page 9) to
bring the oil level to the bottom edge of the oil filler hole.
Do not overfill the engine with oil, as the oil tank capacity is small.
NOTICE
Running the engine with too little or too much oil can cause engine
damage. This type of damage is not covered by the DISTRIBUTOR’S
LIMITED WARRANTY (
page 21).
Screw in the oil filler cap/dipstick securely.
Fuel
Refer to page 12.
Before Using Your Tiller
Before using the tiller, all tiller operators must read the following
chapters and sections:
• TILLER SAFETY (see page 2).
• CONTROL LOCATIONS (see page 4).
• BEFORE OPERATION (see page 4).
• OPERATION (see page 5).
• MAINTENANCE SCHEDULE (see page 8).
HANDLEBAR
KNOBS
OIL FILLER
HOLE
CARRYING
HANDLEBAR
OIL FILLER
CAP/DIPSTICK