
User guide


6
E
4. With the engine in a level position, fill to the upper limit mark
(bottom edge of the oil fill hole) on the dipstick with the
recommended oil (see page 5) Do not overfill.
NOTICE
Running the engine with a low oil level can cause engine damage.
5. Reinstall the oil filler cap/dipstick securely.
AIR CLEANER
A dirty air cleaner will restrict air flow to the carburetor and cause poor
engine performance. Inspect the filter each time the engine is
operated. You will need to clean the filter more frequently if you
operate the engine in very dusty areas.
NOTICE
Operating the engine without an air filter, or with a damaged filter, will
allow dirt to enter the engine, causing rapid engine wear. This type of
damage is not covered under the Distributor’s Limited Warranty (see
page 11).
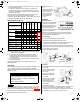
Inspection
1. Press the latch
tabs on the top of
the air cleaner
cover, and remove
the cover. Check
the filter to be sure
it is clean and in
good condition.
2. Reinstall the filter
and air cleaner
cover.
Cleaning
1. Tap the filter several times on a hard surface to remove dirt, or
blow compressed air [not exceeding 30 psi (207 kPa, 2.1 kg/cm²)]
through the filter from the clean side that faces the engine. Never
try to brush off dirt. Brushing will force dirt into the fibers.
2. Wipe dirt from the air cleaner body and cover using a moist rag. Be
careful to prevent dirt from entering the air duct that leads to the
carburetor.
SPARK PLUG
Recommended Spark Plug: NGK BPR6ES
The recommended spark plug is the correct heat range for normal
engine operating temperatures.
NOTICE
Incorrect spark plugs can cause engine damage.
For good performance, the spark
plug must be properly gapped and
free of deposits.
1. Disconnect the cap from the
spark plug, and remove any dirt
from the spark plug area.
2. Use the proper size spark plug
wrench to remove the spark
plug.
3. Inspect the spark plug. Replace it if
damaged, badly fouled, if the
sealing washer is in poor condition,
or if the electrode is worn.
4. Measure the electrode gap with a
suitable gauge. The correct gap is
0.028 - 0.031 in (0.70 - 0.80 mm). If
adjustment is needed, correct the
gap by carefully bending the side
electrode.
5. Install the spark plug carefully, by
hand, to avoid cross-threading.
6. After the spark plug is seated, tighten with the proper size spark
plug wrench to compress the washer.
7. When installing a new spark plug, tighten 1/2 turn after the spark
plug seats to compress the washer.
8. When reinstalling the original spark plug, tighten 1/8 - 1/4 turn after
the spark plug seats to compress the washer.
NOTICE
A loose spark plug can become very hot and can damage the
engine. Overtightening the spark plug can damage the threads in
the cylinder head.
9. Attach the spark plug cap to the spark plug.
SPARK ARRESTER (optional equipment)
In some areas, it is illegal to operate an engine without a USDA
(United States Department of Agriculture)-qualified spark arrester.
Check local laws and regulations. A USDA-qualified spark arrester is
available from an authorized Honda servicing dealer.
The spark arrester must be serviced every 100 hours to keep it
functioning as designed.
If the engine has been running, the muffler will be hot. Allow it to cool
before servicing the spark arrester.
Spark Arrester Removal
1. Remove the three
6 mm bolts from the
muffler protector, and
remove the muffler
protector.
2. Remove the two special
screws from the spark
arrester, and remove the
spark arrester from the
muffler.
Spark Arrester Cleaning &
Inspection
1. Use a brush to remove carbon
deposits from the spark arrester
screen. Be careful not to damage
the screen. Replace the spark
arrester if it has breaks or holes.
2. Install the spark arrester in the
reverse order of removal.
AIR
DUCT
AIR CLEANER
BODY
FILTER
AIR
CLEANER
COVER
LATCH TABS
TABS
SPARK PLUG
WRENCH
0.028 ~ 0.031 in
(0.70 ~ 0.80 mm)
SEALING
WASHER
SPARK
ARRESTER
IDENTIFICATION
PLATE
MUFFLER
PROTECTOR
6 mm BOLT (3)
SPECIAL
SCREW (2)
MUFFLER
SPARK
ARRESTER
POM53483-D.book Page 6 Thursday, March 17, 2005 4:42 PM