
Instruction Manual


7
ENGLISH
ENGINE OIL
Recommended Oil
Use 4-stroke motor oil that meets
or exceeds the requirements for
API service classification SJ or
later. Always check the API
service label on the oil container
to be sure it includes the letters
SJ or later.
SAE 10W-30 is recommended for general use. Other viscosities
shown in the chart may be used when the average temperature in
your area is within the indicated range.
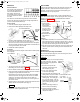
Oil Level Check
1. Check the oil with the engine stopped and level.
2. Remove the oil filler cap/dipstick and wipe it clean.
3. Insert the oil filler cap/dipstick into the oil filler neck as shown, but
do not screw it in, then remove it to check the oil level.
4. If the oil level is near or below the lower limit mark on the dipstick,
remove the oil filler cap/dipstick, and fill with the recommended oil
to the upper limit mark. Do not overfill.
5. Reinstall the oil filler cap/dipstick.
Oil Change
Drain the engine oil when the engine is warm. Warm oil drains quickly
and completely.
1. Turn the fuel valve to the OFF position to reduce the possibility of
fuel leakage (see TYPE 1 Step 1 on page 2).
2. Place a suitable container next to the engine to catch the used oil.
3. Remove the oil filler cap/dipstick and drain the oil into the container
by tipping the engine toward the oil filler neck.
Please dispose of used motor oil in a manner that is compatible
with the environment. We suggest you take used oil in a sealed
container to your local recycling center or service station for
reclamation. Do not throw it in the trash, pour it on the ground, or
pour it down a drain.
4. With the engine in a level position, fill to the upper limit mark on the
dipstick with the recommended oil (see page 7).
NOTICE
Running the engine with a low oil level can cause engine damage.
5. Reinstall the oil filler cap/dipstick securely.
AIR CLEANER
A dirty air filter will restrict air flow to the carburetor and cause poor
engine performance. Inspect the filter each time the engine is
operated. You will need to clean the filter more frequently if you
operate the engine in very dusty areas.
NOTICE
Operating the engine without a filter, or with a damaged filter, will
allow dirt to enter the engine, causing rapid engine wear. This type of
damage is not covered under your DISTRIBUTOR’S LIMITED
WARRANTY (see page 13).
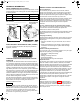
Inspection
1. Press the latch
tabs on the top of
the air cleaner
cover and remove
the cover. Check
the filter to be sure
it is clean and in
good condition.
2. Reinstall the filter
and air cleaner
cover.
Cleaning
1. Tap the filter several times on a hard surface to remove dirt, or
blow compressed air [not exceeding 30 psi (207 kPa, 2.1 kg/cm²)]
through the filter from the clean side that faces the engine. Never
try to brush off dirt. Brushing will force dirt into the fibers.
2. Wipe dirt from the air cleaner body and cover using a moist rag. Be
careful to prevent dirt from entering the air duct that leads to the
carburetor.
SPARK PLUG
Recommended Spark Plug: NGK BPR6ES
The recommended spark plug is the correct heat range for normal
engine operating temperatures.
NOTICE
Incorrect spark plugs can cause engine damage.
For good performance, the spark
plug must be properly gapped and
free of deposits.
1. Disconnect the cap from the
spark plug, and remove any dirt
from the spark plug area.
2. Use a 13/16" spark plug wrench
to remove the spark plug.
3. Inspect the spark plug. Replace it if damaged, badly fouled, if the
sealing washer is in poor condition, or if the electrode is worn.
4. Measure the electrode gap with a
suitable gauge. The correct gap is
0.70 ~ 0.80 mm (0.028 ~ 0.031 in).
If adjustment is needed, correct the
gap by carefully bending the side
electrode.
5. Install the spark plug carefully, by
hand, to avoid cross-threading.
6. After the spark plug is seated,
tighten with a spark plug wrench to
compress the washer.
OIL FILLER CAP/DIPSTICK
UPPER
LIMIT
LOWER
LIMIT
(ELECTRIC
STARTER
TYPES)
OIL FILLER NECK
OIL FILLER
CAP/
DIPSTICK
UPPER
LIMIT
(ELECTRIC
STARTER
TYPES)
AIR DUCT
AIR CLEANER BODY
FILTER
AIR
CLEANER
COVER
LATCH TABS
SPARK PLUG
WRENCH
0.70 ~ 0.80 mm
(0.028 ~ 0.031 in)
SEALING
WASHER
POM52684-L.book Page 7 Monday, February 5, 2007 3:00 PM