Thank you for purchasing a Honda lawn tractor. This manual describes operation and maintenance of the Honda H4013 lawn tractor, type SA. All information in this publication is based on the latest product information available at the time of printing. Honda without Motor Co., Ltd. reserves the right to make changes notice and without incurring any obligation. No part of this publication may be reproduced This manual is considered a permanent stay with the lawn tractor if resold.
CONTENTS ......................................................... 1. SAFETY INFORMATION ............................................... 2. COMPONENT IDENTIFICATION .......................................................................... 3. CONTROLS ....................................................................... Engine switch Throttle lever ........................................................................ Cutter deck height adjusting lever ............................................
.................................................................. 7. MAINTENANCE Maintenance schedule .......................................................... ................................................................ Engine oil change Air cleaner service ............................................................... Spark plug service ............................................................... Battery service .................................................................... Wheel removal .
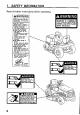
1. SAFETY INFORMATION Read all safety instructions before operating. AWARNING LAWN TRACTORS CAN BE HAZARDOUS IF OPERATED IMPROPERLY. TO AVOID SERIOUS ,N,“R”, READ ALL SAFETY lNSTR”CTlONS CAREFULL”. lREAD OWNER’S MANUA,. BEFORE OPERAT,DN THE OWNER’S MANUAL HAS IMPORTANT SAFE,” AND OPERATION INFDRMATIDN. .LEARN THE LDCATlDN AND FVNCTION OF ALL CONTROLS IN AN EMERCENC” ID” SHOULD BE ABLE TO OPERATE THEM OUICKL”.
SAFETY INFORMATION For your safety precautions: Operator and the safety of others, pay special attention to these Responsibility Keep the lawn tractor in good operating condition. Operating a lawn tractor that is in poor, or questionable condition could result in serious injury. Be sure all safety devices are in working order and that warning labels are in place, these items are installed for your safety. Know how to stop the engine and blades quickly in case of emergency.
Cutting Blade Hazard The cutting blades are sharp, and they turn at high speed. Accidental contact can cause serious injury. l Keep your hands and feet away from the mower deck while the engine is running. l Stop the engine, disengage the Power Take Off (P.T.O.) clutch and remove the key before inspection or maintenance of the deck or blades. l Disconnect the spark plug cap to prevent any possibility of accidental starting.
The engine and exhaust system become very hot during operation and remain hot for a while after stopping. Contact with hot engine components can cause burn injuries and can ignite some materials. . Avoid touching a hot engine or exhaust system. l Allow the engine to cool before performing maintenance or storing the lawn tractor indoors. Carbon Monoxide Poisoning Hazard Exhaust contains poisonous carbon monoxide, a colorless and odorless gas.
2. COMPONENT IDENTIFICATION POWER ,,,; TAKE-OFF IP.T.0.
Engine compartment HOOD \ \ *ENGINE SUB FUSE NUMBER OIL FILLER CAP OIL DRAIN BOLT SPARK PLiJG DUST ‘SCREEN * Record the frame and engine serial numbers for your reference. Refer to the serial numbers when ordering parts, and when making technical or warranty inquiries (see page 72).
3. CONTROLS Engine switch m Always remove the key from the engine switch whenever the lawn tractor is &attended to prevent children or unauthorized persons from starting the engine. This lawn tractor is equipped with an automotive type ignition switch, which controls all the electrical circuits. The switch is located on the righthand side of the control panel. Key positions: “START” to start the engine “ON” to run the engine after starting “OFF” to stop the engine.
Cutter deck height adjusting lever This lever is used to raise and lower the cutter deck. To adjust the cutting height, squeeze the handle lock and then press in and hold the set button. Raise or lower the lever until the desired cutting height appears on the indicator. At that point, release the set button and the handle lock. Be sure the handle lock returns to its normal position when released. Cutting height: 1.0, 1.5, 2.0, 2.5, 3.0, 3.5, 4.0 inches (Approx.
Shift lever This lever is used to select one of the five forward speeds, neutral or reverse. The drive clutch automatically disengages while the lever is being moved. The clutch will then engage automatically when a gear is selected unless the brake pedal is depressed. m trol which Improper use of the shift lever on slopes may cause loss of concould lead to injury. See page 38. IMPORTANT NoTlCE 1 Improper transmission.
Power Take-Off (P.T.O.) lever This lever engages and disengages the power take-off blades. Lever positions: ON (Engaged). . . . . . . . Blades turn OFF (Disengaged).... Blade stop P.T.O. clutch to drive the LEVE (Engaged) NOTE: An interlock switch prevents P.T.O. lever is in the OFF position. the engine from starting unless the Brake pedal Depressing to depress the pedal will first disengage the drive clutch. As you continue the pedal, the brake will be applied to stop the tractor.
Parking brake lever and warning buzzer This lever is used to set the brake when the lawn tractor is parked. To set the parking brake, pull the lever fully up until the ratchet locks, and be sure that the parking indicator lamp on the control panel is ON. To release the parking brake, pull the lever up slightly button, lower the lever while holding in the button.
4. PRE-OPERATION Follow the procedures each use: below and check all of the following CHECKS items before 1. Park the lawn tractor on a level surface. 2. Place the shift lever in the neutral position and set the parking 3. Disconnect the spark plug cap and remove the engine switch prevent accidental engine start-up. brake. key to m If the engine is started accidentally while you are performing the pre-operation checks, moving parts may cause serious injury.
ENGINE OIL IMPORTANT serious NOTICE engine 1 Running damage. the engine with low oil level will cause 1. Place the lawn tractor on a level surface. 2. Open the engine hood, wipe dust and dirt from around the oil filler cap, remove the cap and wipe the dipstick clean. 3. Insert the dipstick into the oil filler neck, but do not screw it in. 4. If the level is low, add the recommended oil to the upper mark on the dipstick. Do not overfill.
GASOLINE Remove low. the gas cap and check the fuel level. Refill the tank if the level is If the low fuel indicator lamp glows, it means you have about US gal) or less remaining and should refuel. Gas tank capacity: 9.0 P (2.38 1 .O P (0.26 US gal, 1.98 lmp gal) Gasoline is extremely flammable, and gasoline vapor can explode. Use extreme care when handling gasoline. Keep gasoline out of reach of children. l Refuel in a well ventilated area with the engine stopped.
Gasoline Recommendation Pump octane rating: 86 or higher We recommend unleaded gasoline because it produces fewer spark plug deposits and extends the exhaust system life. engine and If “spark knock” (metallic rapping noise) or persistent “pinging” occurs at a steady engine speed under normal load, change brands of gasoline. If spark knock or pinging persists, see an authorized Honda lawn tractor dealer. 1 IMPORTANT pinging NOTICE 1 R unning can cause engine the engine damage.
GASOLINES CONTAINING ALCOHOL If you decide to use a gasoline containing alcohol (gasohol), be sure its octane rating is at least as high as that recommended by Honda (see Gasoline Recommendation on page 18). There are two types of one containing ethanol, and the other containing methanol.
Air cleaner Check that the air cleaner elements are clean and in good condition. A dirty air cleaner will restrict air flow to the carburetor, reducing engine performance. A damaged air cleaner will allow dirt to enter the engine, causing rapid engine wear. 1. Open the engine hood, and remove the wing nut to remove the air cleaner cover and air cleaner elements. Clean or replace the elements if 2. Inspect the air cleaner elements. necessary.
Battery Open the hood, and check the battery electrolyte level. The electrolyte level must be kept between the UPPER and LOWER level marks. If the electrolyte level is near the LOWER mark, remove the battery filler caps and carefully add distilled water to each cell until the liquid reaches the UPPER level mark (see page 50). UPPER LEVEL LOWER LEVEL Batteries produce explosive gases. Flames or sparks can cause an explosion, causing serious injury or blindness.
Brake Inspect brake lining condition every time the lawn tractor is used. Firmly set the parking brake, and then check the position of the brake wear indicator. If the indicator is near the wear limit, take the lawn tractor to an authorized Honda lawn tractor dealer for repair. m Under no circumstances should the lawn tractor the brake lining is at or past the service limit.
Cutter deck Prior to using the mower, be sure to check that dirt, mud, and grass have not built up in the deck. For cleaning, refer to page 65. Cutter deck drive belt and blade belt n INSPECTION 1. Lower the cutter deck by using the cutter deck height adjusting lever. 2. Inspect the belts for damage or excessive wear. If the belts are damaged or excessively worn, replace them as described on pages 56 and 57. CUTTER DECK DRIVE BELT \ BLADE BELT Cutter deck drive belt tension 1.
Anti-scalp roller adjustment The anti-scalp rollers help to prevent the blades from gouging or “scalping” high spots. The deck is designed to “float”, and it is important to set the anti-scalp rollers correctly. The setting depends on the type of terrain being mowed and the cut height. FLAT TERRAIN ANTI-SCALP REOLLERS SLOPING OR UNEVEN TERRAIN 1" 1.5” 2” 2.5- -4” ANTI-SCALP ROLLER SHAFT For flat terrain, use the lower hole in the anti-scalp roller shaft.
Tires IMPORTANT Inflate NOTICE 0 verinflation the tires to manufacturer’s can cause premature tire failure. recommended tire pressure. Check the tire pressure with an air pressure gauge. Front . . . . . . . . . . . . . . . . . . . . 1 .O kg/cm2 (14 psi) Pressure: Rear . . . . . . . . . . . . . . . . . . . . . 0.8 kg/cm* (1 1 psi) AIR PRESSURE GAUGE Seat adjustment 1. Loosen the four seat mounting nuts with the spark plug wrench provided. 2.
Blade Before l l each use, inspect the blades for damage or excessive wear. Remove the engine switch key and disconnect the spark plug cap to prevent accidental starting. Wear heavy gloves to protect your hands from the blades. 1. Set the parking ed) position. brake, and move the P.T.O. lever to the OFF (disengag- 2. .Raise the deck height adjusting lever as high as it will go. 3. Inspect the blades for cracks, bending and wear; l The right blade can be seen through the discharge opening.
4. If either of the blades shows signs of damage or excessive wear, remove the cutter deck, and thoroughly inspect the blades (see cutter deck removal instructions on pages 53 and 54). Dull blades can be sharpened, but blades that are worn out, bent, cracked, or otherwise damaged must be replaced. If the blades need sharpening or replacement, take the cutter deck to your authorized Honda lawn tractor dealer.
Safety switch Before performing these inspections, remove the spark plug cap. 1. P.T.O. switch inspection l With the shift lever in the N (Neutral) position, set the P.T.O. lever in the ON (Engaged) position. l Check that the starter motor does not operate when the engine switch is turned to the START position. l Return the P.T.O. lever to the OFF (Disengaged) position. 2. Neutral switch inspection l With the P.T.O. lever in the OFF (Disengaged) position, set the shift lever in the MOWING range.
5. Starting OPERATION the engine Exhaust contains poisonous carbon monoxide gas that can cause loss of consciousness and may lead to death. Never run the engine in an enclosed area. Be sure to provide adequate ventilation. 1. Sit on the transmission position. 2. Move seat and check that the parking brake lever is set, the is in neutral and the P.T.O. lever is in the OFF (disengaged) the throttle lever to the START (CHOKE) position.
3. Turn the engine ENGINE switch to START. (5 seconds maximum) SWITCH IMPORTANT can damage If the engine 10 seconds NoT’CE 1 Running the starter motor for more than 5 seconds the motor. fails to start, release the engirne switch key, and wait at least before operating the starter motor again. 4. After the engine starts, let the engine switch return to ON. 5. After the engine warms up, move the throttle lever to the position.
Seat safety switch operation check The seat safety switch automatically stops the engine if the operator’s weight is off the seat when the following interlocks are actuated. 1. While parked on a level surface, start the engine, and move the P.T.O. lever to ON (Engaged). Rise off the seat; the engine should stop. 2. Return the P.T.O. lever to OFF (Disengaged) and restart the engine. Release the parking brake and shift the transmission into 1st gear.
Mowing Before operating this lawn tractor, you should SAFETY INSTRUCTIONS on pages 4-7. l l l l l read and understand the Rotating blades and thrown objects can cause serious injury. Always stop the engine before clearing the discharge chute or removing the grass bags. Unseen hazards may cause loss of control or damage to the lawn tractor. Look for and avoid rocks, roots, holes, and hidden hazards in the terrain.
For best cut quality and overall performance, set the throttle in the FAST position and select the proper mowing speed with the shift lever. Mowing at low or medium throttle setting will affect blade performance and cut quality. For best results, select a good mowing speed and stay at that speed. Rapid speed changes while mowing will affect cut quality. Do not shift the transmission to 4th or 5th gear (TRANSPORT range) while mowing as this will affect cut quality.
Starting the lawn Be sure mowing. the tractor area is clear 1. Set the cutter deck height of people, adjusting pets and other obstacles lever to the desired cutting NOTE: Be sure that the anti-scalp rollers are in the correct the selected cutting height and terrain (see page 24). before height. position for For best cut quality, and performance, always mow with lever in the FAST position. Use the shift lever to select mowing speed range. the the CUTTING HEIGHT ADJUSTING LEVER 2.
3. Move the P.T.O. lever to the ON (Engaged) position. IMPORTANT NoTtCE 1 To avoid premature wear to the P.T.O. clutch and brake system, always engage and disengage the P.T.O. lever with a quick, smooth motion. P.T.O. LEVER Engaged) 4. Move the shift lever to select the desired mowing speed position. The clutch will engage automatically in about one second. l l If clutch engagement occurs immediately or takes longer than one second, have the lawn tractor serviced by your authorized Honda dealer.
Cutting patterns These cutting surface. l patterns are only recommended for a flat, level lawn In a small area First make 2 or 3 turns in a clockwise tinue cutting in the reverse direction. direction; then turn around and con- * In a large area The first round of cuts is the key to making a neat finish. First, make 2 or 3 turns in a clockwise direction.
Mowing l unsquare areas If your mowing area is not square or four-sided, divide the area into several blocks so you can mow in a neat mowing pattern. l Overlapping on straightaways Be sure that each mowing lane overlaps sufficiently. The recommended overlap width is between lo- 15 cm (4-6 in), or approximately the width of one of the mower’s front tires.
Operation on hills This lawn tractor is intended for use on relatively flat terrain. Operating on slopes exceeding in 1 O” (17% grade) could cause the tractor to tip over. Maximum safe operating angle o MAX MAXIMUM 10” (17% GRADE) NOTE: If you feel that you cannot accurately we suggest that you obtain an inclinometer. available at many hardware stores. judge the angle of a grade, These slope gauges are Mowing on hills l Reduce speed and exercise extreme caution.
Stopping the engine In an emergency: 1. Turn the engine switch 2. Set the parking brake. l ENGINE In normal use: 1. Move the P.T.O. OFF and depress the foot brake. SWITCH l P.T.O. 2. 3. 4. 5. lever to OFF (Disengaged). LEVER Move the shift lever to the Neutral Set the parking brake. Turn the engine switch OFF. Remove the engine switch key. position.
High Altitude Operation At high altitude, the standard carburetor air-fuel mixture will be too rich. Performance will decrease, and fuel consumption will increase. A very rich fuel mixture may also foul the spark plugs and cause hard starting. High altitude performance can be improved by installing a smaller diameter main fuel jet in the carburetor and readjusting the pilot screw.
6. TRANSPORTING Transporting m The engine and exhaust system become hot during operation and remain hot for a while after stopping. Contact with hot engine components or the exhaust system can cause burns and can ignite some materials. Avoid touching the engine or exhaust system for at least 15 minutes the engine has stopped. Allow the engine to cool before transporting lawn tractor. 1 IMPORTANT NoT’CE 1 Towing the lawn tractor behind another ing it to push another vehicle can damage the lawn tractor.
Towing Trailer safety m a 0 l 0 . 0 . l l 0 Avoid sudden starts and stops while towing. The additional weight of the trailer or attachment could cause loss of control resulting in an accident. Never allow anyone to ride in the trailer. Failure to use the proper type of trailer hitch could cause the tractor to overturn resulting in severe personal injury. The weight of a trailer increases stopping distances; use extra care, especially when operating on a slope.
Maximum towing weight: . . . . . . . . . . . . . . . . . . . . . . . . . . . . . . . . . . . . . . . . . . . . . . . . . . . . . . . . 227 kg (500 Ibs) On flat surface On grade (1 O” or less) . . . . . . . . . . . . . . . . . . . . . . . . . . . . . . . . . . . . . . . . . . . . . . 127 kg (280 Ibs) m control Exceeding the maximum towing weight could lead to a loss of and cause an accident resulting in severe personal injury. Maximum tongue weight NOTE: Tongue weight the trailer hitch. m trol.
7. MAINTENANCE Periodic maintenance and adjustment are necessary to keep the lawn tractor in good operating condition. Service and inspect according to the MAINTENANCE SCHEDULE. l l l To avoid carbon monoxide poisoning, shut off the engine before performing any maintenance. If you run the engine in an area that is confined, or even partially enclosed, the air you breathe can contain a dangerous amount of exhaust gas. If the engine must be run for any reason, be sure the area is well-ventilated.
Maintenance ITEM NOTE: Perform II) ^. ILI schedule at every indrcated hour interval. period whichever Service the air cleaner more frequently when used in dusty areas. -. I nese stems snould be servrced by an authorized Honda dealer. unless mechanically proficient. See the Honda Shop Manual. 131 For professional commercial use. log hours of operation to determine 14) Must be serviced by an authorized Honda dealer. the owner proper has proper maintenance tools and is intervals.
Engine Oil Change Drain the draining. oil while the engine is warm to assure rapid and complete m. Used motor oil may cause skin cancer if repeatedly left in contact with the skin for prolonged periods. Although this is unlikely, unless you handle used oil on a daily basis, it is still advisable to thoroughly wash your hands with soap and water as soon as possible after handling used oil. 1. Open the engine hood. 2.
Air Cleaner Service A dirty air cleaner will restrict air flow to the carburetor. If you operate the lawn tractor in very dusty areas, clean the air cleaner more often than specified in the MAINTENANCE SCHEDULE. Operating the engine without the air cleaner will cause rapid engine wear. 1. Open the engine hood. 2. Remove the wing nut and air cleaner cover. Remove the wing nut and air cleaner elements. 3. Foam element: Clean in warm, soapy water, rinse, and dry thoroughly.
I Spark Plug Service Recommended m burns. BPR5ES (NGK), WlGEPR-U (ND) Touching a hot engine or exhaust system can cause Let the engine cool before performing maintenance. IMPORTANT engine spark plug: NOTICE 1 Spark plugs of the wrong heat serious range can cause gapped and free of damage. For best performance, deposits. the spark plug must be properly 1. Open the engine hood and remove the spark plug cap. 2. Clean any dirt from around the spark plug base. 3.
6. Install the spark plug carefully, 7. After the spark plug is seated, press the washer. by hand, to avoid cross-threading. tighten with a spark plug wrench [jlVIPORTANT NOTKE 1 A loose spark plug can get hot enough engine. Overtightening may damage the threads. to com- to damage the NOTE: If installing a new spark plug, tighten 112 turn after the spark plug seats to compress the washer. If reinstalling a used spark plug, tighten l/8l/4 turn after the spark plug seats to compress the washer.
Battery Service WRefilling battery fluid If the lawn tractor is operated with insufficient battery electrolyte, sulfation and battery plate damage will occur. If rapid loss of electrolyte is experienced, or if your battery seems to be weak, causing slow starting or other electrical problems, see you authorized Honda dealer. Open the engine hood and check the electrolyte level in each battery cell. Fill the battery with distilled water to the upper level line. Never overfill the battery.
n Battery cleaning If the battery terminals are contaminated and clean the terminals. . or corroded, 1. Disconnect the battery cable at the battery negative 2. Reomve battery set plate. 3. Disconnect at the battery positive (+) terminal. BATTERY SET POSITIVE TERMINAL (+I _ NEGATIVE TERMINAL I-1 remove the battery (-) terminal, 4. Remove the battery and clean the battery terminals and battery cable terminals with a wire brush or sand paper.
Wheel removal Do not attempt and knowledge to remove or replace a tire unless you have the equipment to do so properly. 1. Block the wheels securely. 2. Remove the wheel cap, and then remove the cotter pin and loosen the 19 mm nut one turn. 3. Jack up the front or rear of the lawn tractor, and place safety stands under the frame. Remove the 19 mm nut, washer, and wheel. 4. Rear wheel only; apply a thin coat of grease to the rear axle (splined position) before installing the rear wheel. 5.
Cutter deck removal m Never attempt to remove the cutter running. Remove the key from the engine switch plug cap to prevent accidental start up. deck while the engine is and disconnect thespark 1. Lower the cutter deck and loosen the belt tension 23). 2. Remove the belt from the engine pulley. adjusting knob (page PULLEY FRONT 3. Remove the belt from the deck driven pully. FRONT .
3. Remove the six yellow-colored remove the front deck links. lock pins (three on each side), and then FRONT LINK DECK , WASHER \ LOCK PIN 4. Raise the deck height adjusting lever as far as it will go. 5. Turn the steering wheel all the way to the left, and carefully deck from the right side of the tractor.
6. Installation is the reverse of disassembly. WASHER LOCK NOTE: After installation, -PIN readjust drive belt tension.
Cutter deck drive belt replacement Shut the engine off and set the parking brake before maintenance. To prevent accidental start-up, remove the enigne switch nect the spark plug cap. l l Wear when If the very performing any key and discon- heavy gloves to protect your hands when replacing drive belts or working with the cutter blades. tractor has been running, the engine, muffler and radiator will be hot. Allow them to cool before proceeding. 1. Lower the cutter deck. 2.
Blade belt replacement 1. Remove the cutter deck (see pages 53 and 54). 2. Remove the nuts and then remove the belt stopper and pulley cover. 3. Pull the belt off pulley A, hold the belt securely and slowly release the tensioner pulley. m Wear heavy gloves to protect your hands when blade belt, and don’t put your hands between the pulleys. . 4. Remove the belt from the other pulleys, BELT STOPPER replacing and replace the belt.
Blade bolt tightness/Blade HBlade 1. 2. 3. 4. replacement bolt tightness Remove the cutter deck from the lawn tractor (see pages 53 and 54). Turn the cutter deck upside down. Clean dirt and grass from the blade and the inside of the cutter deck. While wearing heavy gloves, hold the blade firmly, and use a torque wrench to check that the blade bolt is properly tightened. Blade bolt torque: 6.0 kg-m (44 ft-lb) TORQUE WRENCH n Blade removal 1.
1 Blade installation 1 IMPORTANT NOTICE 1 Use a genuine Honda replacement blade or equiva- lent. l 1. Clean dirt and grass from the blade, blade holder, and the inside of the cutter deck. 2. Install the blade holder, blade, washer, and blade bolts. . BLADE BOLT LOW-LIFT (left side) BLADE WASHER BLADE BLADE HOLDER HIGH-LIFT (right side) .r i NOTE: l Right and left blades are not interchangeable.
Spark arrester maintenance (optional part) You can purchase an optional, U.S.D.A. qualified spark arrester for this product from your authorized Honda Power Equipment dealer. Spark arresters are required in some areas; check local laws and regulations before operaing this Honda product. m The muffler becomes very hot during operation and remains hot for a while after the engine stops. Be careful not to touch the muffler while it is hot. Allow it to cool before proceeding. The spark efficiency.
Fuse replacement The 20 A main fuse is located near the battery on the positive (+I terminal. When frequent fuse failure occurs, it usually indicates a short circuit or an overload in the electrical system. See your authorized Honda dealer for repair. To replace a fuse, pull the old fuse out of the clips with your finger. new fuse into the clips. 20 A MAIN m Serious FUSE Push a 5 A SUB FUSE Never use a fuse with a different rating from that specified.
Fuel filter Remove the fuel filter by pulling it out of its clip under the fuel tank and visually inspect it through the opening in the hitch plate. Replace the filter if it is contaminated with dirt or water. NOTE: Drain the fuel tank before disconnecting filter (see page 63). the fuel lines from the fuel . FUEL FILTER . Transmission oil 1. Park the tractor on level ground. 2. Remove the oil filler cap and make sure that the oil level is up to the lower edge of the oil filler hole. 3.
8. LONG TERM STORAGE Preparation for storage The engine becomes very hot during operation and remains after stopping. Allow the engine to cool before storing. m burns Contact with a hot engine or exhaust system or fires. Let the engine cool before storing. The following steps should be taken to protect it will be stored for longer than 30 days. 1.
2. Change the engine oil (see page 46). NOTE: If the lawn tractor will be stored for longer than 3 months, remove the spark plug and pour three tablespoons (approximately 1 oz.) of clean motor oil into the cylinder. t , Place the P.T.O. (Power Take-off) lever in the front clutch several rotations by hand, then the OFF position. Reinstall the spark plug. ON position. return the P.T.O. Turn the lever to m Be sure to wear heavy-duty gloves when turning the front clutch.
4. If equipped with the optional grass catcher, be sure to empty and clean the bags before storage. 5. Remove the cutter deck (see pages 53 and 54). 6. Turn the cutter deck upside down. Clean the underside of the deck with water, and dry thoroughly. 7. For longer service and greater efficiency, keep the underside of the mower housing clean and free of accumulated grass clippings by washing it down with a hose after use and/or cleaning it with a wire brush and scraper.
9. TROUBLESHOOTING Engine fails to start 1. No fuel. 2. Shift lever in gear. -Position 3. P.T.O. lever engaged. 4. Spark plug faulty or -Regap improperly gapped. 5. Spark plug wire loose -Check or disconnected. 6. Fuel not reaching carburetor. 7. Discharged battery or loose terminal. 8. Blown fuse @Add fuel. shift lever in NEUTRAL. lever in DISENGAGE. plug or replace (see pages 48 and 49). spark plug wire. P.T.O. See your authorized Honda dealer. Charge battery or retighten (see page 51).
I Oil consumption 1. Incorrect oil viscosity2. Oil leaks 3. Worn piston ring, etc.4. Oil level too high . . Excessive vibration 1. Loose blade or enginemounting hardware. 2. Blade damaged or out ofbalance. 3. Belt damaged. 4. Each pulley damaged orpulleys not aligned. Battery will not charge 1. Dead cell in battery.2. Loose electrical connec-tions or broken wire. Parking brake warning 1. Blown fuse 2. Faulty buzzer buzzer Steering is too heavy 1.
Uneven mowing 1. Lawn tractor speed too fast-shift to lower speed. Clean inside deck. 2. Grass accumulationinside deck. ) Replace blade or see your authorized 3. Dull blade. Honda dealer. Check tire pressure (see page 25). 4. Tires improperly inflated.~Check cutter deck mounting. 5. Mower not level. See your authorized Honda dealer. Change to proper height. 6. Wrong cutter deck height.-+ 7. Chute clogged (if equipped -----) Empty grass bag and chute. with optional grass bag). hallow to dry before cutting.
Blade does not rotate or stop 1. Blade belt worn or broken .-Replace 2. P.T.O. lever malfunction .-See Scalping 1. Anti-scalp rollers not adjusted properly. 2. Cutting height too low.---) 3. Turning speed fast.4. Uneven surface. 5. Rough and uneven surface.---, with new belt (see page 57). your authorized Honda dealer. *Adjust anti-scalp rollers (see page 24). Raise cutter deck height. Lower turning speed. ) Change cutting pattern. Adjust with cutting height adjuster (see page 34).
IO. SPECIFICATIONS MODEL H4013 Power products description code MZAR ENGINE Model Type Displacement Bore and stroke Ignition timing Ignition system Cooling system Engine oil capacity Spark plug FRAME Dimensions Length x Width Wheel GXV390 OHV single cylinder 389 cm3 (23.7 cu in) 88 x 64 mm (3.46 x 2.51 in) 20 + 2O BTDC Transistorized magneto Forced air 1.1 P (1.
I g z t&m ,.I I: w u*fa i? z@$*,!ep, 5:+L3 I I - IS@+!, 92 82 t-1. o/,a9+“EJqb- !J[m zl,y z_1 El00 B i z/g f 11 ‘1 PI z $11 YIcl:lg :Y P’1 $ $: = ;z;:;“” 11 I :I;;:I ‘I 1. WIRING DIAGRAM 7 ST'-1 w J gi..: & 5; is 2 ; I - 41 > ,w * kF IS Y. 8I 53 m$1 ag zi .: .
12. WARRANTY Owner SERVICE Satisfaction Your satisfaction and goodwill are important to your dealer and to us. All Honda warranty details are explained in the Distributor’s Limited Warranty. Normally, any problems concerning the product will be handled by your dealer’s service department. If you have a warranty problem that has not been handled to your satisfaction, we suggest you take the following action: * l l Discuss your problem with a member of dealership management.
Current customer service contact information: United States, Puerto Rico, and U.S. Virgin Islands: Honda Power Equipment dealership personnel are trained professionals. They should be able to answer any question you may have. If you encounter a problem that your dealer does not solve to your satisfaction, please discuss it with the dealership's management. The Service Manager or General Manager can help. Almost all problems are solved in this way.