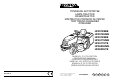
TONDEUSE AUTOPORTEE LAWN-TRACTOR RASENTRAKTOR MINITRACTOR CORTADOR DE CESPED TRATTORINO RASAERBA ZITMAAIER HF2315SBE HF2315HME HF2415SBE HF2417HME HF2417HTE HF2620HME HF2620HTE MANUEL D’UTILISATION OPERATOR’S MANUAL GEBRAUCHSANWEISUNG MANUAL DE INSTRUCCIONES MANUALE DI ISTRUZIONI GEBRUIKERSHANDLEIDING ★★★★★ Honda Europe Power Equipment S.A.
INTRODUCTION EN 1 INTRODUCTION Dear Customer, thank-you for having chosen one of our products. We hope that you will get complete satisfaction from using your new lawn-tractor and that it will fully meet all your expectations. This manual has been compiled in order that you may get to know your machine and to be able to use it safely and efficiently.
EN 2 TABLE OF CONTENTS TABLE OF CONTENTS 1. SAFETY REGULATIONS ............................................................................... 3 Regulations for using the machine safely 2. IDENTIFICATION OF THE MACHINE AND COMPONENTS ........................ 7 Explanations on how to identify the machine and its main components 3. UNPACKING AND ASSEMBLY ..................................................................... 9 Explanations on how to remove the packing and on how to assemble separated parts 4.
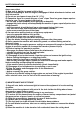
SAFETY REGULATIONS 1. EN 3 SAFETY REGULATIONS 1.1 HOW TO READ THE MANUAL Some paragraphs in the manual containing information of particular importance for safety and operation are highlighted at various levels of emphasis, and signify the following: NOTE IMPORTANT or These give details or further information on what has already been said, and aim to prevent damage to the machine. ! WARNING! Non-observance will result in the risk of injury to oneself or others.
EN 4 SAFETY REGULATIONS 1.2 SAFETY REGULATIONS (read carefully before using the machine) A) TRAINING 1) Read the instructions carefully. Be familiar with the controls and the proper use of the equipment. 2) Never allow children or people unfamiliar with these instructions to use the lawnmower. Local regulations can restrict the age of the operator. 3) Never mow while people, especially children, or pets are nearby.
SAFETY REGULATIONS EN 5 fumes can collect. 2) Mow only in daylight or good artificial light. 3) Before attempting to start the engine, disengage all blade attachment clutches and shift into neutral. 4) Do not use on slopes of more than 10° (17%). 5) Remember there is no such thing as a “safe” slope. Travel on grass slopes requires particular care.
EN 6 SAFETY REGULATIONS 1.3 SAFETY DECALS Your machine must be used with care. Therefore, decals have been placed on the machine, to remind you pictorially of the main precautions to take during use. These decals are to be considered an integral part of the machine. If a decal should fall off or become illegible, contact your Dealer to replace it. Their meaning is explained below. 1 3 2 4 1 = Warning: Read the instructions before operating this machine.
IDENTIFICATION OF THE MACHINE AND COMPONENTS 2. EN 7 IDENTIFICATION OF THE MACHINE AND COMPONENTS 2.1 IDENTIFICATION OF THE MACHINE The plate located on the left side of the main frame has the essential data of each machine. The serial number (5) must be quoted when you require technical assistance or spare parts. 1. Acoustic power level according to directive 2000/14/EEC 2. Conformity mark according to directive 98/37/EEC 3. Year of manufacture 4. Type of machine 5. Serial number 6. Weight in kg 7.
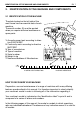
EN 8 IDENTIFICATION OF THE MACHINE AND COMPONENTS 2.2 IDENTIFICATION OF MAIN COMPONENTS Various main components can be seen on the machine, and these have the following functions: 1. Cutting deck: this is the guard enclosing the rotating blades. 2. Blades: these are what cut the grass. The wings at the ends help convey the cut grass towards the collector channel. 3. Collector channel: this is the part connecting the cutting deck to the grasscatcher. 4.
UNPACKING AND ASSEMBLY 3. EN 9 UNPACKING AND ASSEMBLY For storage and transport reasons, some components of the machine are not directly installed in the factory, but have to be assembled after their removal from the packing. Final assembly is carried out by following these simple instructions. IMPORTANT The machine is supplied without engine oil or fuel. Before starting up the engine, fill with oil and fuel following the instructions. 3.
EN 10 UNPACKING AND ASSEMBLY with the hole in the shaft and insert the pin supplied (3) using a hammer, ensuring that the end comes completely through to the opposite side. NOTE To avoid damaging the steering wheel, use a punch of the same size to push the pin in the last part. 3.3 FITTING THE SEAT ➤ HF2•••◊BE Mount the seat (1) on the plate (2) using the screws (3).
UNPACKING AND ASSEMBLY EN 11 or 31,5° Baumé) until the indicated level is reached, distributing it evenly among the six elements. 6 1 2 7 Close the six caps (5) which are included and begin charging the battery. Remount the battery on the machine. The elastic strap (2) shoud be placed behind the filling caps (5) of the battery. Connect the red cable (6) to first the positive terminal (+) then the black cable (7) to the negative terminal (–) using the supplied screws as indicated.
EN 12 UNPACKING AND ASSEMBLY the wings (1a) are turned inwards. Hook the upper part of the grass-catcher frame (5) onto the brackets and centre it up with the rear plate (2). 5 1a Adjust the position of the two brackets (1) to the stop (6) so that, when turning the grass-catcher frame, the pin (7) slots into the seat (8) correctly.
UNPACKING AND ASSEMBLY EN 13 3.8 REMOVAL OF THE STOP FROM THE HOOKING PAWL OF THE GRASSCATCHER For transport purposes, the pawl (1) hooking the grass-catcher is held onto the rear plate by a stop (2). This stop must be removed before fitting the grass-catcher brackets, and is not to be subsequently used. 2 1 3.
EN 14 UNPACKING AND ASSEMBLY shown. Fit the two rubber caps (10) into the holes in the two side elements (7). E) Insert the frame in the canvas cover (11) making sure it is correctly positioned on the base perimeter. Hook the plastic profiles (12) onto the frame tubes with the aid of a screw-driver (13). ➤ HF2•••SBE HF2•••HME F) Place the plate (14) between the canvas and the lower part of the frame’s right side element (7a), lining up the holes.
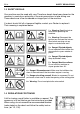
CONTROLS AND INSTRUMENTS 4. EN 15 CONTROLS AND INSTRUMENTS 4.1 STEERING WHEEL Turns the front wheels. 4.2 CHOKE CONTROL This enriches the mixture so must only be used for the time necessary when starting from cold. 4.3 ACCELERATOR LEVER Regulates the engine's r.p.m. The positions are indicated on the plate and corre4.7 4.9.2 4.8.1 A 4.2 B 4.9.3 4.1 4.3 B 4.8.2 4.4 A 4.9.1 B 4.8.3 4.5 A A B 4.
EN 16 CONTROLS AND INSTRUMENTS spond to: «SLOW» for minimum engine speed «FAST» for maximum engine speed – When moving from one area to another, put the lever in a position between «SLOW» and «FAST». – When cutting, go to the «FAST» position. 4.4 KEY IGNITION SWITCH This key operated control has three positions: «OFF» everything is switched off; «ON» activates all parts; «START» engages the starter motor. On being released at the «START» position, the key will automatically return to «ON». 4.
CONTROLS AND INSTRUMENTS EN 17 correspond to just as many cutting heights. Their values are indicated in the “Specifications table” (☛ Chapter 9). – To go from one height to another, press the release button at the end of the lever. 4.7 PUSH-BUTTON FOR REVERSE MOWING By keeping the push-button pressed, it is possible to engage the reverse gear and go backwards even with the blades engaged, without causing the engine to stop. 4.8 BLADE ENGAGEMENT AND BRAKE CONTROL 4.8.1 A ➤ HF2•••SBE B The lever (4.
EN 18 CONTROLS AND INSTRUMENTS – If the blades are engaged when safety conditions have not been complied with, the engine shuts down and cannot be restarted (☛ 5.2). – On disengaging the blades (position "A"), a brake is simultaneously activated which stops their rotation in few seconds. – It is possible to engage the blades in reverse only by pressing push-button 4.7. 4.9 CONTROL FOR TIPPING GRASS-CATCHER ➤ HF2•••SBE HF2•••HME The grass-catcher may be tipped to empty by pulling the lever (4.9.
CONTROLS AND INSTRUMENTS ➤ HF2620HME EN 19 Afterwards, when a warning light comes on, it indicates: l m b c d e f g h j ➤ HF2315HME HF2417HME b) seat without operator; c) blades engaged; d) parking brake engaged; e) missing grass-catcher or stoneguard; f) insufficient battery recharge; look for the causes in chapter 7 of this manual; g) transmission in “neutral” position. h) low fuel: it means that approx. 1.
EN 20 CONTROLS AND INSTRUMENTS ➤ HF2•••SBE 4.21 CLUTCH / BRAKE PEDAL This pedal has a dual function: during the first part of its stroke, it acts as a clutch, engaging and disengaging drive to the wheels, and in the second part it acts as a brake on the rear wheels. 4.21 IMPORTANT Do not keep the pedal halfway between clutch engagement and disengagement for a long time; this can cause overheating and consequent damage to the transmission belt. NOTE N R 4.
CONTROLS AND INSTRUMENTS EN 21 speed. 4.31 – Increasing pressure on the pedal progressively increases the speed of the machine. – The pedal automatically goes into neutral «N» when released. – The neutral condition «N» is shown by the lighting of an indicator light (4.10.g). 4.32 N F N 4.33 REVERSE PEDAL This pedal engages reverse drive in the wheels and modulates the machine’s speed. 4.33 R 4.
EN 22 5. HOW TO USE HOW TO USE 5.1 SAFETY RECOMMENDATIONS ! DANGER! The machine must only be used for the purpose for which it was designed (cutting and collection of grass). Do not tamper with or remove the safety devices fitted to the machine. REMEMBER THAT THE USER IS ALWAYS RESPONSIBLE FOR DAMAGE AND INJURIES TO OTHERS. Before using the machine: – read the general safety regulations ( ☛ 1.
HOW TO USE EN 23 To start the engine, in all cases it is necessary that: – the transmission is in “neutral”; – the blades are not engaged; – the operator is seated or the parking brake is engaged.
EN 24 HOW TO USE 5.3 PRELIMINARY OPERATIONS BEFORE STARTING WORK Before starting to work it is necessary to carry out several checks and operations to ensure that the work gives the best results and is done in maximum safety. 5.3.1 SEAT ADJUSTMENT ➤ HF2•••◊BE To adjust the seat position, the four fixing screws (1) must be loosened. Move the seat along the support slots. 1 1 When you find the desired position, tighten the four screws (1).
HOW TO USE EN 25 5.3.3 FILLING WITH OIL AND FUEL IMPORTANT Use oil SAE 10W30 and Petrol Unleaded Euro 95. IMPORTANT Running the engine with an insufficient amount of oil can damage it very seriously. The use of a non-detergent or two-stroke engine oil can reduce the life of the engine. MAX MIN On a flat surface and with the engine off, remove the cap with the dipstick and dry it. Push it fully in without screwing it on, then take it out and check the oil level.
EN 26 HOW TO USE 5.3.5 FITTING THE PROTECTION DEVICES AT THE EXIT (GRASS-CATCHER OR STONE-GUARD) ! WARNING! Never use the machine without having fitted the protection devices at the exit! ➤ HF2•••HTE 1 The protection devices must be fitted with the tipping levers lowered. Attach the grass-catcher inserting the upper tube of the frame into the slots of the 2 brackets (1). Make sure that the lower tube of the opening of the grass-catcher hooks onto the pawl (2).
HOW TO USE EN 27 5.4 USING THE MACHINE 5.4.1 STARTING ! DANGER! All starting operations have to be effected in an open or well-ventilated area! ALWAYS REMEMBER THAT THE ENGINE’S EXHAUST FUMES ARE TOXIC! To start the engine: – – – – – – engage the parking brake (☛ 4.5), on sloping ground; put the transmission into neutral («N») (☛ 4.22 or 4.32/33); disengage the blades (☛ 4.8); if started cold, use the choke (☛ 4.2); position the accelerator lever (☛ 4.
EN 28 HOW TO USE 5.4.2 FORWARD DRIVE AND MOVING WITHOUT MOWING ! WARNING! This machine has not been approved for use on public roads. It has to be used (as indicated by the Highway Code) in private areas closed to traffic. NOTE When moving the machine, the blades must be disengaged and the cutting deck put at its highest position (position «7»). ➤ HF2•••SBE Put the accelerator control between the «SLOW» and «FAST» positions, and the gear change lever in the 1st speed position (☛ 4.22).
HOW TO USE EN 29 5.4.3 BRAKING First, reduce the machine’s speed by reducing the engine’s r.p.m. and then push the brake pedal (☛ 4.21 or 4.31) to further reduce the speed until the machine stops. ➤ HF2•••HME HF2•••HTE NOTE The machine already slows down considerably by just releasing the drive pedal in forward or reverse. 5.4.4 REVERSE Reverse must be engaged ONLY when the machine is stopped.
EN 30 HOW TO USE tain space in the lowest position, whereas it does not function when in the highest position. 1 To change the position, unscrew end remove the pin (1) then reposition the wheel (2) in the upper or lower hole of the wale shown on the diagram. 2 ! WARNING! This work is to be done to all four wheels, WITH THE ENGINE OFF AND THE BLADES DISENGAGED.
HOW TO USE EN 31 5.4.6 EMPTYING THE GRASS-CATCHER Do not let the grass-catcher become too full as this may block the collector channel. When the grass-catcher is full there is an intermittent audible warning. At this point: – – – – lower the engine speed; go into neutral (N) (☛ 4.22 or 4.32/33) and stop forward movement; engage the parking brake on slopes; disengage the blades (☛ 4.
EN 32 HOW TO USE 5.4.7 UNBLOCKING THE COLLECTOR CHANNEL Cutting very tall or wet grass, particularly at too high speed, can cause the collector channel to become blocked. Should this happen, it will be necessary to: – stop forward movement immediately, disengage the blades, stop the engine and remove the key; – take off the grass-catcher or stone-guard; – remove the accumulated cuttings, reaching them from the outlet of the collector channel.
HOW TO USE EN 33 5.4.11 CLEANING AND STORAGE Put the machine away in a dry place protected from weather and, if possible, cover with a cloth. After each mowing, clean the outside of the machine, empty the grass-catcher and shake it to remove residual grass and earth. ! WARNING! Always empty the grass-catcher and do not leave containers full of cut grass inside a room.
EN 34 HOW TO USE 5.4.12 STORAGE AND INACTIVITY FOR LONG PERIODS If the machine is likely to be unused for a long period (more than 1 month), disconnect the ground (black) cable from the battery. Lubricate all joints as directed (☛ 6.2.1). ! WARNING! Carefully remove any dry grass cuttings which may have collected around the engine or silencer to prevent their catching fire the next time the machine is used! Empty the fuel tank by disconnecting the tube situated at the inlet of the fuel filter (1).
HOW TO USE EN 35 IMPORTANT The battery must be kept in a cool and dry place. Before a long storage period (more than 1 month), always charge the battery, only with the specific charger supplied with your machine, and then recharge before using again (☛ 6.2.4). The next time the machine is used, check that there are no fuel leaks from the tubes or carburettor. 5.4.
EN 36 HOW TO USE ! WARNING! Take care when beginning forward movement on sloping ground to prevent the risk of tipping up. Reduce the forward speed before going on a slope, particularly downhill. ! DANGER! Never use reverse to reduce speed going downhill. control of the machine may be lost, particularly on slippery surfaces. ➤ HF2•••SBE ! DANGER! Never ride the machine on slopes in neutral gear or with the clutch out! Always engage a low gear before leaving the machine stopped and unattended.
HOW TO USE EN 37 4. The engine must run at full speed, both to ensure a sharp cut of the grass and to get the necessary thrust to push the cuttings through the collector channel. 5. The frequency of mowing should be in relation to the rate of growth of the grass, which should not be left to grow too much between one cut and the next. 6. During hot and dry periods, the grass should be cut a little higher to prevent the ground from drying out. 7.
EN 38 HOW TO USE To ... You will need to ... Cut the grass (☛ 5.4.5) Fit the grass-catcher or stone-guard, adjust the height of the cutting deck wheels and move the accelerator; engage the blades and adjust the cutting height. ➤ HF2•••SBE : push the pedal right down, engage the gear (☛ 4.22) and then gradually release the pedal; ➤ HF2•••HME HF2•••HTE :press the drive pedal forward (☛ 4.32); Empty the grass-catcher (☛ 5.4.
MAINTENANCE 6. EN 39 MAINTENANCE 6.1 SAFETY RECOMMENDATIONS ! WARNING! Before cleaning, maintenance or repair work, take out the ignition key and read the relevant instructions. Wear suitable clothing and heavy gloves when dismantling and refitting the blades and in all other hazardous situations for hands. ! WARNING! Never use the machine with worn or damaged parts. Faulty or worn-out parts must always be replaced and not repaired.
EN 40 MAINTENANCE a) Periodic maintenance (☛ 6.2.2) HOURS ➤ 10 25 50 100 1.2 1.15 1.1 1.14 1.2 2 1) 1.5 1.1 1.9 1.7 1.9 1.12 1.3 1.13 1.12 1.3 1.13 1.10 1.11 HF24••◊•• 10 25 50 100 HOURS ➤ HF2315◊•• HF26••◊•• 1.2 1.15 1.1 1.14 1.2 2 1) 1.5 1.1 1.11 1.
MAINTENANCE EN 41 b) Lubrication GREASE OIL - SAE 30 ➤ HF2315◊•• ➤ HF24••◊•• ➤ HF2•••S•• ➤ HF26••◊•• HF2•••H••
EN 42 MAINTENANCE 6.2.2 GUIDE TO SCHEDULED MAINTENANCE This table is to help you maintain your machine’s safety and performance. It shows the main maintenance and lubrication work, indicating the frequency with which it should be carried out. To the right of each item there is a box where you write the date or after how many hours of operation the work was carried out. WORK HOURS 1. MACHINE 25 1.1 Check of tightness and sharpness of blades 1.2 Blade replacement 100 1.3 Check the transmission belt 25 1.
MAINTENANCE EN 43 6.2.3 REAR AXLE This is a sealed single unit which does not require maintenance. It is permanently lubricated and this lubricant does not need changing or topping up. 6.2.4 BATTERY To ensure long life to the battery, it is essential to keep it carefully maintained. The battery on your machine must be charged before using for the first time (☛ 3.4). 1 During periods when it is not used, the charge level can be kept constant by using the maintenance battery charger supplied.
EN 44 MAINTENANCE 6.3 CHECKS AND ADJUSTMENTS 6.3.1 DISMANTLING, SHARPENING AND BALANCING BLADES Blades that are badly sharpened tear at the grass, reduce collection and make the lawn turn yellow. IMPORTANT When accessing the blades, remove the cutting deck that is equipped with a quick release system that makes their removal from the machine easy.
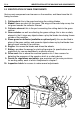
MAINTENANCE EN 45 ing it out towards the left so that all the pins come out of their positions. 10 When assembling, perform the operations described above in reverse while making sure that the front terminal of the collector channel properly fits into the exit of the cutting deck. ➤ HF24••◊•• HF26••◊•• 1 2 Put the cutting height adjustment lever into the notch at position "1". ➤ Only for HF24••◊•• : 10 release the spring (1) of the blade engagement.
EN 46 MAINTENANCE out loosening or changing the position of the nuts (8) and locknuts (9). Remove the two cotter pins (10) of the rear pins. After checking that there are no obstructions, remove the deck in such a way that all the pins come out of their housings. When assembling, ensure that the two rear holes of the corner joints are used for fixing the pins (7).
MAINTENANCE EN 47 ! WARNING! The blades differ and are contra-rotating. When installing them, make sure that they are correctly positioned. ! WARNING! 4 3 1 2 When re-fitting the blades, always follow the indicated sequence, making sure that the blades' wings are facing 1 towards the interior of the cutting 2 deck and that the cupped side of the cup washer (1) is pressing against the blade. Tighten the fix2 1 ing screws (2) using a torque wrench set to 45-50 Nm.
EN 48 MAINTENANCE 7 - 9) of the three trace rods until the deck is resting on the blocks. – turn the two right-hand upper nuts (6 - 8) and the left-hand lower nut (4) to the point where the deck begins to lift. Tighten the three locknuts (5 - 7 - 9) and turn the nuts (3) until the slightest movement of the lifting lever brings about a similar movement of all the lifting rods.
MAINTENANCE EN 49 – turn both the rear screws (5) until the rear of the deck begins to rise both at the right and the left, and then tighten the relative locknuts (6). 4 3 7 If you are unable to adjust the cutting deck properly, contact your Dealer. 6.3.3 ADJUSTING BLADE ENGAGEMENT AND BLADE BRAKE When the lever to disengage the blades is operated, this also brings the blade brake into operation for stopping the blades within few seconds.
EN 50 MAINTENANCE ➤ HF2315HME With the engine running, engage the blades and then switch off the engine without disengaging the blades. Turn the adjusting nut (1) until the correct spring length (2) is achieved. Disengage the blades with the engine off. After regulation, the cable (3) should be slack when the blades are disengaged, to keep the blade brake efficient. 2 3 1 91 ÷ 94 mm ➤ HF2417◊•• With the engine running, engage the blades and then switch off the engine without disengaging the blades.
MAINTENANCE EN 51 ➤ HF2•••SBE A A = 47,5 - 49,5 mm ➤ HF2•••HME HF2•••HTE B = 45 - 47 mm 2 3 measured inside the washers. When the adjustment has been made, tighten the nut (1). 1 IMPORTANT 1 3 Do not screw below these levels to avoid overloading the brake unit. B ! WARNING! If the brake still does not work properly even after this adjustment, immediately contact your Dealer . DO NOT ATTEMPT OTHER WORK ON THE BRAKE THAN DESCRIBED HERE. 2 6.3.
EN 52 MAINTENANCE 6.3.6 ADJUSTMENT OF THE SPRING OF THE PAWL FOR HOOKING THE GRASS-CATCHER If the grass-catcher tends to jump about and to open up when going over rough ground, or if it is difficult to hook back on after being emptied, the tension of the spring will need to be adjusted(1). 1 Change the hooking point by using one of the holes (2) until the required result is achieved. 2 6.4 DISMANTLING AND REPLACEMENT 6.4.
MAINTENANCE 2 EN 53 1 2 1 4 3 3 ➤ HF23••◊•• HF24••◊•• ➤ HF2620◊•• 5. Install the new oil filter on the filter base and tighten it by hand until the O-ring seats against the filter base. 6. Tighten the oil filter to the specified torque (12 Nm - 1.20 kgm). IMPORTANT Use only a Honda genuine oil filter or a filter of equivalent quality specified for your model. Using the wrong Honda filter or a non-Honda filter which is not of equivalent quality may cause engine damage. 7.
EN 54 MAINTENANCE 1a 5 1b 2 4 3 6 1b 5 4 6 ➤ HF23••◊•• HF24••◊•• 3 2 ➤ HF2620◊•• IMPORTANT Never run the engine without the air cleaner. Rapid engine wear will result from contaminants, such as dust and dirt being drawn into the engine. 1. ➤ HF23••◊•• HF24••◊•• : Release the four latch tabs (1b) from the air cleaner cover (2), and remove the cover. ➤ HF2620◊•• : Remove the two air cleaner cover bolts (1a) from the air cleaner cover, and remove the cover. 2.
MAINTENANCE EN 55 4. Wipe dirt from the inside of the air cleaner case (5) and cover, using a moist rag. Be careful to prevent dirt from entering the clean chamber that leads to the carburetor. 5. Reinstall the air cleaner elements and the cover. ➤ HF23••◊•• HF24••◊•• : Tighten the two air cleaner cover bolts securely. ➤ HF2620◊•• : Hook the latch tabs (1b) securely. NOTE Do not allow dust, dirt, and debris to enter the clean chamber (air cleaner case) when servicing the air cleaner. 6.4.
EN 56 MAINTENANCE 0,70-0,80 mm 1 1 2 ➤ HF23••◊•• HF24••◊•• ➤ HF2620◊•• To ensure proper engine operation, the spark plugs must be properly gapped and free of deposits. 1. Remove the spark plug caps and use a spark plug wrench (1) to remove each spark plug. ! WARNING! If the engine has been running, the muffler will be very hot. Be careful not to touch the muffler. 2. Visually inspect the spark plugs. Discard the spark plug if there is apparent wear, or if the insulator is cracked or chipped.
MAINTENANCE EN 57 spark plug seats to compress the washer. When reinstalling a used spark plug, tighten 1/8 1/4 turn after the spark plug seats to compress the washer. IMPORTANT The spark plugs must be securely tightened. Improperly tightened spark plugs can become very hot and may damage the engine. 6.4.6 REPLACING WHEELS Stop the machine on a flat surface and put a block under a load-bearing part of the frame on the side that the wheel is to be changed.
EN 58 MAINTENANCE 6.4.9 REPLACING A FUSE A few fuses of various capacities are envisaged on the machine. Their functions and features are given in the following table: 1 - 10 Amps - (Red) protection of the main circuits and power circuits of the electronic card; ➤ HF23••◊•• HF24••◊•• 2 - 15 Amps - (Blue) protection of the recharge circuit; ➤ HF2620H•• 2 - 25 Amps - (White) 3 - 10 Amps - (Red) protection of the recharge circuit; protection of the grass-catcher tipping control circuit.
MAINTENANCE 7. EN 59 TROUBLESHOOTING PROBLEM LIKELY CAUSE 1. With the key at «ON» the dashboard remains off with no audible signal. The protection of the electronic card has cut in due to: SOLUTION Put the key in the «OFF» position and look for the cause of the problem: – badly connected battery – battery terminals crossed – completely flat battery or eroded battery plates – fuse blown – check connections (☛ 3.4) – check connections (☛ 3.4) – recharge battery (☛ 6.2.4) – replace fuse (10 A) (☛ 6.
EN 60 PROBLEM TROUBLESHOOTING LIKELY CAUSE 6. Weak engine perfor- – forward speed too high in relation to mance during cutting cutting height (☛ 5.4.5) 7. Engine stops when blades are engaged SOLUTION – reduce the forward speed and/or raise the cutting deck – you are not ready to engage the blades – sit firmly on the seat (if problem contin(☛ 5.2) ues, check micro-switch) – check that the grass-catcher or stoneguard are correctly in position (if problem continues, check micro-switch) 8.
TROUBLESHOOTING EN 61 PROBLEM LIKELY CAUSE ( ➤ models with electromagnetic clutch) – belt loosened – problems in the electromagnetic clutch – turn the adjusting nut (☛ 6.3.3) – contact your Dealer 14. Uneven cut and poor grass collection – cutting deck not parallel to the ground – check the tyre pressures (☛ 5.3.2) – re-align the cutting deck to the ground (☛ 6.3.2) – check that the blades are fitted properly (☛ 6.3.1) – sharpen or fit new blades (☛ 6.3.
EN 62 8. ACCESSORIES ON REQUEST ACCESSORIES (OPTIONAL) 1. STONE-GUARD KIT For use in place of the grass-catcher when the cuttings are not to be collected. 1 2. TOWING HITCH For towing a small trailer. 2 3. MULCHING PLUG It finely chops the grass cuttings and leaves them on the lawn, instead of collecting them in the grass-catcher.
SPECIFICATIONS 9. EN 63 SPECIFICATIONS HF2415SBE HF2417HME HF2417HTE HF2620HME HF2620HTE Electric system ................................. 12 V Battery ............................................... 24 Ah Engine: HONDA type ........................ GCV520 Operating engine speed ................... 2800 r.p.m. Front tyres ......................................... 13 x 5,00-6 Rear tyres ......................................... 18 x 8,50-8 Front tyres pressure ..........................
EN 64 10. ALPHABETICAL INDEX ALPHABETICAL INDEX Accelerator Function and use ....................................... 4.3 Audible warning Function .............................................. 4.10-m When it signals ...........................5.4.6 - 5.4.12 Battery Description ............................................. 2.2-7 Connections .............................................. 3.5 Prolonged lack of use ............................ 5.4.12 Maintenance and recharge ..................... 6.2.