
Operation Manual


67
7 MAINTENANCE
Maintenance procedures
Replacing the blades
To replace the blades, perform the procedures below.
N WARNING
- Put on a pair of work gloves before performing the following procedures.
NOTE:
- This work requires technical skill and knowledge, as well as special tools. Consult your dealer if you
cannot perform the procedures below.
- To maintain uniformity, replace all 3 blades and their nuts during replacement.
- Before replacing the blades, remove the grass clippings (M page 63) .
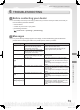
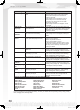
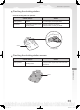
Replacement Item(s) Part number
Blade 72511-VP7-030
Nut 90305-VP7-000
1
Turn the power off.
Adjust the height of the blades to position 1 and
turn the lawnmower upside down.
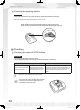
2
Hold the base of the blade disc with a 24 mm
spanner so that the blade disc does not rotate
when you rotate the nuts.
3
Remove the nut from each blade with a 8 mm
spanner.
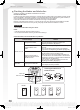
4
Replace the blades, insert each blade through
each bolt on the blade disk, and lightly tighten a
nut with the 8 mm spanner.
NOTE:
- If you are replacing the blades, use new nuts.
- Tighten the nuts after the shoulders of the nut
is securely in the hole of the blade.
5
Tighten the nuts to the specied torque value
using a torque wrench.
4.4~6.0 N • m (0.45~0.60 kgf • m, 3.2~4.4 lbf • ft)
NOTE:
- If you do not have a torque wrench, have your
dealer perform the work.
- Use a torque wrench between the blade disc
and the lawnmower body.
6
Check that the blades rotate smoothly. If they do
not rotate smoothly, remove and install the nuts
again.
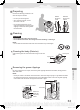
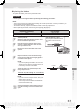
IncorrectCorrect
Hold the blade disc in place
Insert a spanner between the blade
disc holder and the lawnmower
body.
VP7Z.indb 67 2014/12/18 14:26:03