
Owner's Manual
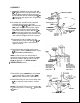
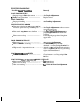

ASSEMBLY
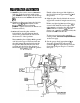
1.
Secure
the landside to the frog with
two
.
%If
x
1"
plow bolts and square nuts; finger
tighten.
Next,
mount the brace between
the moldboard and the landside with
%It
x
1
If
plow bolts and square nuts. Tighten
all
bolts securely.
2.
Assemble the standard to the landside
assembly after inserting the land
adjusting bolt
(94"
x
2%"
hex) through the
tab
on
the standard and into the square
nut. Then install the carriage bolt and
square nut
at
the top hole, and the
'Aff
x
2"
plow bolt and square nut (not shown)
at
the remaining hole in the landside,
frog,
and standard. Tighten the bolts securely.
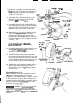
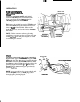
3.
Position the beam assembly over the
standard and secure with
two
1/13''
x
2*h"
hex bolts, lock washers, and hex nuts;
tighten securely.
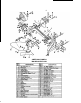
4.
Install the beam assembly on the mast
using
two
U
-
bolts
(saddled
from the front),
9@,lr
lock
washers,
and
hex
nuts.
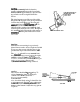
NOTE:
If
the tractor rear wheels
are
set
in narrow tread position, position the
beam
as
shown.
If
wheels
are
set wide. locate the
beam
as
outlined.
(See
Width
of
Cut
in
-
'OPERATION
section.)
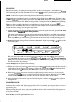
5.
Install the spacer
between
the mast
arms
at the bottom hole. Secure with a
%If
x
21/13
"
hex bolt, lock washer. and hex hut.
6.
Install the link pins and secure them with
%If
hex
jam
nuts, lock washers. and hex
nuts.
NOTE:
Use holes
X
-
X
for
tractors with
8.00
x
15"
or larger tires: use holes
2-2
with
8.00
x
12"
tires.
BEAM ASSEMBLY
BOLTS.
LOCK
WASHERS,
NUTS
CARRIAGE BOLT,
LAND ADJUSTING
BOLT,
Ye"
X
2%
"
BEAM
-
ASSEMBLV
Beam position
/I
with rear wheels
set
for narrow
tread; approx.
21
"
between tires.
\
Beam position
with rear wheels
set
for wide tread;
tread; approx.
30
"
between tires.
HOLIE
T
Use
with
8.00
x
12
"
tires