
Owner's Manual
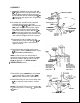
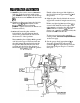

7.
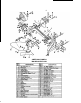
Insert the standard into the hub on the
.fork and secure it with the pin.
Leave
an
equal amount of the pin extending on
each side
of
the hub.
8.
Assemble the coulter blade hub to the
blade using three carriage bolts,
flat
SPACERS NUTS
washers, hex lock nuts.
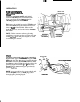
9.
Assemble the fork and coulter with the
axle, aligning the squares. Install two
flat
washers. and secure with the cotter pin.
Bend the legs of the pin over the axle.
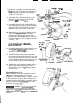
10.
Mount the coulter/fork assembly on the
left side of the plow beam using the
clamp and U
-
bolt. Insert two spacers
between the beam
arms,
then secure the
U
-
bolt with
94"
hex nuts: tighten the nuts
securely.
After assembly, refer to
PLOW
ADJUSTMENTS
to set the coulter.
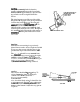
1 1.
Install the hub on the gauge wheel using
three
!%//
x
3/4't
carriage bolts, plain
washers, and hex lock nuts.
12.
Install the
flat
washer on the hex bolt,
insert the bolt through the hub. then add
a
second flat washer
and
the hex
jam
nut.
Secure with the lock washer and hex nut
on the inside of the bracket
as
shown.
13.
Mount the gauge wheel assembly on the
plow beam standard using the short
U
-
bolt and secure with
94"
lock washers
and
hex
nuts.
Preparing
Plow
for
Use
After assembly, clean the moldboard with
a
rag
soaked in turpentine, kerosene or
naphtha
so
that
dirt
will
be
less
likely to stick
to the protective coating. The coating can be
removed with an old brick or
a
pumice stone,
but this usually isn't
necessaq unless the
soil
is
too wet or stice.
b-
Work
in
a
well-ventilated
area
and
handle
cleaning materials
with
care.
Wipe
up any spilled liquid immediately
and
make
sure
the
area
is
dry
before
starting
the
tractor.
SPACERS NUTS
'
-STANDARD
-STANDARD
COULTE~
BLADE
WASHER
HEX BOLT
h
1
WASHERS
BR
A
CKET
LOCK WASHERS,
If
//I