
Product Manual

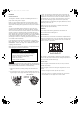
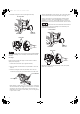
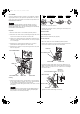
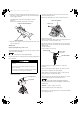
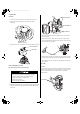
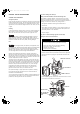
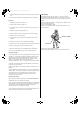
Table Of Contents

16
5. Operate the throttle system several times and check if it has
free play (i.e. throttle trigger does not move while operating the
throttle trigger interlock).
After adjustment, check the throttle trigger for smooth
operation.
Consult your authorized Honda dealer if necessary.
6. Reinstall the air cleaner cover by inserting the lower tabs, then
insert the upper tab.
SPARK PLUG
Recommended Spark Plug: CMR5H (NGK)
The recommended spark plug has the correct heat range for normal
engine operating temperatures.
An incorrect spark plug can cause engine damage.
For good performance, the spark plug must be properly gapped and
free of deposits.
1. Loosen the 5 mm socket bolt with a hexagon wrench, then
remove the top cover.
Do not operate the engine when the top cover is
removed.
Do not pull the recoil starter handle when the top
cover is removed.
You may be injured from the rotating parts or burned
by the muffler or other engine components.
THROTTLE TRIGGER INTERLOCK
THROTTLE TRIGGER
TOP COVER
5 mm SOCKET BOLT
2. Disconnect the spark plug cap, and remove any dirt from
around the spark plug area.
3. Remove the spark plug with a 5/8-inch spark plug wrench.
4. Inspect the spark plug.
Replace it if damaged or badly fouled, if the sealing washer is in
poor condition, or if the electrode is worn.
5. Measure the spark plug electrode gap with a wire-type feeler
gauge. Correct the gap, if necessary, by carefully bending the
side electrode.
The gap should be:
0.024–0.028 in (0.6–0.7 mm)
6. Install the spark plug carefully, by hand, to avoid cross-
threading.
7. After the spark plug is seated, tighten with a 5/8-inch spark
plug wrench to compress the sealing washer.
When installing a new spark plug, tighten 1/2 turn after the
spark plug seats to compress the washer.
When reinstalling the original spark plug, tighten 1/8–1/4 turn
after the spark plug seats to compress the washer.
A loose spark plug can overheat and damage the engine.
Overtightening the spark plug can damage the threads in the
cylinder head.
TORQUE: 11.8 Nm (1.2 kgf∙m, 8.7 lbf∙ft)
8. Attach the spark plug cap to the spark plug.
9. Install the top cover, and tighten the 5 mm socket bolt securely
with a hexagon wrench.
SPARK PLUG WRENCH
SPARK PLUG
SIDE ELECTRODE
0.024–0.028 in
(0.6–0.7 mm)
SEALING WASHER
31VP8600.fm Page 16 Friday, May 15, 2015 2:40 PM