honestech Claymation Studio 2.
. honestech End User License Agreement IMPORTANT : READ THE FOLLOWING TERMS AND CONDITIONS CAREFULLY BEFORE CONTINUING THIS INSTALLATION. IF YOU DO NOT AGREE WITH THESE TERMS AND CONDITIONS, PROMPTLY REMOVE THE SOFTWARE FROM YOUR COMPUTER AND RETURN THE SOFTWARE, INCLUDING THE DOCUMENTATION, TO YOUR SUPPLIER AND YOUR MONEY WILL BE REFUNDED. IF YOU DOWNLOADED THIS SOFTWARE, PLEASE REMOVE THE SOFTWARE FROM YOUR COMPUTER AND CONTACT YOUR SUPPLIER TO REQUEST A REFUND.
. Claymation Studio 2.0 5. Limited Warranty a. Licensor does not warrant that the functions contained in the Licensed Product and Hardware will meet Licensee’s requirements or that the operation of the Software and Hardware will be uninterrupted or error-free. Licensor does warrant that the media on which the Software is furnished and the hardware will be free from defects in materials and workmanship under normal use for a period of thirty (30) days from the date of delivery (“Warranty Period”).
. honestech Table of Contents End User License Agreement .................................................................................................. 2 Table of Contents..................................................................................................................... 4 1. About honestech Claymation Studio 2.0 ...................................................................... 6 1.1. What is Claymation Studio?....................................................................
. Claymation Studio 2.0 6.Storyboard ................................................................................................................. 29 6.1. Add Image Frame(s) ..................................................................................... 29 6.2. Cut Frame(s) ................................................................................................. 30 6.3. Copy Frame(s) .............................................................................................. 30 6.4.
. honestech 1. About honestech Claymation Studio 2.0 1.1. What is Claymation Studio? With honestech Claymation Studio, you can easily create stop-motion video. Capture images using a digital camera, webcam or DV camcorder and add background images, audio, and music to create your own stop-motion movies. and faster than ever with the new auto capture feature.
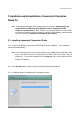
. Claymation Studio 2.0 2. Installation and Un-installation of honestech Claymation Studio 2.0 Note: To optimize performance of the product and your computer, defragmenting the Hard Disk Drive (HDD) prior to installing honestech Claymation Studio software is recommended. Also, if there is any security software on your PC that may block or interfere with the installation or removal of the software, please disable it or turn it off prior to installing or uninstalling the software. 2.1.
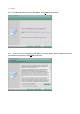
. honestech 2.1.4. The following welcome screen will appear. Click [Next >] to continue. 2.1.5. End-User License Agreement will appear as shown below, read the agreement and if you accept the agreement, click [Next] to continue.
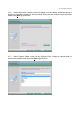
. Claymation Studio 2.0 2.1.6. Choose Destination Location screen will appear as shown below. Accept the default or change the installation location by clicking change. When your are ready to install Claymation Studio, click [Next >] to continue. 2.1.7. Select Program Folder screen will be displayed next. Accept the default folder or choose your program folder then click [Next >] to continue.
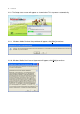
. honestech 2.1.8. The Setup status screen will appear as shown below. This step occurs automatically. 2.1.9. Windows Media Runtime Setup window will appear, click [Yes] to continue. 2.1.10. Windows Media User License Agreement will appear, click [Yes] to continue.
. Claymation Studio 2.0 2.1.11. Files will install automatically and the following completion window will appear. Click [OK] to finish Windows Media Runtime Setup. Note: The installation for Windows Media Format 9 is NOT necessary for Windows Vista systems. You will see this step only on Windows XP systems. 2.1.12. Claymation Studio Setup is now complete; click [Finish] to complete the installation.
. honestech 2.2. Uninstalling honestech Claymation Studio 2.0 2.2.1. Uninstall honestech Claymation Studio 2.0 using its own uninstallation file or the Add or Remove Programs in the Control Panel. 2.2.1.1. To uninstall using the uninstallation file: from the task bar, go to Start All Programs honestech Claymation Studio 2.0 and click on Uninstall honestech Claymation Studio 2.0 2.2.1.2. To uninstall with Add or Remove Programs: from the task bar, go to Start Control Panel Add or Remove Programs.
. Claymation Studio 2.0 2.2.2. The uninstallation is in progress. Please wait for completion.
. honestech 3. Program Interface 3.1. Menu 1. Menu options Manage projects (new, open and save/save as) Create output Settings 2. Help Button Help Button provides helpful information on certain features and how to use them. i. Click on the Help Button button ( ).
. Claymation Studio 2.0 ii. Move your mouse cursor over any tab or button you wish to know more about. If the Help Button is applicable, the mouse cursor will change to iii. 3. 4. 5. 6. Click on the tab or button, and an information window will pop up describing the specific feature and how to use it. Help Minimize Maximize Close 3.2. View Screen 1. 2. 3. Capture screen and frame preview. Preview On/Off Image overlay 3.3.Control Panel 1. Camera A. B. C. D. E. .
. honestech 4. Audio A. B. C. D. Preview captured frames Open and view background images Manual chroma key section adjustment Mask option 3.4. Storyboard 1. 2. 3. 4. 5.
. Claymation Studio 2.0 4. Managing Projects 4.1. What is a project? A project file is a small reference file that points the program to your Claymation content (pictures, audio recordings, titles etc.), typically saved elsewhere on your computer. A project file will not contain your actual work, but instead indicates which files are needed and what work you have done within that particular project. 4.2. Create New Project 1. Click and select New Project… to create a new project.
. honestech 4.4. Save Project 1. Click and select Save Project… to save the current project. (Hot-key : Ctrl+S , Ctrl+Shift+N) 2. If you want to save the project under a different name, select Save Project As… . Then, select a folder, name your project, and click Save.
. Claymation Studio 2.0 5. Capture 5.1. Select Camera Device 1. Click and select Settings. The Settings window will open up as shown below. A. Camera Device : select a camera from the list of available devices. a. Your camera must already be connected to your PC and installed properly. Please refer to the installation manual for your camera or webcam for details. B. Capture Size: select the capture resolution C. Frame Rate: adjust the number of frames to be played per second.
. honestech 5.2. Camera Setup You can use various tools available here to help you create/modify your figures. The view screen will switch to capture mode. 1. Click A. to access camera options. Capture Device B. : adjust the brightness : flip image horizontally (mirror image) : flip image vertically : return to default setting Grid: Displays grid on the window to help users adjust the figure more accurately. : Control the grid size using the slide bar.
. Claymation Studio 2.0 C.
. honestech 5.3. Capture Images 1. Click to switch the view screen into capture mode. : Switch to capture mode – the display screen will show the image from the camera. : Switch to preview mode – the display screen will show the image from the storyboard. 2. Place your figure in front of the camera. You will see your figure/object on the display screen. 3. Click to capture your first image. This image will be added to the Storyboard window as a frame. 4.
. Claymation Studio 2.
. honestech 5.4. Auto Capture Auto capture allows you to automatically capture images of your figure at a pre-defined time interval without manually clicking on the capture button. The display screen will switch to capture mode. : Displays the auto-capture speed. : Define auto-capture speed (i.e. Automatically capture a frame every 5 seconds) : Start capture 5.5.
. Claymation Studio 2.0 2. Click 3. Click on the display screen to select the chroma key color using the mouse pointer ( / to switch the chroma on/off. ). : The “+” indicates the selected color, and the box 4. indicates the tolerance range. You change the color that you want to use as the chroma key color here. 5. : Adjust the color range. 6. : Adjust the saturation range. Camera window : Shows the image from the capture device. : Adjust the mask area on the capture screen.
. honestech 7. How to apply chroma key to imported images: A. Click . B. Browse and locate the image file(s) you want to add to the Storyboard. C. The selected image will be shown in the display screen. It will say “Imported Image” on the top left corner. D. Click tab. E. Click to browse and select background image. F. Click to add the image to the Storyboard. switch to capture mode.
. Claymation Studio 2.0 5.6. Rotoscope If you need help in setting up your figure, the "Rotoscope" option allows you to view a still photo on top of your clay figure. You can use this feature to line up the images, then capture a frame using the 1. Click 2. Click 3. Click button. to access rotoscope options. / to switch rotoscope on/off. to browse and select a picture that you want to import as a reference photo. 4.
. honestech 5.7. Review your frames You can review your work before you create the final output. If you don’t like any of the frames you have created, you can go back and edit your work. A. Select one of the three options to change the thumbnail viewing mode. 1. Click 2. Click 3. Use the buttons below to review your work. 4. to switch the view screen into preview mode. to play the frames you have created so far in sequence. : Play the frames. : Jump to the first frame.
. Claymation Studio 2.0 6.Storyboard You can manage your frames in the storyboard. 6.1. Add Image Frame(s) 1. Click , or right-click on the Storyboard window. 2. Select “Import Image File(s)” from the context menu. 3. Browse and locate the image file(s) you want to add to the Storyboard. The selected image(s) will appear in the Storyboard.
. honestech 6.2. Cut Frame(s) 1. Select the frame(s) in the Storyboard you wish to cut, and right-click on them. 2. Select “Cut Frame(s)” from the context menu (Hot-key: Ctrl + X). 6.3. Copy Frame(s) 1. Select the frame(s) in the Storyboard you wish to copy and right-click on them. 2. Select “Copy Frame(s)” from the context menu (Hot-key: Ctrl + C). 6.4. Paste Frame(s) 1. Select the frame in the Storyboard you wish to place frames before, and right-click on it. 2.
. Claymation Studio 2.0 6.5. Move Frames 1. Select the frame(s) in the Storyboard you wish to move. 2. Click and hold, then drag the frame(s) to a different location. 3. Release your mouse button, and the frame will drop into the new location. Note: Intro/Ending title frames cannot be moved to different location. 6.6. Delete Frame(s) 1. Select the frame(s) in the Storyboard you wish to delete, and right-click on them. 2. Click menu.
. honestech 6.7. Insert Blank Frame(s) 1. Select the frame in the Storyboard you wish to insert a blank frame before and rightclick on it. 2. Select “Insert Blank Frame” from the context menu. 3. Select a color for the blank frame being inserted. 4. The blank frame will be inserted right before the selected frame.
. Claymation Studio 2.0 6.8. Add Intro/Ending Credits 1. Select “Add Intro Title” or “Add Ending Title” from the context menu. 2. Enter text onto the dialogue screen. D B A C a) Move the text location within the frame/window by clicking on the text and dragging. b) Enter text here. Click c) Select the duration of time for the title frame to display. d) Select the background for the title frame. background color, or click to change the font and size.
. honestech 7. Audio Recording 7.1. Record Audio Record audio for voice-overs, sound effects, etc... 1. Select the frame in the Storyboard you wish to record audio for, and right-click on it. 2. Select “Record audio” from the context menu. 3. Audio recording will begin after a 3 second countdown. 4. When the recording begins, your project will play in the Preview window. 5. When you stop recording, the recorded audio will be added to the selected frame.
. Claymation Studio 2.0 7.2. Delete Audio Delete audio recordings from your project/storyboard. 1. Select the frame in the Storyboard you wish to delete audio files from and right-click on it. 2. Select “Delete Audio” from the context menu. 3. The audio clip will be removed from the Storyboard.
. honestech 7.3. Add Background Music Add background music to enhance your animation. 1. Click 2. Click 3. The selected audio file will become the background music for your stop motion video. to access audio options. to browse and select an audio file you want to add.
. Claymation Studio 2.0 8. Creating Output Create video output in the format of your choice. 1. Click 2. Select output video format: WMV, AVI or MPEG. and select Output. 3.
. honestech 8.1. WMV Format Settings 1. Select a WMV profile of your choice. Other related settings will be available based on the profile you select. 2. Click [OK] to create the video output in WMV format.
. Claymation Studio 2.0 Note : For detailed instructions on the Profile Manager, please refer to the help menu in the Windows Media Encoder. Video Settings Video: supports both NTSC and PAL formats. Resolution: video resolution (horizontal lines X vertical lines) Frame rate: number of frames played per second. Audio Settings Sampling Rate: select audio sampling frequency (in Hz).
. honestech 8.2. AVI Format Settings 1. Under “Video Setting” tab: A. Resolution: select output video resolution B. Frame Rate: select the output frame rate. This is different from the frame rate for capturing. 2. Click on “Codec Setting” tab A. Video: i) ii) . Video codec: Select a video codec from the list of available codec on your PC. “No compression” option for video may result in large output file size.
. Claymation Studio 2.0 A lower value will result in higher video quality, but it will increase the output file size B. Audio: i) Audio codec: ii) Select an audio codec from the list of available codecs on your PC. Format: adjust audio quality settings. Note : Please contact the codec manufacturer/develop or refer to their user manual for appropriate assistance on how to use/configure specific video/audio codec.
. honestech 8.3. MPEG Format Settings 1. Under “Video Setting” tab: A. TYPE: select MPEG1 or MPEG2. B. Resolution: select video resolution C. i) MPEG1: 320x240 max ii) MPEG2: 720x480 or 720x576 Frame rate: number of frames to be created for each second of playback. i) Recommended settings (1) For North American users, NTSC setting is recommended: (a) Maximum resolution 720x480 (b) Maximum frame rate: 29.
. Claymation Studio 2.0 D. Select “Quality” i) A higher quality setting will result in better video quality, but it will increase the ouput file size. 2. Under “Audio Setting” tab: A. Sample rate: select the number of samples per second taken from audio signal B. Bit rate: select the number of bits processed per second.
. honestech 9.
. Claymation Studio 2.
. honestech honestech VHS to DVD 3.0 honestech VHS to DVD 3.0 is a revolutionary software that allows the easy and simple production of DVD/CD movies. Now you can save and keep your priceless home videos forever in sharp and crystal clear DVD/CD. Videotapes can deteriorate over time. Deteriorated videos will have color bleed, white specks, and other distortions.
. Claymation Studio 2.0 honestech VHS to DVD 3.0 Deluxe honestech VHS to DVD 3.0 Deluxe is a revolutionary software that allows the easy and simple production of DVD/CD movies. Now you can save and keep your priceless home videos forever in sharp and crystal clear DVD/CD. Videotapes can deteriorate over time. Deteriorated videos will have color bleed, white specks, and other distortions.
. honestech honestech Audio Recorder 2.0 Deluxe With just a few clicks, convert your analog music into digital formats including MP3s and audio CDs. Convert all of your analog music, including LP, 8-track, and cassette tapes into WAV file, MP3, audio CDs and MP3 CDs, and listen to them on your portable music players. Features 1. Noise Reduction Improve audio quality by reducing unwanted noise or statics. 2. Built-in Normalizer Controls irregular volume by increasing or decreasing as needed 3.
. Claymation Studio 2.0 honestech Fireman CD/DVD Burner 3.0 honestech Fireman CD/DVD Burner 3.0 allows you to create data, audio, or video discs. You can also import audio from music CDs and create system backup/recovery discs and bootableCD/DVD. With DVD Authoring Studio, you can create your own stylish video DVD with ease. Create photo slideshow DVD of using your digital photos that you can also play on your home DVD player.
. honestech honestech DVD Authoring Studio 2.0 With honestech DVD Authoring Studio 2.0, you can archive up to 27 hours movie in one dual-layer DVD. Create your own high-quality DVD movies with thie powerful software. Simply capture video from your web cam, digital camera or TV using your TV tuner/capture device and convert the video into DVD. Features 1. Ultra-Long DVD format Archive 16 hours of video on a DVD or 27 hours of video on dual-layer DVD. 2.
. Claymation Studio 2.0 honestech Burn DVD 3.2 honestech Burn DVD 3.2 lets your convert your video of various formats into DVD, VCD and SVCD. The simple 3 step interface guides user through the entire process. honestech Burn DVD 3.2 is easy enough for novice yet powerful enough for experienced users. Features 1. Automatic MPEG Conversion Feature Atomatically detects and convert the original video file into DVD, Video CD or SVCD format. 2.
. honestech honestech Video Editor 7.0 honestech Video Editor 7.0 provides user-friendly interface which allows even beginners to create and edit amazing videos. Compress and save your edited videos in high quality MPEG-1, MPEG-2, AVI, DV-AVI and WMV video format. Various rendering options: Full Rendering, Smart Rendering or Fast GOP (Group of Pictures) encoding methods. Title, Transition, Special Effects, and Overlay features allow you to personalize your videos with ease. Features 1.
. Claymation Studio 2.0 honestech Easy Video Editor 2.0 honestech Easy Video Editor 2.0 is an easy-to-use program that allows even a novice to split and merge video files of various formats. Features 1. Supports various video formats: AVI, DV-AVI, MPEG and WMV and are supported for input and output. WMV output format is supported for video streaming on the internet. 2. Multiple video files can be rendered simultaneously. 3.
. honestech honestech Photo DVD 3.0 honestech Photo DVD 3.0 is a simple program that allows you to create personalized photo slide shows on CD/DVD to watch on your television or computer. You can even add background music or a narrated audio file to your slide show. Features 1. Create photo slide shows to various video formats including DVD, VCD, SVCD, mini-DVD, MPEG, AVI, DV-AVI, and WMV. 2. Edit Pictures honestech Photo DVD 3.0 allows you to edit your pictures and add text or special effects. 3.
. Claymation Studio 2.0 honestech Video Patrol 5.0 honestech Video Patrol 5.0 provides a comprehensive personal video monitoring surveillance solution. You can monitor your home or office from anywhere with broadband internet access. You can control up to three cameras at a time, send e-mail notices to specified email accounts, and schedule monitoring time slots. You can record surveillance videos in MPEG format when a motion is detected. Features 8. Free Online membership (www.my-iptv.com) 1.
. honestech Honestech, Inc. North and Latin America P.O. Box 26365 Austin, TX 78755 Fax : 512-248-2215 E-mail : support@honestech.com http://www.honestech.com Honest Technology Taiwan Address : Room 6E08, No. 5, Sec. 5, Hsin-Yi Road., Taipei, Taiwan, R.O.C < Taipei World Trade Center > E-mail : Taiwan@honestech.com Honest Technology Japan Address : MS Bldg 6F, 2-25-4, Taitou, Taitou-Ku, Tokyo, 110-0016 JAPAN E-mail : japan@honestech.