BTH-03382 curved shower rod 72 in L x 1 in Dia (182.9 cm L x 2.5 cm Dia) WWW.HONEYCANDO.COM | SALES@HONEYCANDO.COM | 877.2.I.CAN.DO (877.242.
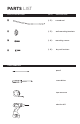
PARTS LIST PART/ILLUSTRATION (QTY) DESCRIPTION A ( 2 ) curved rod B ( 2 ) wall-mounting brackets C (4) mounting screws D (4) dry wall anchors TOOLS REQUIRED pencil screw driver tape measure electric drill
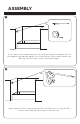
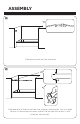
ASSEMBLY 1 With a pencil and tape measure, mark the wall above the center of the tub ledge at the desired height for installation of the curved shower rod. Be sure to mark each side at the same height. 2 B Align bottom of wall-mounting bracket with the marks in step #1. Be sure to complete for both ends of shower rod.
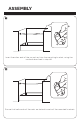
ASSEMBLY 3 D Drill holes in the marked locations for the mounting screws and insert the drywall screws. *Note: if screws will be going directly into the wall studs, wall anchors will not be necessary 4 B C Fasten brackets to the wall with the mounting screws provided. Repeat for other bracket.
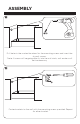
ASSEMBLY 5 A Slide one curved rod into the other. 6 A B Slide one end of the curved rod into place on the bracket. You will need to push in the buttons on each side of the curved rod to lock it into place on the bracket.
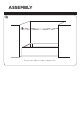
ASSEMBLY 7 A B Insert the other end of the curved rod into the mounting bracket, using the method described in step #6. 8 B Ensure that both ends of the rods are locked in each of the mounted brackets.
ASSEMBLY 9 Enjoy your new curved shower rod !
LIMITED LIFETIME WARRANTY Honey-Can-Do International, LLC (HCD) warrants its products will be free from defects in materials and workmanship when used for normal personal or household use, except as provided below. HCD, at its option, of purchase. This warranty DOES NOT apply to damage caused by negligence, misuse, excessive use, improper cleaning, improper assembly, or any circumstances not directly attributable to manufacturing defects.