
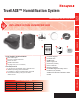
Installation Sheet


GETTING
STARTED
Personal Safety
• Wear safety glasses while installing the humidier.
• Do not cut into any air conditioning or electrical line.
• Follow professional safety standards and all local regulations for plumbing, electrical, and mechanical
considerations.
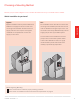
Mounting Location
• Mount the humidier in a level position to avoid water damage and ensure maximum output.
• Location must have access to a water line, drain, and power.
• Do not install the humidier where the ambient temperature is lower than 34°F (1.1°C) or higher than 90°F
(40°C).
• Mounting area must be strong enough to support humidier weight (up to 16 lbs [Fan] or 10 lbs [Bypass]).
• Do not mount directly to ductboard.
• If used near a pool or spa, make sure the humidier can not fall into the water or be splashed.
• Ensure that the top and bottom covers of the humidier can be removed and that the pad is accessible from
the chosen location.
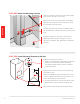
Water Supply and Drainage
• Consult local plumbing codes for drain size, material, and maximum temperature allowed.
If Replacing an Old Bypass Humidier
The humidier is not identical in size and shape to other Honeywell bypass humidiers. Before performing a
retrot installation, you might need to:
• Dry-t the humidier to the existing ducting, plumbing, and wiring before fastening it to the duct to ensure that
the existing connections will reach the humidier.
• If the duct opening of the old humidier is not the right size for the humidier, choose a new location or cover
the old opening with a piece of sheet metal and cut a new opening specically for the humidier using the
template provided.
Important Installation Requirements
Failure to comply with these requirements will result in voided warranty, improper installation, and
service callbacks.
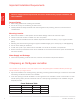
Cross Reference Table
Humidier Honeywell® Aprilaire® GeneralAire®
HE100 and HE150 HE225 500 570
HE200 and HE250 HE265 600 900
HE300 HE365 700 1000
Humidier 69-2413EF—17
4