
Installation Instructions


e7w WIRELESS EMS THERMOSTAT - INSTALLATION INSTRUCTIONS
31-00308–01 2
CAUTION
• Read instructions carefully. Failure to follow
them could damage the product or create a
hazard.
• Check the ratings given in the instructions
and on the product to ensure that the prod-
uct is suitable for your application.
• Installer must be a trained, experienced ser-
vice technician.
• After installation is complete, check product
operation as indicated in instructions.
• For variations of these systems, refer to the
installation instructions of the controlled
equipment.
INSTALLATION
Location
Select a location about 1.5m (5ft.) above the floor
with good air circulation at average temperature.
Do not mount thermostat where it may be af-
fected by:
• Drafts or dead spots behind doors or in cor-
ners.
• Hot or cold air from ducts.
• Radiant heat from sun or appliances.
• Concealed pipes or chimneys.
• Unheated (un-cooled) areas behind the ther-
mostat.
• Near other RF sources/ transmitters to avoid
interference.
• When the thermostat is equipped with PIR,
consider view angle, range characteristics,
and mounting position for proper coverage.
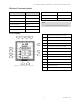
Figure 2. Recommended mounting location
Mounting
The e7w Wireless EMS thermostat supports
mounting on the following standard mounting
junction boxes; US single-gang, US double-gang
and UK standard gang. The installation kit pro-
vides a Smart Wall Mounting Plate.
If mounted on a single-gang box, the right side
(keypad side) of the e7w overlaps the wall area to
the right.
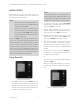
To mount the e7w, follow the below steps:
1. Take the Smart Mounting Plate and orient it
with the raised arrow embossed on mounting
plate pointing UP.
2. Attach the plate to the junction box using the
supplied screws as shown in Figure 3.
3. Insert the 4 AA alkaline batteries.
Note:
• Use alkaline batteries only.
• Refer the “Battery details” sections for
more information.
4. After inserting AA batteries, all segments and
characters of the LCD are illuminated for
couple of seconds. Confirm all segments and
characters on the e7w LCD are displayed
correctly.
Refer LCD Display section for more details.
5. If the LCD displays blank information, run
the following checks: