Prepare for File Transfer 1. Make sure the remote device has file sharing enabled. It must support the OBEX File Transfer server profile. Note: If the other device is also using the Bluetooth Connection Kit, you can enable file sharing by tapping the Bluetooth icon. In the pop-up menu, tap Transfer via Bluetooth | Enable File Sharing. 2. Now you are ready to browse the remote device. Tap on the Bluetooth icon. In the pop-up menu, tap Transfer via Bluetooth | Browse Remote Device. 3.
6. After the devices successfully connect, the Bluetooth File Explorer will appear. Half of the screen shows contents of the remote device, while the other half shows contents of your device (the local device). The very bottom of the screen reports the connection status. Send/Receive File(s) or Folder(s) 1. Select the file(s) or folder(s) that you wish to transfer. You can only select items from one device per transfer session. Single-tap items to select them for transfer.
4. After the transfer, a copy of each selected item should appear in the other device. Create a Folder 1. Tap on the File menu. Select Remote device or Local device, wherever you want to create a folder, then tap Create remote folder or Create local folder, as applicable. 2. Alternatively, on the Dolphin 9500/9550, you can tap and hold your stylus on an item in either the remote or local device that you wish to put in a new folder. In the pop-up menu, select Create folder. 3.
3. Tap and hold your stylus an item in either the remote or local device that you wish to put in a new folder. In the pop-up menu, select Delete folder. 4. In the Confirm screen, tap Yes. Refresh Remote View 1. Tap on the Device menu. Select Refresh remote view. 2. Your local device will begin to read the contents of the remote device. 3. After a few seconds, the view of the contents of the remote device will be refreshed. Connect/Disconnect To connect to the remote device, do the following: 1.
Exit Bluetooth File Explorer To exit the Bluetooth File Explorer, tap File | Exit. Receive Contact or File 1. Tap on the Bluetooth icon. In the pop-up menu, tap Transfer via Bluetooth | Receive Contact or File. 2. The Receive Contact or File status screen will appear. Your mobile computer will wait two minutes for the contact or file. 3. After successfully connecting to the remote device, the screen will report Connected then disappear. The new contact or file should now be on your device. 4.
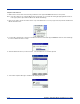
Enable File Sharing 1. Tap on the Bluetooth icon. In the pop-up menu, tap Transfer via Bluetooth | Enable File Sharing. 2. The Enable File Sharing status screen will appear. Your mobile computer will wait two minutes for the remote device to connect. 3. After successfully connecting to the remote device, the screen will report Connected. 4. If two minutes passes before you connect, tap Wait Again. 5. File sharing will be enabled until you end it by tapping Cancel.
Use the Dialer 1. To use the dialer, the mobile computer must already be connected to the Bluetooth phone. You can use the Get Connected! Wizard to do this. Also, the Bluetooth phone must be selected as your favorite. 2. Go to Start | Contacts. 3. Tap and hold your stylus on the contact you wish to dial to. In the pop-up menu, select Dial Contact. Alternatively, you can tap on Tools and select Dial Contact. 4.
Additionally, the following string can be included in a phone number: (',') The Dialer can not dial a phone number containing non-numeric characters other than those listed above. HHP recommends that you follow the standard Microsoft Outlook format for phone numbers. Get Connected Wizard The Get Connected! Wizard guides you through a one-time setup process that prepares the mobile computer and phone for Bluetooth connections. The wizard varies depending on what phone you want to connect to.
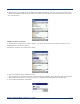
4. When the search is complete, a list of the discovered Bluetooth phones will appear. Choose the phone you wish to connect to, and tap Select. A service discovery phase will begin, about 5-10 seconds. 5. As prompted in the next screen, prepare your phone for bonding. For instructions on setting your phone to "Bondable" or "Pairable" mode, refer to your phone manual. Have your passkey ready, then tap Next>. 6. In the next screen, enter the passkey. Tap Reply. 7.
Note: You may also switch between different phones by assigning a new "favorite phone" in the Bluetooth Devices folder. Motorola Timeport 270C, Nokia 3650/6310/7650/8910/8910i 1. Tap on the Bluetooth task tray icon . In the pop-up menu, select Get Connected! 2. Follow the Bluetooth "Get Connected!" Wizard. In the second screen, use the drop-down list to select your Bluetooth phone. The wizard will provide tailored instructions for your phone. Note: The screens below are for the Nokia 7650. 3.
Automatic Connections - This procedure is optional but will make future Bluetooth connections more convenient. 6. Continue to the last screen of the wizard and tap Finish. Now proceed to STEP 6 to complete the bonding process and, if desired, set up automatic connections. Dial-up to Your Network Complete the following steps to create a new Bluetooth connection. Before setting up dial-up networking, prepare yourself with dial-up information and other necessary settings for your office network or ISP. 1.
2. In the next screen, enter a name for the dial-up connection. For the modem, select Bluetooth Phone. For the Baud Rate, select 115200. Tap Advanced… Note: Remember what you name the connection. You will need it when you start the connection. 3. The Port Settings screen will appear. If needed, tap on the TCP/IP and/or Name Servers screens to enter any necessary settings for your office network or ISP. Tap ok. 4. Tap Next. 5. In the Phone number field, enter the dial-up number. Tap Next. 6.
8. ONLY FOR MOTOROLA TIMEPORT 270C OR NOKIA 3650/6310/7650/8910/8910i: a) After you tap Connect for the first time, the phone will display a message asking if you want to bond. On Motorola, enter GRANT; on Nokia, enter ACCEPT. b) Make up a 4-16 digit passkey, enter it on the phone, then enter it on the Pocket PC. Note: The Bluetooth icon on the Today screen will blink to indicate a connection.
• • • • 9. Scroll to 10 Bluetooth, then press SELECT. Scroll to 4 View Paired Devices, then press SELECT. Highlight the Pocket PC, then press OPTIONS. Scroll to 3 Request Connection Authorization, then press NO. To use a different Bluetooth phone for dial-up networking, you can use the same connection setup, but you must make the new phone your favorite. Just run the Get Connected! Wizard again, select the new phone, and make it your new Favorite when prompted.
5 - 48 Dolphin® 9500/9550 Mobile Computer User’s Guide
6 Customizing Your Dolphin 9500/9550 You can customize your Dolphin 9500/9550 mobile by adjusting device settings and installing additional software. Adjusting Settings You can adjust device settings to suit the way you work. To see available options, tap Start, Settings, then the Personal or System tab located at the bottom of the screen.
4. Tap the file, such as a *.xip or *.exe file. The installation wizard will begin. Follow the directions on the screen. Adding a Program to the Start Menu Tap Start, Settings, Menus, the Start Menu tab, and then the check box for the program. If you do not see the program listed, you can either use File Explorer on the device to move the program to the Start Menu folder, or use ActiveSync on the desktop computer to create a shortcut to the program and place the shortcut in the Start Menu folder.
7 Applications Microsoft Pocket Outlook includes Calendar, Contacts, Tasks, Inbox, and Notes. You can use these programs individually or together. For example, e-mail addresses stored in Contacts can be used to address e-mail messages in Inbox. Using ActiveSync, you can synchronize information in Microsoft Outlook or Microsoft Exchange on your desktop computer with your device. You can also synchronize this information directly with a Microsoft Exchange server.
To create an appointment: 1. If you are in Day or Week view, tap the desired date and time for the appointment. 2. Tap New. 3. Using the input panel, enter a description and a location. Tap first to select the field. Tap to return to the calendar (the appointment is saved automatically). Tap to choose from predefined text. Tap to choose from previously entered locations. Tap to select a time. Tap to select a date. Notes is a good place for maps and directions. Entering an Appointment 4.
Using the Summary Screen When you tap an appointment in Calendar, a summary screen is displayed. To change the appointment, tap Edit. View appointment details. View. Tap to change appointment. Appointment Summary Screen Creating Meeting Requests You can use Calendar to set up meetings with users of Outlook or Pocket Outlook. The meeting request will be created automatically and sent either when you synchronize Inbox or when you connect to your e-mail server.
Contacts Contacts maintains a list of your friends and colleagues so that you can easily find the information you’re looking for, whether you’re at home or on the road. Using the device infrared (IR) port, you can quickly share Contacts information with other device users. Select the category of contacts you want displayed in the list. Tap and enter part of a name to quickly find it in the list. Tap to see additional phone numbers and e-mail addresses. Tap to display or edit the contact details.
To create a contact: 1. Tap New. Tap to return to the contact list (the contact is saved automatically). Scroll to see more fields. Notes is a good place for maps and directions. Creating a Contact 2. Using the input panel, enter a name and other contact information. You will need to scroll down to see all available fields. 3. To assign the contact to a category, scroll to and tap Categories and select a category from the list. In the contact list, you can display contacts by category. 4.
View contact details. Tap to view notes. Tap to change contact information.
Tasks Use Tasks to keep track of what you have to do. Select the category of tasks you want displayed in the list. Select the sort order of the list. Indicates high priority. Tap to display or edit the task details. Tap and hold to display a pop-up menu of actions. Tap to create a new task. Task Application Note: To change the way information is displayed in the list, tap Tools and then Options.
To create a task: 1. Tap New. Tap to return to the task list (the task is saved automatically). Tap to choose from predefined subjects. Notes is a good place for maps and drawings. Creating a Task 2. Using the input panel, enter a description. 3. You can enter a start date and due date or enter other information by first tapping the field. If the input panel is open, you will need to hide it to see all available fields. 4.
Using the Summary Screen When you tap a task in the task list, a summary screen is displayed. To change the task, tap Edit. View task details. Tap to show and hide additional summary information. View notes. Tap to change task.
Notes Quickly capture thoughts, reminders, ideas, drawings, and phone numbers with Notes. You can create a written note or a recording. You can also include a recording in a note. If a note is open when you create the recording, it will be included in the note as an icon. If the note list is displayed, it will be created as a stand-alone recording. Tap to change the sort order of the list. Tap to open a note or play a recording. Tap and hold to display a pop-up menu of actions. Tap to record.
To create a note: 1. Tap New. 2. Create your note by writing, drawing, typing, and recording. For more information about using the input panel, writing and drawing on the screen, and creating recordings, see Chapter xx. Tap to return to the note list (the note is saved automatically). Tap to show or hide the input panel. Tap to write on the screen. Tap to add a recording to the note.
• E-mail messages in the Outbox folder on your device are transferred to Exchange or Outlook, and then sent from those programs. • E-mail messages in subfolders must be selected in ActiveSync on your desktop computer in order to be transferred. Note: You can also synchronize e-mail messages with your desktop computer from a remote location. For more information, see Chapter 7.
Using the Message List Messages you receive are displayed in the message list. By default, the most recently received messages are displayed first in the list. Select the service and folder you want to display. Select the sort order for messages. Tap to open a message. Tap and hold to display a pop-up menu of actions. Tap to connect and to send and receive e-mail. Tap to connect to the selected service. InBox Application When you receive a message, tap it to open it.
Tap to return to the message list. Tap to delete this message. Tap to view the previous or next message. Tap to reply to or forward this message. Viewing A Message When you connect to your e-mail server or synchronize with your desktop computer, by default, you’ll receive messages from the last five days only, the first 100 lines of each new message, and file attachments of less than 100 KB in size. The original messages remain on the e-mail server or your desktop computer.
Composing Messages To compose a message: 1. Tap New. 2. In the To field, enter an e-mail or SMS address of one or more recipients, separating them with a semicolon, or select a name from the contact list by tapping the Address Book button. All e-mail addresses entered in the e-mail fields in Contacts appear in the Address Book. Tap to send the message. Tap to show or hide the complete header. Tap to show / hide the recording toolbar. Tap to display the Address Book. Tap to insert common messages.
Managing E-mail Messages and Folders By default, messages are displayed in one of five folders for each service you have created: Inbox, Deleted Items, Drafts, Outbox, and Sent Items. The Deleted Items folder contains messages that have been deleted on the device. The behavior of the Deleted and Sent Items folders depends on the options you have chosen. In the message list, tap Tools and then Options. On the Message tab, select your options.
8 Communications Using Microsoft ActiveSync, you can synchronize the information on your desktop computer with the information on your device. Synchronization compares the data on your Dolphin mobile computer with your desktop computer and updates both computers with the most recent information. For example: • Keep Pocket Outlook data up-to-date by synchronizing your device with Microsoft Outlook data on your desktop computer.
View connection status. Tap to connect and synchronize. Tap to stop synchronization. View synchronization status. Tap to synchronize via IR or change synchronization settings. ActiveSync For more information about ActiveSync on your device, switch to ActiveSync, tap Start, and then tap Help.
9 Getting Connected You can use your device to exchange information with other mobile devices as well as your desktop computer, a network, or the Internet. You have the following connection options: • Use the infrared (IR) port on your device to send and receive files between two devices. If this is the method you want to use, see the following section “Transfer Items Using Infrared.” • Connect to your Internet service provider (ISP).
9-2 Dolphin® 9500/9550 Mobile Computer User’s Guide
10 Pocket Internet Explorer Use Microsoft Pocket Internet Explorer to view Web or WAP pages in either of these ways: • During synchronization with your desktop computer, download your favorite links and mobile favorites that are stored in the Mobile Favorites subfolder in Internet Explorer on the desktop computer. • Connect to an Internet service provider (ISP) or network and browse the Web. When connected to an ISP or network, you can also download files and programs from the Internet or intranet.
Using AvantGo Channels AvantGo is a free interactive service that gives you access to personalized content and thousands of popular Web sites. You subscribe to AvantGo channels directly from your device. Then, you synchronize your device and desktop computer, or connect to the Internet to download the content. For more information, visit the AvantGo Web site. To sign up for AvantGo: 1. In ActiveSync options on the desktop computer, turn on synchronization for the AvantGo information type. 2.
To view mobile favorites and channels: 1. Tap the Favorites button to display your list of favorites. Tap the favorite you want to view. Tap to add or delete a folder or favorite link. Mobile Favorites 2. Tap the page you want to view. You’ll see the page that was downloaded the last time you synchronized with your desktop computer. If the page is not on your device, the favorite will be dimmed.
10 - 4 Dolphin® 9500/9550 Mobile Computer User’s Guide
11 Companion Programs The companion programs consist of Microsoft Pocket Word and Microsoft Pocket Excel. To switch to a companion program on your device, tap Programs on the Start menu, and then tap the program name. Pocket Word Pocket Word works with Microsoft Word on your desktop computer to give you easy access to copies of your documents. You can create new documents on your device, or you can copy documents from your desktop computer to your device.
If you’re opening a Word document created on a desktop computer, select Wrap to Window on the View menu so that you can see the entire document. Typing Mode Using the input panel, enter typed text into the document. For more information on entering typed text, refer to Using the Dolphin 9500/9550 Mobile Computer. To format existing text and to edit text, first select the text.
Writing Mode In writing mode, use your stylus to write directly on the screen. Ruled lines are displayed as a guide, and the zoom magnification is greater than in typing mode to allow you to write more easily. For more information on writing and selecting writing, see Chapter xx. With Space button selected, drag to insert space. An arrow appears showing the space direction and size. Tap to highlight selected text. Tap to select formatting options, such as pen weight and line color. Space button.
Select Shape on the pop-up menu to convert objects to proper shapes. Resize an object by dragging the selection handles. Tap an arrow to see your choices. Tap to select formatting options, such as line weight, fill color, and line color. Pen button. Drawing on the Screen in Pocket Word For more information on using Pocket Word, tap Start and then Help. Pocket Excel Pocket Excel works with Microsoft Excel on your desktop computer to give you easy access to copies of your workbooks.
Cell contents appear here as you enter them. Format button. AutoSum button. Zoom button. Using Pocket Excel If your workbook contains sensitive information, you can protect it with a password. To do so, open the workbook, tap Edit, and then Password. Every time you open the workbook, you will need to enter the password, so choose one that is easy for you to remember but hard for others to guess.
11 - 6 Dolphin® 9500/9550 Mobile Computer User’s Guide
12 Dolphin 9500/9550 HomeBase™ Hub of the System As the hub of your Dolphin 9500/9550 system, the Dolphin 9500/9550 Charging/Communication cradle performs three important functions – power, communications and storage. Power Conditioning The HomeBase provide power to the intelligent battery charging system incorporated into Dolphin terminals. The charging/communication cradle also has an auxiliary battery well, located on the back of the cradle, allowing users to charge a spare battery.
Dolphin 9500/9550 HomeBase Charging/Communication Cradle Parts & Functions Front Panel HomeBase Image Engine/ Laser Engine Window Speaker Stylus Microphone Battery Well Battery 12 - 2 Dolphin® 9500/9550 Mobile Computer User’s Guide
Terminal Well COMM LED DOCK LED Front View of HomeBase Terminal Well Place the Dolphin in this well to communicate with a host device and to charge the Dolphin’s battery. LEDs There are three LEDs on the front panel of the HomeBase. 1. Dock LED Turns solid green when the Dolphin terminal is properly seated into the Dolphin HomeBase. 2. AUX BATT LED Indicates status of battery charging in the HomeBase’s auxiliary well. AUX BATT LED Description Orange LED AUX battery is charging.
3. COMM LED Indicates the status of data transfer between the Host Device and the Dolphin Terminal as described below. :Using the Serial Port: Comm LED Description Red LED Serial data is being sent from the Host Device to the Dolphin HomeBase. Green LED Serial data is being sent from the Dolphin HomeBase to the Host Device. Orange LED Serial data is being sent at high data rates. Comm LED Description Green LED A USB Connection is established with the host computer.
Back Panel HomeBase Condition Button Auxiliary Battery Well RS-232 Connector Power Supply Connector Rear View of Dolphin 9500/9550 HomeBase Power supply connector Use this connector to attach a power supply to the HomeBase. The power supply provides 9.5V DC input for communications and battery charging. RS-232 Communications Port Use a standard serial cable to connect this port to a host RS-232 device.
Powering the Dolphin Terminal The HomeBase charging/communication cradle provides power to the intelligent battery charging system incorporated into Dolphin 9500/9550 terminals. This charging method protects the battery from being damaged by overcharging. Therefore, Dolphin terminals may be stored indefinitely in the charging/communication cradles without damage to the terminals, battery packs, or peripherals. To charge a Dolphin terminal, follow these steps: 1.
HomeBase /Host Port (DCE) IBM AT DB9 (DTE) IBM XT DB25 (DTE) Modem DB25 (DCE) Pin / Input Signal 2 / (RD) 2 3 2 3 / (TD) 3 2 3 5 / (SG) 5 7 7 4 / (DTR) 4 20 6 6 / (DSR) 6 6 20 7 / (RTS) 7 4 5 8 / (CTS) 8 5 4 Note: The HomeBase cannot be daisy-chained. Connect the power supply to the charging/communication cradle. Plug the AC transformer into the Dolphin HomeBase 9.5 Volt DC power supply connector. The AC wall transformer provided can power only one HomeBase.
3. Select the desired option for connecting to the desktop computer (‘115200’ default). Click OK. 4. Place the Dolphin in the cradle. 5. The Dolphin 9500/9550 will automatically attempt to start an ActiveSync connection with the desktop computer, Note: ActiveSync must be installed and configured properly on the desktop computer in order for an ActiveSync communication connection to the Dolphin 9500/9550 to be successful.
In the "Locate Drive Files" dialog, check the CD-ROM drives check box and insert the driver CD provided into the CD tray on your PC. Select the wceusbsh.inf file. At this point, the hardware is installed and operating. You may need to reset your PC to complete the installation process. You may also need to remove and then re-insert the Dolphin 9500/9550 in the HomeBase to initiate a USB connection. You can verify that the USB driver is functioning by watching the COMM LED on the USB home base.
ActiveSync Connection Settings To configure the Dolphin 9500/9550 terminal for communications, see Configuring the Dolphin Terminal for Communications on page 12-7. Communicating with the Dolphin 9500/9550 Terminal To communicate with the Dolphin and any other devices connected to the Dolphin Charging/Communication cradle: 1. Insert the Dolphin into the terminal well of the HomeBase. If the Dolphin is in sleep mode, it will awaken into active state. 2. The DOCK LED on the cradle will illuminate.
Mounting the HomeBase The HomeBase may be desk -mounted for convenience and storage. The HomeBase may be desk-mounted as long as room is allowed for accessibility to the auxiliary battery well. Desk Mounting: Dolphin charging/communication cradles have a DIN rail (7.5 X 35 mm) slot on the bottom to allow for secure desk attachment of the unit if desired.
Wall Mounting 12 - 12 Dolphin® 9500/9550 Mobile Computer User’s Guide
13 Dolphin® QuadCharger The Dolphin® QuadCharger provides intelligent battery management for Li-Ion (Lithium Ion) Dolphin 9500/9550 battery packs. This device fully charges as many as four Li-Ion batteries in four hours. Charging slots work independently to control charging of individual battery packs. The QuadCharger is compatible with all models in the Dolphin 9500/9550 family of hand held computers.
Rear Panel Power Supply Connector Rear Panel of Dolphin 9500/9550Quad Charger Power Supply Connector Use this connector to attach the power supply to the QuadCharger. The universal power supply accepts input voltages between 90-265 volts. Charging Batteries In The QuadCharger Follow these steps to charge batteries in the QuadCharger: 1. Set up the charger for use 2. Supply power 3.
Status LED Description Green Charging is complete and battery is ready for service. Orange Battery is being charged at a maximum charge rate Red Error was encountered during charge cycle Status of LEDs during Charging Cycle To remove a battery pack, push the locking tab down and pull the battery out from the charging pocket with a hinging motion. Analyzing The Battery Pack To analyze a battery, insert it into charging pocket #4 and press the Analyze button.
Troubleshooting If you encounter problems with your Dolphin QuadCharger, refer to chart below for possible solutions. If problems persist, please contact HHP Technical Support. Problem Issue Check the power connections on the The “CHARGING” LED does not come on Dolphin QuadCharger. Also check to when I insert a battery pack into the ensure the POWER switch is ON and the Dolphin QuadCharger battery pack is properly seated. The red status LED comes on during charging.
14 Dolphin Mobile Charging/Communication Cradles As the hub of your Dolphin 9500/9550 mobile data collection system, the Dolphin 9500/9550 Mobile Base charging/ communication cradle performs three important functions -- charging, communications and storage. The charging/ communication cradle is ideal for use with both in-premise warehouse and in-transit data collection applications.
Terminal Well Place the Dolphin 9500/9550 in this well to communicate with a host device and to charge the mobile computer’s battery. LEDs There are two LEDs on the front panel of the Mobile Base. 1. Dock LED Turns solid green when the Dolphin Terminal is properly seated into the Dolphin Mobile Base. 2.
Rear Panel Mounting Bracket Power Supply Connector RS-232 Communications Port Rear Panel of Dolphin Mobile Base The power supply connector and RS-232 connector are located on the bottom of the unit: Power supply connector Use this connector to attach a power supply to the Mobile Base. The power supply provides power for communications and battery charging. RS-232 Communications Port Use a standard serial cable to connect this port to a host RS-232 device.
Charging A Dolphin Terminal The Mobile Base supplies charging power to the Dolphin terminal so that the terminal can monitor the charging of its battery pack. This charging method protects the battery from being damaged by overcharging. Therefore, the Dolphin terminal may be stored indefinitely in the Mobile Base without damage to the terminal, the battery pack, or the Mobile Base. To charge a Dolphin terminal, follow these steps: 1. Insert a battery pack into the Dolphin terminal. 2.
2. Attach the bracket to the ball joint on the back of the MobileBase and tighten the turnscrew. Connecting the Cables Connect the Mobile Base to the host computer or other device by plugging an RS-232 serial cable into the RS-232 Communications Port on the bottom of the Mobile Base. Plug the other end of the RS-232 serial cable into the correct port on the host RS-232 device.
You can make your own cables by following the pin configuration in the chart below. To do so, you must determine if your host RS-232 device is 9-pin or 25-pin, and whether it is configured as a DCE or DTE device.
Configuring the Dolphin Terminal The Communications Properties must be configured on Dolphin 9500/9550 terminal in order for it to communicate with the Mobile Base. To set Communications Properties: 1. Select Start>ActiveSync>Tools>Options. 2. Select the PC Connection tab. Communications Properties 3. Check the Enable Synchronization check box. 4. Select the appropriate baud rate for connecting to the RS-232 Host Device. Click OK and close the ActiveSync window on the Dolphin 9500/9550. 5.
14 - 8 Dolphin® 9500/9550 Mobile Computer User’s Guide
15 Warranty, Support and Service Limited Warranty Hand Held Products, Inc., d/b/a HHP ("HHP") warrants its products to be free from defects in materials and workmanship and to conform to HHP’s published specifications applicable to the products purchased at the time of shipment.
North America HHP Corporate Offices Telephone: (800) 782-4263, option 3 Fax: (704) 566-9904 E-mail: ProductService@hhp.com Canada HHP Repair Service available through: National Service Center Telephone: (800) 500-6421 Fax: (864) 676-4277 E-mail: canada.hhp.repair@nationalservicecenter.com Latin America HHP Latin America Telephone: (941) 263-7600 Fax: (941) 263-9689 Mexico HHP Repair Service available through: National Service Center Telephone: (800) 500-6421 Fax: (864) 676-4277 E-mail: mexico.hhp.
North and South America: Japan Office HHP Bon Marusan 8F Products Services Department 3-5-1 Kanda-Jinbocho 7510 East Independence Blvd.
15 - 4 Dolphin® 9500/9550 Mobile Computer User’s Guide
16 Appendix A Use the keyboard shortcuts in the chart below to navigate the Dolphin 9500 and Dolphin 9550 terminal keyboards. Windows Keyboard Shortcuts Press To CTRL + C Copy CTRL + X Cut CTRL + V Paste CTRL + Z Undo DELETE Delete CTRL + RIGHT ARROW Move the insertion point to the beginning of the next word. CTRL + LEFT ARROW Move the insertion point to the beginning of the previous word. CTRL + DOWN ARROW Move the insertion point to the beginning of the next paragraph.
Using the Modifier Keys The Dolphin 9500/9550 terminal keyboard features the standard Windows modifier keys, Alt, Ctrl and Shift. The Shift key only modifies the next key pressed; it must be pressed before each key you wish to make lower case. For multiple lower case characters, hold the Shift key down with one hand while typing with the other. Functions of the Alt and Ctrl keys are dependent on the software application in use.
Red Key Functions & Characters For 43-Key Alpha Shifted Numeric Keyboard Key Combination Function/Special Character Red key + U F5 Red key + V F6 Red key + W F7 Red key + X F8 Red key + Y START Red key + Z INS (insert) Red key + SP BKSP (backspace) Red key + BACKLIGHT KEY DEL (delete) * Exit the mouse utility prior to adjusting the contrast.
Key Combinations Using Blue & SFT Keys Key/Key Combinations Function/Special Characters Blue + SFT + T ? Blue + SFT + X | Miscellaneous Key Combinations Key/Key Combinations Function/Special Characters NUM + ALT + 3 + 9* ‘ NUM + ALT + 3 + 4* “ *Hold the ALT key down as you type in the numbers.
Key Combinations Use the key combinations listed below to access certain keyboard functions or to use special characters that are not defined on the 35-key version of the Dolphin keyboard. Key Combinations Using ALPHA & SFT Keys Key/Key Combination Function/Special Character ALPHA + SFT + 1 ! ALPHA + SFT + 2 @ ALPHA + SFT + 3 # ALPHA + SFT + 4 $ ALPHA + SFT + 5 % ALPHA + SFT + 6 ^ ALPHA + SFT + 7 & ALPHA + SFT + 8 * ALPHA + SFT + 9 ( ALPHA + SFT + 0 ) ALPHA + SFT + .
Blue Key Functions & Characters For 56-Key Full Alpha Numeric Keyboard Key Combination Function/Special Character Blue key + , - Blue key + A ; Blue key + B : Blue key + C / Blue key + D \ Blue key + E _ Blue key + F @ Red Key Functions & Characters for 56-Key Full Alpha Numeric Keyboard 16 - 6 Key Combination Function/Special Character Red key + ESC Lightens Contrast* Red key + TAB Darkens Contrast* Red key + SFT Toggles on Caps Lock Red key + A F1 Red key + B F2 Red key + C
Red Key Functions & Characters for 56-Key Full Alpha Numeric Keyboard Key Combination Function/Special Character Red key + P F16 Red key + Q F17 Red key + R F18 Red key + S F19 Red key + T F20 Red key + U F21 Red key + V F22 Red key + W F23 Red key + X F24 Red key + Y Z * Exit the mouse utility prior to adjusting the contrast.
Miscellaneous Key Combinations Key/Key Combinations Function/Special Characters ALT + 3 + 9* ‘ ALT + 3 + 4* “ *Hold the ALT key down as you type in the numbers.
™ 95/9550/UG-02 Rev (a)