
Quick Start Guide
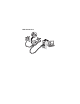
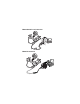


Table Of Contents
- Voyager™ 1202g
- Getting Started
- Power Supply Assembly (if included)
- USB Connection
- RS232 Serial Port Connection
- RS485 Connection
- Keyboard Wedge Connection
- Reading Techniques
- Standard Product Defaults
- RS485 Interface
- Keyboard Country
- Locked Link
- Override Locked Scanner
- Unlinking the Scanner
- Out-of-Stand Modes/CodeGate® Activation
- Reread Delay
- Suffix
- Add Code ID Prefix to all Symbologies
- Data Format Editor Instructions
- 1. Scan the Enter Data Format symbol.
- 2. Primary/Alternate Format: scan 0 for Primary Format
- 3. Terminal Type: scan 099 for any terminal type
- 4. Code I.D.: scan 99 for any bar code type
- 5. Length: scan 9999 for any length bar code.
- 6. Editor commands: use the Programming Chart that follows.
- 7. Scan Save to save your entries.
- Programming Chart
- Changing a Scanner Battery
- EZConfig-Scanning
- Technical Assistance
- Limited Warranty
- User Documentation
- Patents
- Disclaimer

Note: Refer to your user’s guide for information about cleaning your
device.
Getting Started
Turn off the computer’s power before connecting the base, then
power up the computer once the base is fully connected. When the
base is connected and powered up, put the scanner in the base to
establish a link. The green LED on the base flashes to indicate the
scanner’s battery is charging.
Power Supply Assembly (if included)