
User Manual


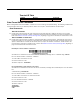
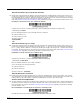
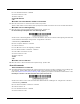
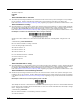
Table Of Contents
- Granit™ 1280i User’s Guide
- Table of Contents
- Getting Started
- Programming the Interface
- Introduction
- Programming the Interface - Plug and Play
- RS232 Serial Port
- Verifone® Ruby Terminal Default Settings
- Gilbarco® Terminal Default Settings
- Honeywell Bioptic Aux Port Configuration
- Datalogic™ Magellan® Aux Port Configuration
- NCR Bioptic Aux Port Configuration
- Wincor Nixdorf Terminal Default Settings
- Wincor Nixdorf Beetle™ Terminal Default Settings
- RS232 Modifiers
- NCR Modifiers
- Scanner to Bioptic Communication
- Input/Output Settings
- Power Save Mode
- Power Up Beeper
- Beep on BEL Character
- Good Read and Error Indicators
- Laser Aimer
- LED Indicators
- Out-Of-Stand Settings
- Reread Delay
- CodeGate®
- Character Activation Mode
- Character Deactivation Mode
- Centering
- Blinky Mode
- Laser Scan Angle
- Decode Security
- Continuous Scan Mode
- Output Sequence Overview
- No Read
- Data Editing
- Data Formatting
- Symbologies
- All Symbologies
- Message Length Description
- Codabar
- Code 39
- Interleaved 2 of 5
- Matrix 2 of 5
- NEC 2 of 5
- Code 93
- Straight 2 of 5 Industrial (three-bar start/stop)
- Straight 2 of 5 IATA (two-bar start/stop)
- Code 11
- Code 128
- GS1-128
- Telepen
- UPC-A
- UPC-A/EAN-13 with Extended Coupon Code
- UPC-E0
- EAN/JAN-13
- EAN/JAN-8
- MSI
- Plessey Code
- GS1 DataBar Omnidirectional
- GS1 DataBar Limited
- GS1 DataBar Expanded
- Trioptic Code
- GS1 Emulation
- China Post (Hong Kong 2 of 5)
- Utilities
- Serial Programming Commands
- Product Specifications
- Maintenance
- Customer Support
- Reference Charts
- Sample Symbols
- Programming Chart

5 - 2
Step 5. Length
Specify what length (up to 9999 characters) of data will be acceptable for this symbology. Scan the four digit data length
from the Programming Chart inside the back cover of this manual. For example, 50 characters is entered as 0050.
Note: 9999 indicates all lengths.
Step 6. Editor Commands
Refer to Data Format Editor Commands (page 5-3). Scan the symbols that represent the command you want to enter.
Step 7. Scan Save to save your data format, or Discard to exit without saving your changes.
Other Programming Selections
Clear One Data Format
This deletes one data format for one symbology. If you are clearing the primary format, scan 0 from the Programming
Chart inside the back cover of this manual. If you are clearing an alternate format, scan 1, 2, or 3, depending on the
format you are clearing. Scan the Terminal Type and Code I.D. (see Symbology Charts on page A-1), and the bar code
data length for the specific data format that you want to delete. All other formats remain unaffected.
Clear all Data Formats
This clears all data formats.
Save to exit and save your data format changes.
Discard to exit without saving any data format changes.
Enter Data Format
Save
Discard
Clear One Data Format
Clear All Data Formats
Save
Discard