
Safe Manual


PREPARE FLOOR FOR ANCHORING
ANCHORING SAFE TO FLOOR
1. Select a suitable and convenient location for your safe.
2. Empty the safe, tilt the safe onto its back side and open the safe Door.
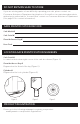
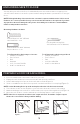
3. Lift the Mounting Hole Cap out of the safe and set aside (Figure 1).
4. Stick a screwdriver into the hole to punch-out the bottom hole cover plug (Figure 2).
NOTE: Set the Mounting Hole Cap aside and replace after the Safe has been mounted.
4. Turn safe back onto its feet and place your safe in the desired location for mounting,
5. Mark the drilling point on the floor surface with a pen or pencil through the hole (Figure 3).
6. Move the safe aside to clear the marked spot for drilling and proceed to page 6.
NOTE: If the floor is carpeted, cut a hole in the carpet at least 1” around the carpet to expose
the wood or concrete floor that you will be drilling.
You may bolt your safe to the floor for added theft protection and resistance to tipping. Your
safe has a bolt-down hole in the floor panel and mounting hardware is provided for securing to
floors. .
NOTE: Bolting/unbolting of the unit is at the consumer’s expense and discretion. LH Licensed
Products, Inc. is not responsible for any costs incurred if the unit has to be replaced. If you have
any questions about mounting the safe, please check with your local home center/hardware
retailer or independent contractor.
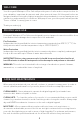
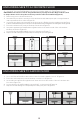
3/8” (9.5mm) x 13/4” (45mm)
Hex Head Bolt – 1 ea.
3/8” (9.5mm) x 19/16” (40mm)
Drop-in Anchor – 1 ea.
Hex Head Wood Lag Bolt
3/8” (9.5mm) x 21/2” (64mm)
Mounting Hardware Includes:
Tools Required for Anchoring to Concrete:
• Phillips Screwdriver
• Pen or Pencil
• Drill
• Hammer
• 1/2” Concrete Drill Bit
• 9/16” Socket Wrench
Tools Required for Anchoring to Wood:
• Phillips Screwdriver
• Pen or Pencil
• Drill
• 1/4” Wood Drill Bit
• 9/16” Socket Wrench
5
Figure 1 Figure 2 Figure 3