ENGLISH User Guide Waterproof Fire Safe Model 2901 Package Includes; 1 - Waterproof Fire Safe 1 - Operation Manual 2 - Override Access Keys 1 - Mounting Kit 1 - Removable Shelf 4 - Shelf Clips 1-Waterproof Fire Safe 1-Operation Manual 2 - Override Access Keys 1-Mounting Hardware 4 - Shelf Clips 1 - Removable Shelf Please carefully check the above list to confirm all items have been received. If any items are missing, please contact Consumer Assistance. (see page 9 for contact information).
DO NOT RETURN SAFE TO STORE If you are missing parts or have difficulty operating your safe, please contact our Consumer Assistance Department by telephone. Store will not accept returned products without prior authorization. You must first contact our Consumer Assistance Department (See page 9 for contact information).
INDEX WELCOME ......................................................................................PAGE 1 PROPER SAFE USE .......................................................................PAGE 1 CARE AND MAINTENANCE .........................................................PAGE 1 INTERIOR MOISTURE WARNING ...............................................PAGE 2 GETTING STARTED.........................................................................PAGE 2 INSTALL BATTERIES .................................
WELCOME Your Honeywell Waterproof Fire Safe will provide years of safe and secure protection for your valuables, important documents and other personal items. All Honeywell safes are designed and built using the highest manufacturing standards to ensure maximum user satisfaction under a variety of conditions. With proper care, your Honeywell safe will provide “Peace of Mind” for many years to come.
INTERIOR MOISTURE WARNING IMPORTANT: For optimum performance, Waterproof Fire Safes should be opened and aired out for at least 30 minutes every two weeks to prevent any build up of moisture inside. It is recommended to occasionally do this for longer periods. This will balance the humidity difference inside and outside and allow any excess moisture trapped inside to escape.
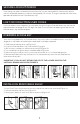
TESTING DIGITAL LOCK 1. With the door open, press and hold the lock release button on the inside edge of the safe door (Figure 1). 2. While holding the lock release button, turn the handle to the left, to place the bolts in the locked position (Figure 2). 3. Enter the preset factory code 1-5-9 followed by the * key (Figure 3). 4. If the code is entered correctly, the LED will turn green (Figure 4). 5. You have 5 seconds to turn the handle to the right to retract the bolt into the unlock position (Figure 5).
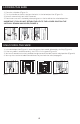
LOCKING THE SAFE 1. Close the safe door (Figure 1). 2. Turn the handle to the left, to place the bolts in the locked position (Figure 2). 3. Safe will automatically lock after 5 seconds. 3. Check to ensure safe is locked by attempting to turn the handle to the unlocked position. IMPORTANT: IF YOU DO NOT RETURN THE KEY TO THE LOCKED POSITION THE SAFE WILL REMAIN UNLOCKED (FIGURE 3) Figure 1 Figure 2 Figure 3 UNLOCKING THE SAFE 1.
ANCHORING SAFE TO FLOOR You may bolt your safe to the floor for added theft protection and resistance to tipping. Your safe has a bolt-down hole in the floor panel and mounting hardware is provided for securing to concrete floors. Instructions are included for securing to a wood floor, but you will need to purchase a 3/8” x 3” Wood Lag Bolt. NOTE: Bolting/unbolting of the unit is at the consumer’s expense and discretion. LH Licensed Products, Inc.
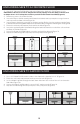
ANCHORING SAFE TO A CONCRETE FLOOR 1. Use a 1/2” Concrete Drill Bit drill a hole in the floor with a depth of 1-5/8” (Figures 1 & 2). IMPORTANT: Hole must be 1-5/8” deep (minimum) to properly insert the Drop-in Anchor, and no deeper than 1-3/4” to keep the anchor in position for the Button Head Bolt (Figure 2). 2. Remove any excess dust from the hole. 3. Insert the Drop-in Anchor into the hole (slotted side down) and tap into place using a hammer until even with the floor surface (Figure 3). 4.
SECURE LOCKOUT PERIOD If the wrong user code is entered 3 consecutive times in a row, the keypad will automatically lockout and will not be able to open the safe with the keypad for 15 minutes. During this period, the safe can be opened and locked with the Override Access key. LOST OR FORGOTTEN USER CODES If the user code is lost or forgotten, you may open the safe using the Override Access key and use the red reset button to reprogram the 3-8 digit user code.
ORDERING ADDITIONAL OVERRIDE ACCESS KEYS The following information is required to obtain a Key: 1. PROOF OF OWNERSHIP (1 of 2 Options Below) SALES RECEIPT & IDENTIFICATION - INTERNATIONAL ORDERS ONLY! • Copy of sales receipt showing Store, Date & Product Description. • Copy of your picture I.D. (Drivers license, passport, regular I.D.). PRODUCT OWNERSHIP VERIFICATION FORM If sales receipt is not available, contact us by email or telephone to request a “Product Ownership Verification Form”. 2.
NOTES 9
CONSUMER ASSISTANCE EMAIL: LHLPCustomerService@LHLPinc.com WEBSITE: www.honeywellsafes.com ADDRESS: Consumer Assistance Dept. LH Licensed Products, Inc. 860 East Sandhill Avenue Carson, CA 90746 USA TELEPHONE: CALL CENTER HOURS: CALL BACK HOURS: US/Canada 1-877-354-5457 (Toll Free) Mexico 01-800-288-2872 After English voice recording stops you must then enter 800-860-1677 to complete your call.
LIMITED WARRANTY LH Licensed Products, Inc., (“LHLP, Inc.”) warrants that for a period of seven (7) years from the date of purchase, this product will be free from structural or mechanical defects resulting from materials or workmanship. LHLP, Inc., at is sole option and as the purchaser’s sole remedy under this warranty, will repair or replace this product or any component of the product found to be defective during the warranty period.
Manufactured by: LH Licensed Products, Inc. 860 East Sandhill Avenue Carson, CA 90746 The Honeywell Trademark is used under license from Honeywell International Inc. Honeywell International Inc. makes no representations or warranties with respect to this product. M2901 E V0 www.honeywellsafes.