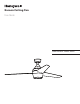
Home Eamon Ceiling Fan User Guide Model #50603, 50604, 50605
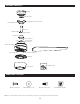
PACKAGE CONTENTS Canopy Canopy Cover Mounting Bracket Screw (x 4) Mounting Bracket Downrod Downrod Clip Downrod Pin Yoke Cover Set Screw (x 2) Yoke Closemount Screw (x 3) Motor Assembly Fitter Plate Blade (x 3) Fitter Plate Screw (x 3) Light Kit Remote Pack Lens Cover HARDWARE CONTENTS Blade Screw (x 9) Blade Washer (x 9) Wire Connector (x 1) Blade Balancing Kit Note: Some extra hardware may be included. The quantity listed above is the number required for installation.
SAFETY INFORMATION Please read and understand this entire manual before attempting to assemble, operate or install the product. • Before you begin installing the fan, disconnect the power by removing fuses or turning off the circuit breakers. • Make sure all electrical connections comply with local codes, ordinances, the National Electrical Code and ANSI/NFPA 70-199. Hire an electrician or consult a do-it-yourself handbook if you are unfamiliar with installing electrical wiring.
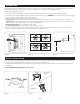
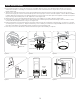
PREPARATION Before beginning the assembly of this product, ensure all parts are present. Compare all parts with the package contents list and hardware contents list. If any part is missing or damaged, do not attempt to assemble the product. Estimated assembly time: 2 hours Tools required (not included): Electrical tape, Phillips Screwdriver, Safety Glasses, Step Ladder, and Wire Strippers. 1. Turn off power to the fan at the breaker box and the wall switch (Figure 1.1).
STANDARD OR ANGLE MOUNT INSTRUCTIONS 1. Remove the downrod pin and downrod clip from the downrod. Then partially loosen the set screws in the yoke at the top of the motor assembly (Figure 3.1). 2. Feed the fan wires through the yoke cover, canopy and downrod (Figure 3.2). 3. Slide the downrod into the yoke of the motor assembly. Align holes and reinstall the downrod pin and downrod clip and secure with the two set screws (Figure 3.3). 4.
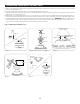
CLOSEMOUNT INSTRUCTIONS (optional) 1. Remove the canopy cover from the bottom of the canopy (Figure 4.1). 2. Remove the three Phillips-head closemount screws from the top of the motor assembly. Then align the canopy with the holes in the top of the motor assembly. The larger holes in the canopy will encompass the remaining screws. Secure the canopy to the top of the motor assembly with the previously removed closemount screws (Figurev 4.2). 3.
FINAL INSTALLATION 4. Insert blade through slot in the side of the motor assembly. Align the holes of one blade with three blade screw holes in underside of the motor assembly. Secure with three blade screws and blade washers. Repeat this step for the remaining blades (Figure 5.4). 5. Remove one of the three fitter plate screws preassembled to the fitter plate and loosen the other two but do not remove.
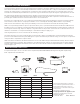
OPERATING INSTRUCTIONS 1. To operate the fan using remote control, press and release the following buttons: A - High fan speed B - Medium fan speed C - Low fan speed D - Turns the fan off. Press and hold this button for 5 seconds to enter Light Delay Off mode, which will turn off light after one minute. The LED indicator on the remote control will flash four times to confirm mode setting. E - Light Control: Dimmable Bulbs - Press light control to turn lights off and on.
TROUBLESHOOTING If you experience any faults, please check the Troubleshooting section below. If a problem cannot be remedied or you are experiencing difficulty in installation, please contact Customer Service: 1-877-361-3883. Warning: Shut off the power supply before you begin any maintenance task. PROBLEM CORRECTIVE ACTION The fan does not move. 1. Firmly push the reverse switch completely left or right. 2. Make sure the wall switch is turned on. 3. Turn the power on or check the fuse (breaker). 4.
LIMITED LIFETIME WARRANTY Set forth below, the manufacturer, Hong Kong China Electric Appliance Company (HKC) warrants the fan motor for this ceiling fan to be free from defects in workmanship and material for the life of the product.