
Installation Instructions


8
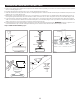
Figure 5.11Figure 5.10 Figure 5.12
Finial Cap
Fan Pull Chain
Light Pull Chain
Finial
FINAL INSTALLATION
10. Feed the pull chains through the appropriate holes in the glass bowl. Then, lift the glass bowl over the threaded rod until it is
ush with the plastic spacer. Lift the nial cap onto the threaded rod and secure with the nial (Figure 5.10).
11. Attach the pull chain extensions to the pull chains (Figure 5.11).
12. Turn on power to fan at breaker box and the wall switch (Figure 5.12). Assembly is complete.
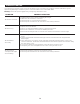
Figure 7.2Figure 7.1
Reverse Switch
Light Pull Chain
Fan Pull Chain
OPERATING INSTRUCTIONS
1. The fan pull chain has four positions to control fan speed. One pull is high, two is medium, three is low and four turns the fan
off. The light pull chain has two positions to control the light, on and off (Figure 7.1).
2. Use the reverse switch located on the switch housing to optimize your fan for seasonal performance. In warmer weather, push
the reverse switch down which results in downward airow creating a wind chill effect. In cooler weather, push the reverse
switch up which results in upward airow that will help move hot air of the ceiling (Figure 7.2).